As an Amazon Associate I earn from qualifying purchases.
If you are looking for a foolproof elk roast recipe, you’ve found it. The secret is to reverse sear the roast slowly, then finish over very high heat — and this method works with any large roast, not just elk.

First off, as you can see, this elk roast recipe deals with hind leg roasts here, not front shoulder roasts. Those are much better cooked as a venison pot roast, or Mexican barbacoa, or with my nifty shoulder recipe inspired by Senegalese cuisine.
The reason is because you will want to eat your roast rare-to-medium, like roast beef. And to do that you need big muscle groups largely free of connective tissue. (I have a very detailed tutorial on how to butcher deer and elk in my cookbook Buck, Buck, Moose.)
How to Cook an Elk Roast
A major problem people have with large roasts like this is the “black and blue” effect, where the outside is well browned and pretty, but the center is raw, the outer layers gray and sad. The answer is to reverse sear the roast, either in an oven or, better yet, a smoker.
Keep in mind that this is not simply an elk roast recipe, it is a recipe and method for all large, red meat roasts. So beef, moose, deer, oryx, nilgai, large sheep (wild or farmed), caribou, musk ox, etc.
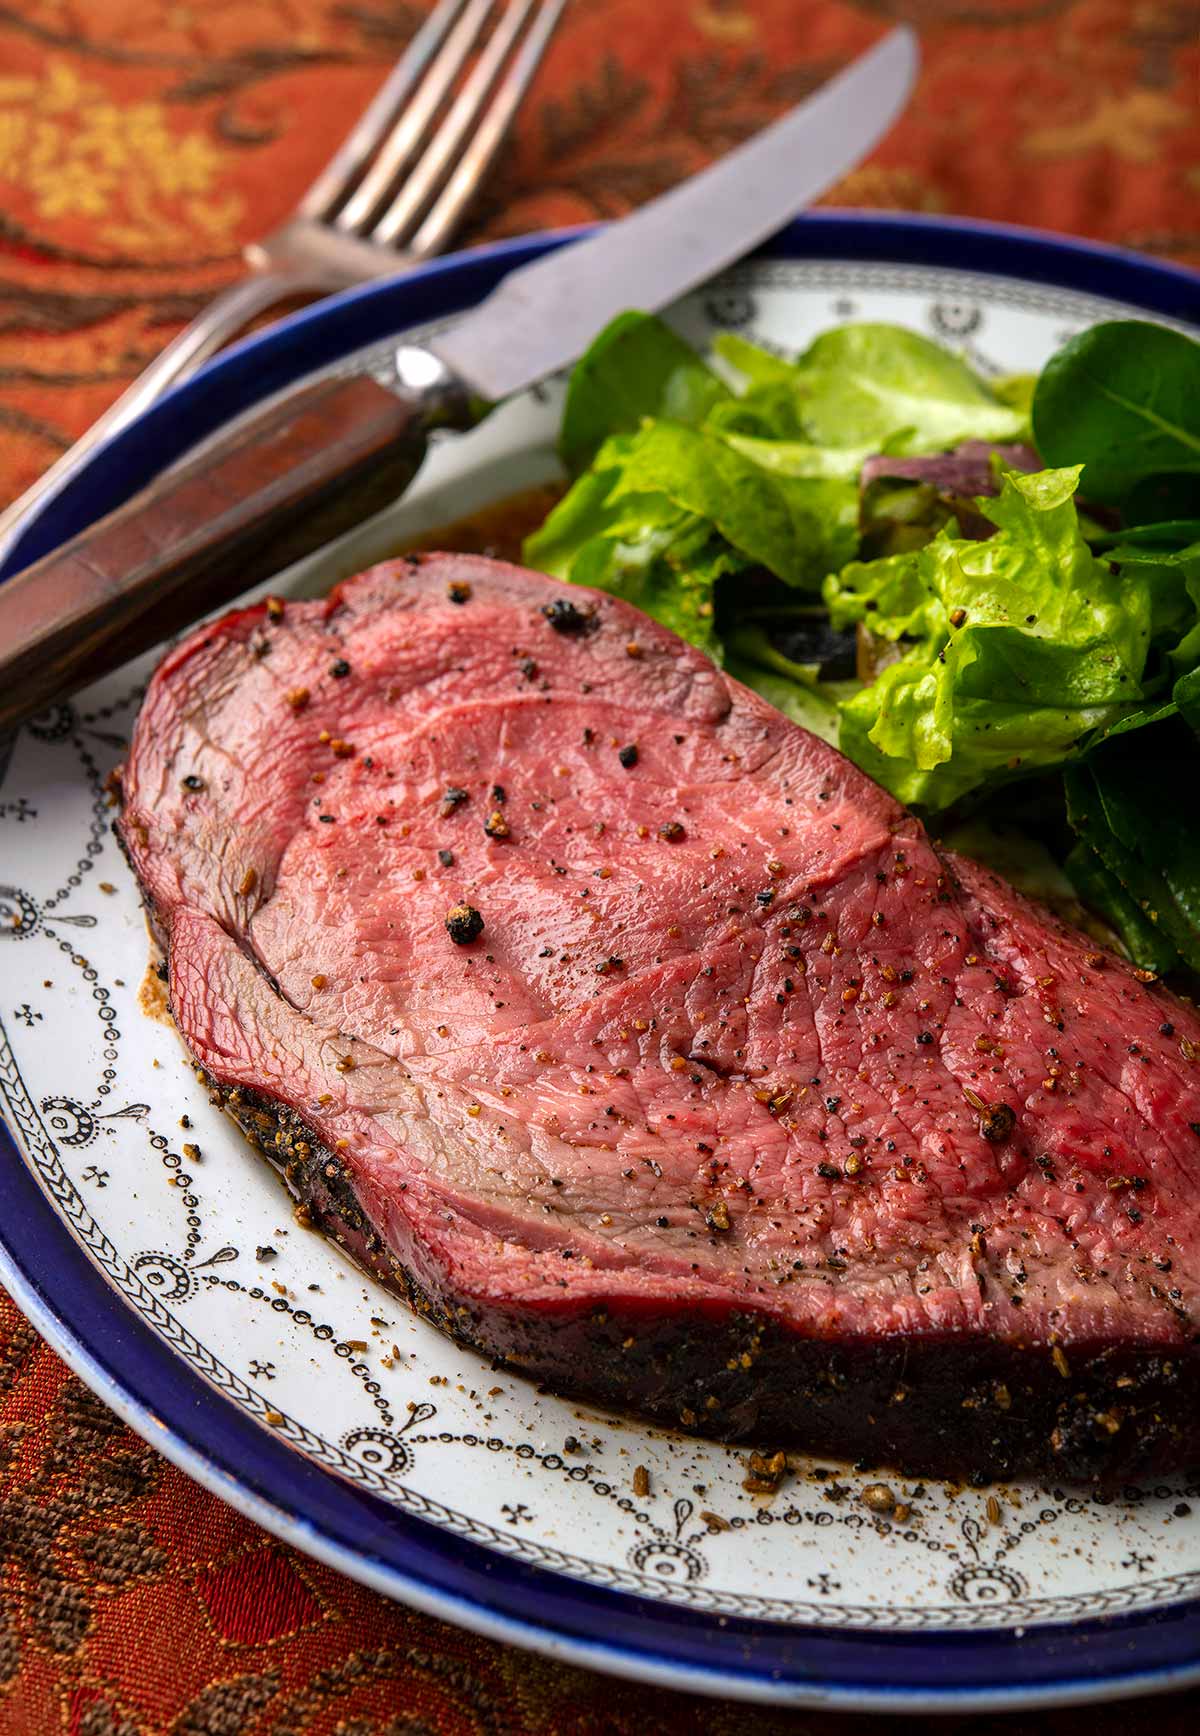
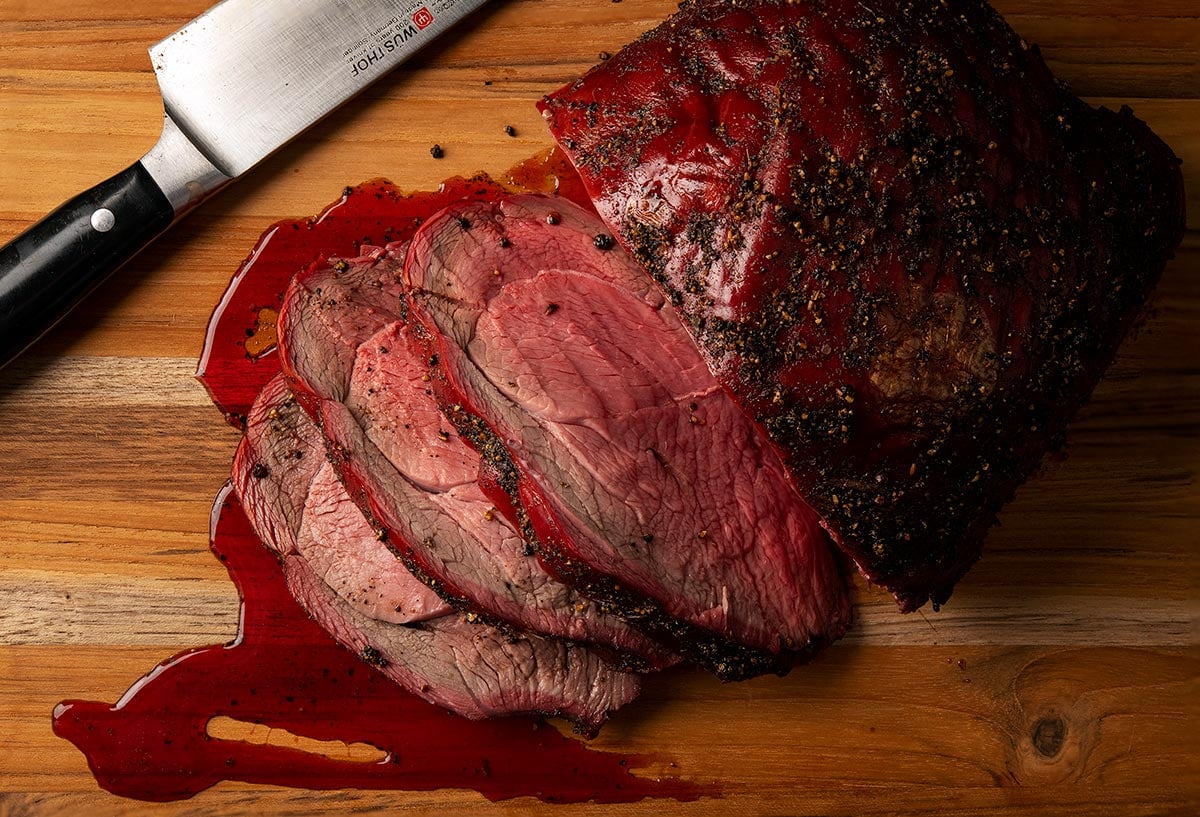
As you can see from the smoke ring on the meat in the photo, I used a smoker. This recipe is different from my recipe for a fully smoked venison roast in that this is salted shortly before you start cooking, and the smoking only takes you part of the way towards doneness. And of course you need not smoke your roast at all. An oven works fine.
The finish here is in an oven set as high as it will go, ideally 550°F. That gets you a nice crust on the outside.
To pull off this recipe, you need a probe thermometer. The Traeger I use comes with one, but you will want a thermometer that gives you a constant read of the temperature at the thickest part of the roast. You pull the meat when it hits your target.
Carryover Heat
That target temperature should be way lower than what you want when you eat your elk roast, because a) you are going to sear the meat, and b) large roasts have major carryover heat.
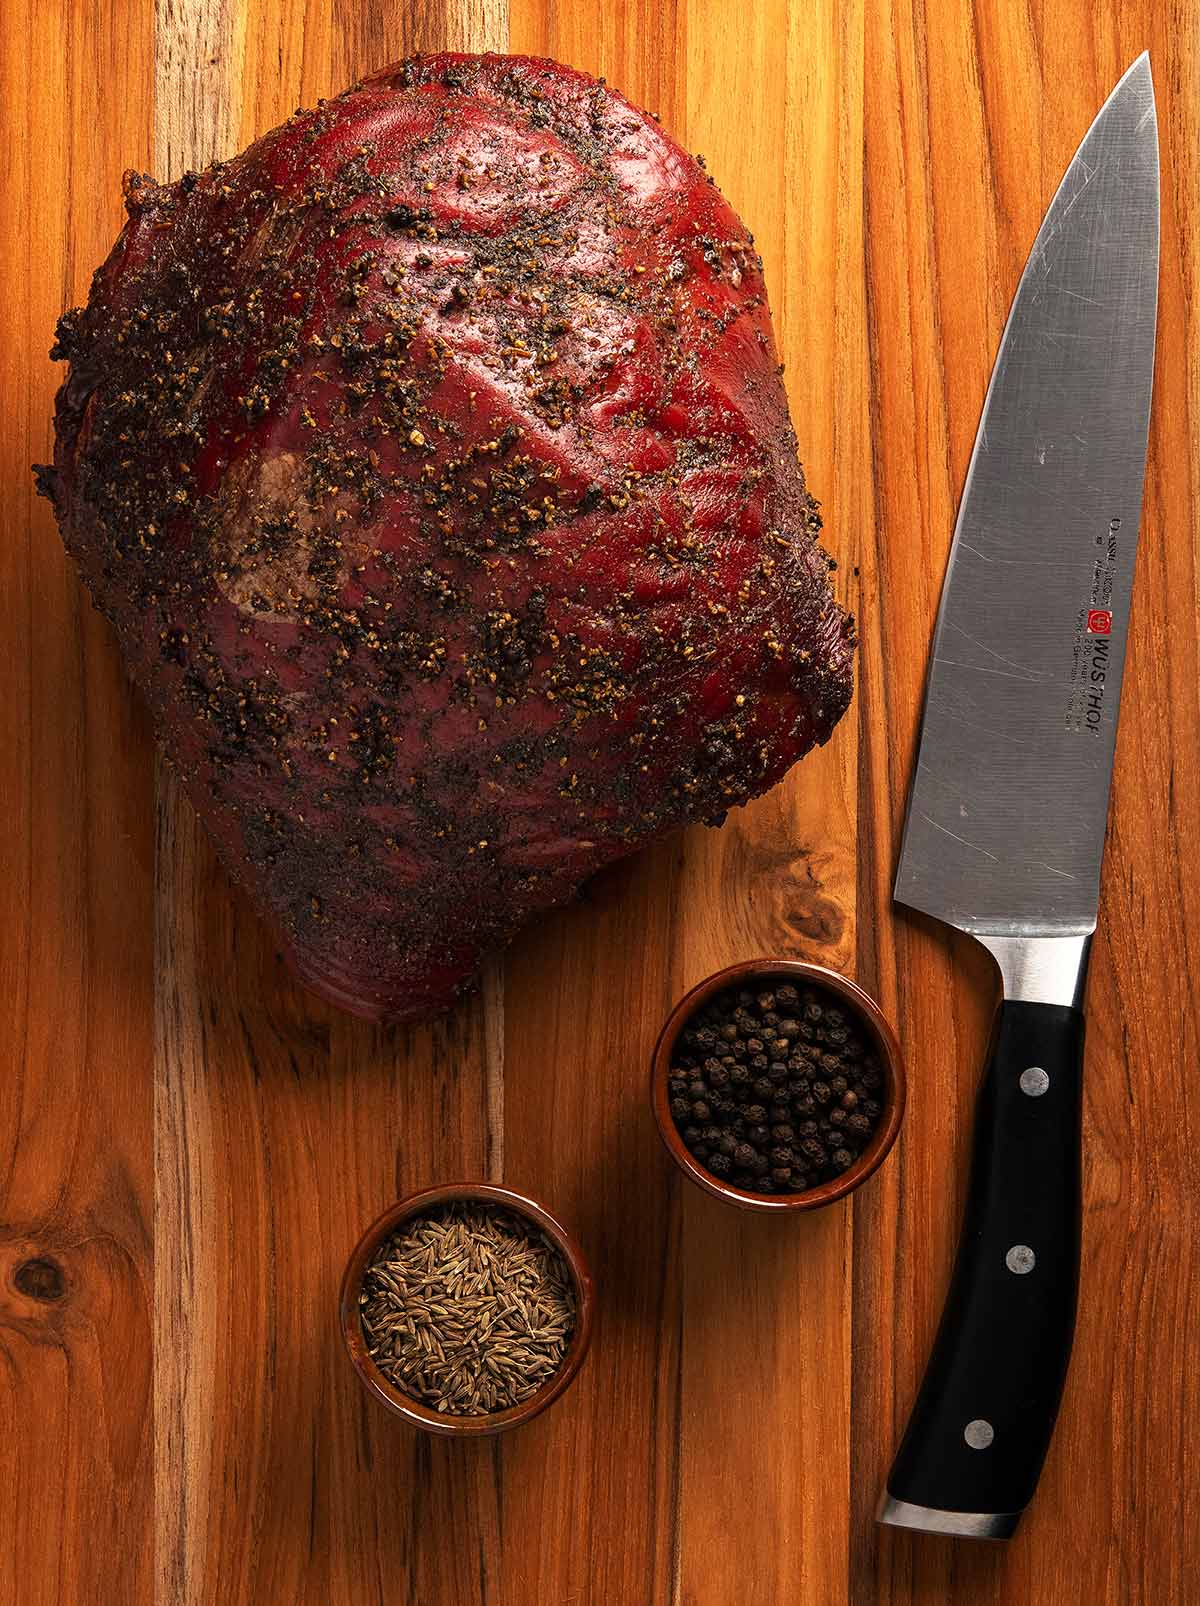
Roasts are the ultimate vehicle for carryover heat because they are often very large — this elk roast was more than 6 pounds — and they are kinda-sorta spherical: The closer an object is to a sphere, the more profound its carryover heat will be.
Temperature is another major factor. You don’t really get a lot of carryover heat when you cook at low temperatures; the “stall” in barbecue is related to this. That means that by reverse searing your elk roast, you avoid drastic carryover until the end, which is good because it limits the really serious “gray ring” at the outside of a roast.
(Here’s a good article on the science of carryover heat.)
If you were to cook a roast at only high temperatures, the outside would be blasted to hell by the time the center was rare, even if you let the roast come to room temperature for more than an hour.
Want a Smoke Ring?
With this recipe, exactly when you take your elk roast out of the fridge depends on how you are going to cook it. If you are smoking it, you will want to go right from the fridge to the smoker. This extends the smoking time, and helps develop a better smoke ring, which you can see in some of these pictures.
You won’t get a smoke ring in the oven, so in that case it’s best to salt the roast and let it sit on a cutting board for an hour before starting.
I also coat my roasts in a little olive oil and then a sprinkling of cracked black pepper and cumin and/or coriander before they hit the smoker or oven. Just a little added flavor pop.
No matter how you are doing the slow roast, when the thickest part of your meat hits about 110°F, take it out of the smoker or oven. Jack your oven up as high as it will go, at least 500°F. If your oven won’t do that, maybe your grill will. Even 600°F isn’t too high here, so a pizza oven is a great idea.
Once your high heat is ready, return the roast to the fire and blast it for just about 10 to 15 minutes, a little less if you’ve got that pizza oven. All you want is a pretty crust on the outside.
Resting Your Elk Roast
Then, you wait. At least 10 minutes, and 30 isn’t too long, although 15 minutes is enough.
This rest period allows heat to redistribute throughout the roast, resulting in a more even cook that, when you slice it, won’t release a gusher of juice — although even with a 15-minute rest you will lose some; just add that to the pan sauce.
If you are looking for some good pan sauces to play with while your elk roast is resting, try any of these:
- An English Cumberland sauce is a great option.
- Classic steak Diane sauce is, too.
- For a Mexican flair, try this ancho sauce.
- Another French classic besides Diane is steak au poivre.
- Sometimes you want a straight-up, Southern red eye gravy.
After that, all you need is a nice salad and either bread or potatoes or some other starch to balance it all out.
Oh, and the leftovers make killer “roast beast” sandwiches or steak salads. Also good chopped in tacos or enchiladas.
For another use of this technique on a different cut (and species), check out my seared bison steak recipe and my Canada goose breast recipe.

Reverse Seared Elk Roast
Ingredients
- 5 pounds elk roast (or other large roast)
- 2 tablespoons olive oil
- Salt
- 2 tablespoons cracked black pepper
- 2 tablespoons ground cumin
- 1 tablespoon ground coriander (optional)
Instructions
- Coat the roast with the oil, then massage the salt and spices into it.
- If you are using a smoker, get it ready. You want to smoke around 200°F and no hotter than 250°F. Wood choice is up to you. If you are using your oven, set it to 225°F.
- Set the roast in the oven or smoker, and insert a probe thermometer into its thickest part. With a roast around this size, you will be shooting for an internal temperature of about 110°F to 120°F. This could take as long as 3 hours to reach, but normally it takes a couple hours.
- When you hit that temperature, remove the roast and set it on a cutting board. Remove the probe thermometer. Either increase the heat of your oven to at least 500°F and better yet 550°F, or get a grill or pizza oven roaring. 600°F is not too much heat.
- Return the roast to the screaming hot oven or grill (cover the grill if that's what you are using), and roast for 10 to 15 minutes. If you've hit 600°F, you may only need about 6 minutes. You are looking for a pretty, browned crust.
- Remove the roast once again and let it set on a cutting board. Re-insert the thermometer, ideally in the same hole. Let this sit until the internal temperature hits at least 127°F, and no hotter than 145°F. In terms of time, no less than 10 minutes and up to 30 minutes is fine. Slice and serve.
Notes
Keys to Success
- Cooking large roasts is an art, not a science, because there are so many variables in terms of size, temperature and time. If you don’t have a probe thermometer, err on undercooking your roast. You can always cook it a bit more.
- If time is not an issue, you can drop the smoker temperature to 200°F or lower and get a really nice smoke on the roast before finishing. It’s up to you.
- The spices I use are just what I like. Use what you want, or skip everything but the salt. You need the salt.
- Leftovers make great sandwiches, and are good in steak salads and chopped in tacos, burritos or enchiladas.
Nutrition
Nutrition information is automatically calculated, so should only be used as an approximation.

Excellent recipe for Oryx Roast – Brined mine for 4 days before smoking to 115 degrees, then reverse seared it, let it cool for 3 hours, then put it in a pyrex with a sealed lid top and refridgerated for 5 hours and served cold. Fastest dish to disappear for Thanksgiving. Thank You for this recipe.
This is the best recipe I have ever came across for venison, I do this for all my roasts large or small! The coriander and cumin blend perfectly with wild game. You get a nice smoke ring and super tender throughout! It’s my go to recipe! I’ve even done with venison chops and it turns out awesome!
I cheated a bit by using Montreal steak seasoning but other than that I cooked my elk roast, in the oven, following your reverse sear recipe exactly. It came out outstanding! Thanks for the tip!
What are your thoughts on salting the roast and vacuum sealing it for a couple days prior to the smoke? If so, how heavily should I salt a 5 lb roast?
Seth: You can do that. I would measure out 1% salt by weight of the roast. Massage that all over the roast, then seal. I’d let that sit for several days, even up to a week in the fridge.
No doubt the best recipe I’ve tried for wild game. I only had a 2 1/2lb elk roast, so had to do some adjustments. Low and slow was definitely the trick. Oven roasted @ 225 for about an hour to hit 110 on the thermometer, cranked it to broil (500+) and it took about 18 minutes to bring it to 135 degrees and I took it out. It sat for ten minutes and turned out PERFECT with almost all cut slices medium rare. Taste was outstanding. Thank you Hank!
My roast was 2.2 lbs and the only thing I did different was to broil for 20 minutes, (I live at 6,500 ft elevation ?), and achieved the same result. 135 internal temp when I pulled it from the oven. Absolutely the best result I’ve had thus far with a chunk of meat this size. Turned out perfect!
A game (no pun intended) changer for wild meats. I’ve always struggled with single muscle group roast and often just preferred to turn them in to grind or cured them (pastrami/corned). I used this recipe last night on a ball tip sirloin from an elk and it was fantastic. It has definitely changed my perspective on whole muscle roasts and I’ll be doing more of it with future elk…..and hopefully moose someday.
Hey Hank:
Have you thought about Sous Vide instead of oven or smoker?
Tom: Yes. I don’t like it. Results in pasty, unremarkable meat in my opinion.
Do you roast in covered or uncovered in the oven?
Alayna: I roast uncovered.
One more question for ya—THANKS for responding to my earlier one about doing it still partially frozen! I put the meat in early this morning because I was nervous about how long it might take. But it’s looking like it will be done a few hours before our guests arrive tonight. Do you recommend finishing the process with the sear and then re-heating when our guests arrive, OR, like someone else’s question above, cook it to 120 then wait til the guests are here for the final sear? And if you cook it to 120 and then sear hours later, do you refrigerate in between or just leave it out?
It’s looking beautiful in the oven–my first attempt at one of these huge, football sized roasts! I’m nervous but excited!
THANKS!!
Amy: Definitely wait on the sear until they arrive. And I’d refrigerate the roast if the wait is longer than about 2 hours.
Have you ever done this on a roast that’s maybe not fully defrosted all the way to the center from the freezer yet? I never remember to take the meat out of the freezer enough days in advance 🙁
Amy: Yes, but it can take a while.
Would it be a bad idea to precook the meat to 110 and then let it sit overnight before cooking it at high heat?
Annabel: I’d take it to 120, but yes, you can do that.
Just finished slicing this… it’s so good! Juicy, tender, flavorful. A whole different creature than the elk roasts I made years ago. My roast was only 3lbs so smoking time was shorter and I cut back on the seasoning a bit.
wouldn’t sous vide cooking to rare then searing be the same result?
Jim: Sorta. But smoking is SO much better. Also, with sous vide there is no way to determine when the center of the meat hits the target temperature. you run the risk of it not hitting that temperature, or, if you go too long, you turn the meat mushy.
Very interesting and a thought for doing the deer’s hind quarter football ball roast.
Have any thoughts of doing the cook via sous vide? Then a high temperature grill? What temperature would you am for if using sous vide?
Thanks, as alway enjoy your post and pod casts.
Dick: You could do that. You’d set the sous vide at your target internal temperature, or a little higher, then sear. Might take a few hours at that low temperature, though.
Sous vide ar 130 degrees for 6 hours and charcoal sear and it turned out excellent, medium rare and extremely tender
Thanks for your great recipes.
A recipe that works perfectly! Shaw’s cookbooks are worth everyone penny. Just wish he had his own cooking show!
What would be a good remote thermometer?
Richard: I link to one in the post. It’s that hotlink.
Hey Hank,
Would this reverse process work for a larger Turkey?
Thanks,
Will
Will: Maybe? Good idea, but I’ve not yet tried it.