As an Amazon Associate I earn from qualifying purchases.
Canned venison is handy to have in your pantry, whether it’s plain canned venison or in stews and pasta sauces. Here’s how to go about it.
Right from the start you need to know that you absolutely must can venison with a pressure canner.
I know that several very old, traditional recipes will use a water bath method for many hours, and some people swear by it, but it is flat out unsafe. The boiling water method is not hot enough to kill botulinum spores and other nasties that could be lurking in your canned venison.
If you choose to use such methods, you are on your own.
There are two main manufacturers of pressure canners, Presto and All American. I prefer the All American because it’s sturdy, thick aluminum, and that heft makes me feel better considering I have essentially a pressure bomb on my stovetop. But both are fine.
Before I go any further, venison here means any red wild game meat, not just deer meat. So that includes, antelope, elk, moose, caribou, wild sheep or goats, and all the red meat exotics like nilgai and oryx.
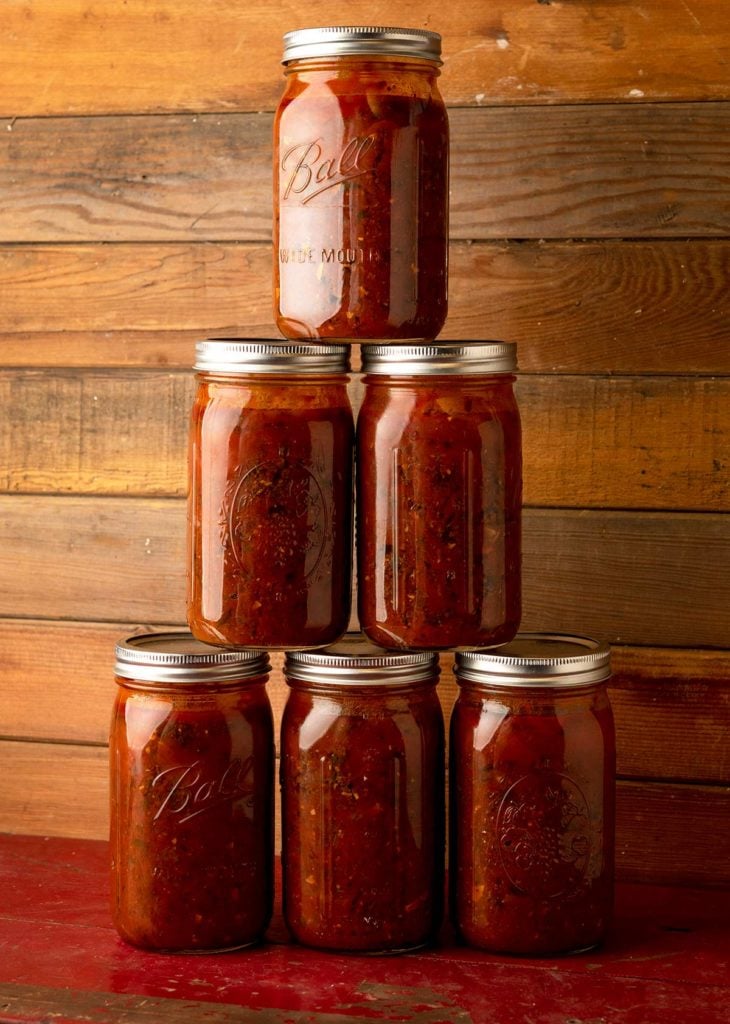
You will be making canned venison with either pints or quarts. Use wide mouth jars.
Canning Venison: Raw or Cooked?
Know that you can either raw pack or hot pack your canned venison. This means what you think it means. You can pack cold chunks of venison into jars and use the pressure canning process to cook it, or you can pre-brown your meat and then pack it in.
Or — and this is what I do — you make something with your venison and then can that.
I find this to be 100 percent more useful. I am never really in need of random hunks of shelf stable cooked venison on a Tuesday night, but I do find myself wanting a quick spaghetti with meat sauce, or chile verde or chile colorado; all three are very good options for canned venison.
Starting with just meat, you will want to add chunks of meat, a little salt, and not much else, for the raw pack method.
For the hot pack method, I would grill, smoke or sear the meat to get some nice Maillard action going on, then pack into jars, covering with homemade venison broth or water. You must leave 1 inch of headspace in the jar, or even a tad more. Use a butter knife to poke around to remove air bubbles.
In either case, dampen a paper towel with a little bit of vinegar and wipe the rims. You don’t want them wet, but you want no trace residue of fat on them. That can break your seal.
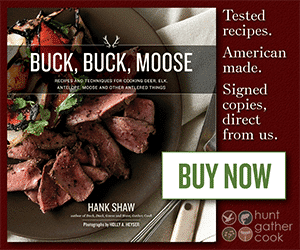
Hand seal your jars and place in the pressure canner. I like the water to go up about 1/4 of the way up the sides of the jars. Seal your canner according to its directions — mine requires a slick of oil around the rim of the canner — vent the canner for 7 minutes or however long as it required, then start the pressure going.
You will want 10 PSI up to about 1000 feet in elevation, 15 PSI above 1000 feet, unless you have a canner you can dial in, in which case it’s 12 PSI from 2000 to 4000 feet, with an extra PSI for each 2000 feet above that. I use a weighted gauge canner.
It doesn’t matter if you raw pack or hot pack, you will need 75 minutes for pints, and 90 minutes for quarts. Don’t short this time. It’s important.
Much of this information is gleaned from personal experience, various state cooperative extensions, as well as the National Center for Home Preservation.
Be Patient!
Once your time has elapsed, turn the heat off and go do something else. You want the temperature and pressure to decline naturally. Decompressing and opening the canner too soon can cause the jars to break seal and spray the contents all over your canner. Ask me how I know…
Only after the pressure gauge is all the way at the bottom, and the canner has rested at least an hour, even 2 hours, should you open the canner.
The insides will still be plenty hot, so put the jars on a cutting board to rest overnight before putting in the pantry. They’ll keep more than a year that way.
Canning Venison Better
OK, that’s basic canned venison. To up your game, make ready-to-eat meals in a jar.
I cook a lot at home, but even I have nights where I just want to get some quick, fast food in me. These pressure canned venison stews and meat sauces are the trick.
They all hinge on the National Center for Home Food Preservation’s “beef stew” or “meat sauce” recipes in terms of safety. Use them as a guide for your own canned venison experiments.
The process is to can in quarts or pints — quarts are smarter — starting with hot stew, for 75 minutes, following all the guidelines of your individual canner in terms of venting and pressure.
For starters, here are some existing recipes on Hunter Angler Gardener Cook that can be pressure canned, some as-is, some with only minor modifications, which I’ll get into in a moment.
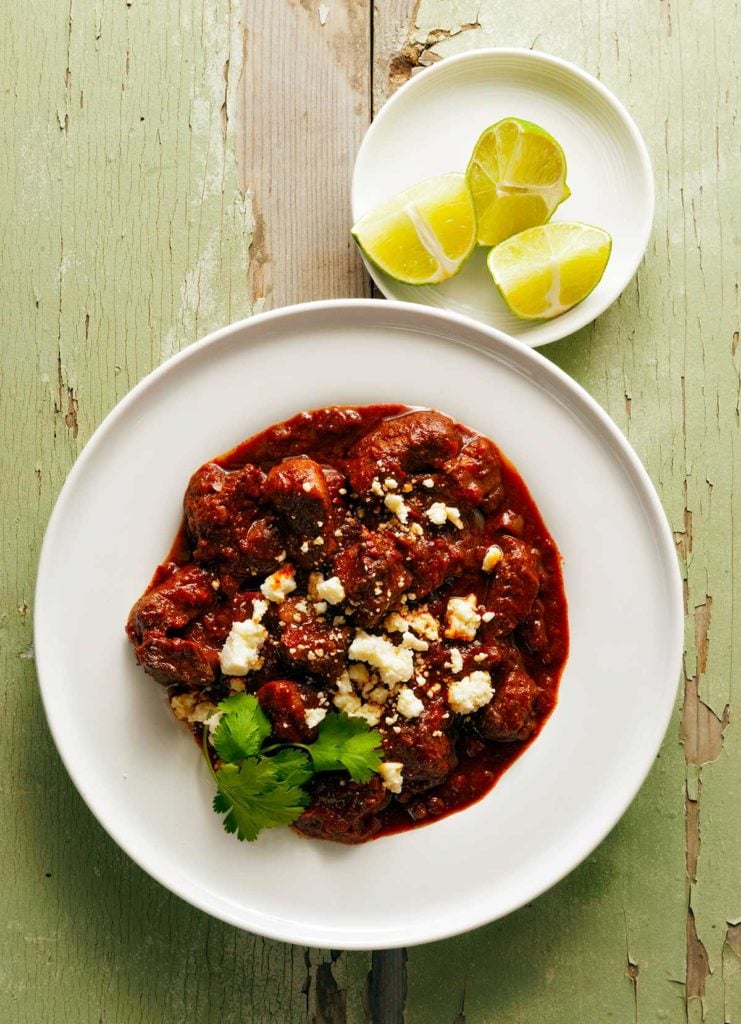
- Chile colorado, a desert Southwest stew of red chiles. This can be pressure canned as-is.
- It’s cousin, chile verde, can be canned as-is, too. I do this a lot.
- Venison stock. Easy peasy, and with a different pressure canning time of only 25 minutes.
- Belgian venison carbonnade can be canned as-is.
- Venison chili, if you have the beans about half-cooked first.
- Kentucky burgoo can also be pressure canned as-is.
- Hungarian venison goulash can be canned, although you’ll need to make the dumplings when you want to eat it.
- This Tunisian venison stew can be canned as-is.
That should get you started.
Do’s and Don’ts
It is generally fine to freestyle ingredients when pressure canning venison, with the following exceptions.
No dairy! Dairy products are not safe for pressure canning. Add them when you are ready to eat the stew or sauce.
Eggs, too. Eggs in a stew or sauce disqualify it from pressure canning. This isn’t normally an issue because who puts eggs in a venison stew?
Flour thickeners, like a roux. That leaves out pressure canned gumbo. You could in theory make the whole rest of the gumbo and then add the roux at the end, though.
Pasta and rice, and other starchy grains. Apparently they interfere with the heat transfer of your canning, and can in theory be unsafe. Beans are OK, though. But, you’ll want to half cook dry beans before adding to the stew you’re going to can.
Timing is Everything
OK, I just mentioned that you need to have beans about half cooked before you add them to a stew to can. That brings up the question of whether you cook your stew before canning it. Remember, you’re pressure canning/cooking for 75 minutes.
That means you may want to cook really tough things, like venison neck or shank meat, maybe an hour in the stovetop first. Add long cooking vegetables like carrots and potatoes in for maybe 10 minutes, and then anything more tender raw — but you do need to bring your entire stew to a boil before ladling it into jars.
Also remember that some things shouldn’t be canned, like fresh herbs at the end. Do that when you are ready to eat, whenever that is.
Another pro tip with beans: You can add fully cooked beans to pressure canned venison, so long as they are bathing in something acidic, like tomato or tomatillo. This prevents them for dissolving.

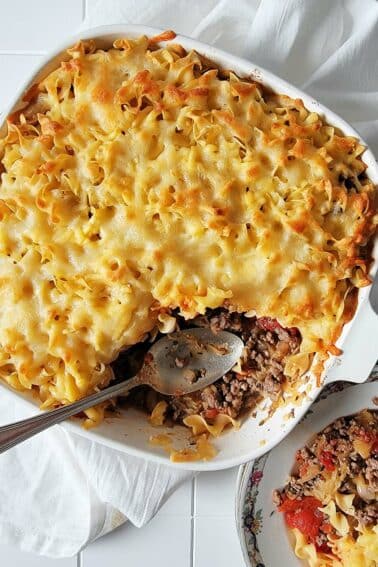
Canned Venison Spaghetti Sauce
I’ll leave you with this one. This is the spaghetti sauce I have been making, more or less, my whole life. It’s simple, satisfying, and it cans very well. It is my absolute go-to when I am feeling down or in a hurry.
Any ground meat works, too, not just venison.

Canned Venison Spaghetti Sauce
Ingredients
- 1/4 cup olive oil
- 2 1/2 pounds ground venison, or other ground meat
- 1 large yellow onion, minced
- 6 cloves garlic, minced
- 1 six ounce can tomato paste
- 1 cup red wine
- 2 tablespoons dried oregano
- 1/4 cup minced fresh parsley
- 1/2 teaspoon red pepper flakes
- 2 28-ounce cans crushed tomatoes
- 1 quart venison or beef stock
- Salt, black pepper and sugar to taste
Instructions
- Sauté the venison in a large Dutch oven or similar pot over medium-high heat. Note, if your ground venison is already cut with fat, you might only need a splash of olive oil. You'll need the whole 1/4 cup if there is no fat in your ground venison.
- Once the meat browns, add the onion, stir and cook for about 8 minutes, stirring often. Stir in the garlic and cook another minute or two. Stir in the tomato paste and mix well. Let this cook a couple minutes. You want it to turn brick red.
- Stir in the wine and add the red pepper flakes and herbs. Boil the wine down by half, then add the crushed tomatoes and the stock. Bring this to a solid simmer and cook it down for about 30 minutes. Add salt, pepper and sugar to taste. I do like a hefty pinch of sugar, but no more than that.
- While the sauce is cooking down, get your pressure canner ready. Set out clean quart jars with new lids. Ideally you have a jar funnel, which will keep your rims clean. Even so, get a piece of paper towel ready, moistened a little with vinegar; this removes trace oil around the rim.
- Ladle the hot sauce into the jars, leaving 1 inch of headspace, or a touch more. Don't overfill. Hand seal the lids and set the jars in the canner. Repeat with the other jars. If you have extra, just put it in the fridge to eat that week.
- Seal the canner according to its directions, vent (mine takes 7 minutes to vent), then set the weight on the vent or set the gauge. Turn up the heat until you get to the pressure you need, normally 10 PSI for sea level to 1000 feet. Turn the heat to medium so the weight jiggles about 3 times per minute. Set the timer for 70 minutes.
- When the time has elapsed, turn off the heat and leave the canner alone for at least 1 hour, and 2 hours is better. You want the pressure to return to normal slowly, and you want the temperature to drop significantly. Carefully open the canner. Wait until all the jar lids have popped. Remove the jars to a cutting board and leave them overnight.
- Label and store in a cool, dry place for up to 2 years.
Notes
Nutrition
Nutrition information is automatically calculated, so should only be used as an approximation.

Hi Hank,
Thanks very much for all those useful tips! I’ve been canning for years but I always pick up so much useful information from your posts! I’m definitely going to try this recipe with goose meat!
Hello, just canned venison for the first time. Why would it taste dry? I put 1/2 tsp salt and 1/2 tsp beef bouillon with the raw meat before pressure canning between 10 and 12 for 74 minutes.
Judy: Maybe because there was no moisture in there? I never can straight venison because I don’t like it. I always can venison as a stew or a braise.
Great post, thanks for the tips. Any replacement for the wine?
JG: Sure, more beef or venison stock.
So much good info, even for an experienced canner! I learned a few things and can’t wait to try some of these recipes! That photo above the “do’s and donut’s” what recipe is that? That color is gorgeous!!!
Thank you! That recipe is Chile Colorado.
I can a lot of venison, using raw pack method It frees up my freezer space (I don’t freeze stew meat). It’s great for quick meals on school nights, and long term storage.
Hi Hank,
Great post. I have always done the plain raw pack with a boullion cube, but your post on this has inspired me to can some fancy venison. We had a fantastic bolete crop this fall. Do you have a bolete and venison recipe that would can well?
Just got the text we have another elk to put up in the freezer. I have some white-tail deer and some elk from last year – roasts, steaks, ground – that are in the freezer now. Can I thaw some of that meat and then can it in my pressure canner? Will that affect quality? Or would you just can the new stuff from the recent hunt? I’m not going to have enough freezer space for all of it.
Charlotte: You should be fine canning the thawed stuff from last year.