As an Amazon Associate I earn from qualifying purchases.
Venison summer sausage comes in many forms, from the faux fermented versions you see from many butchers, to this real-deal, old school version that hails from Holland.
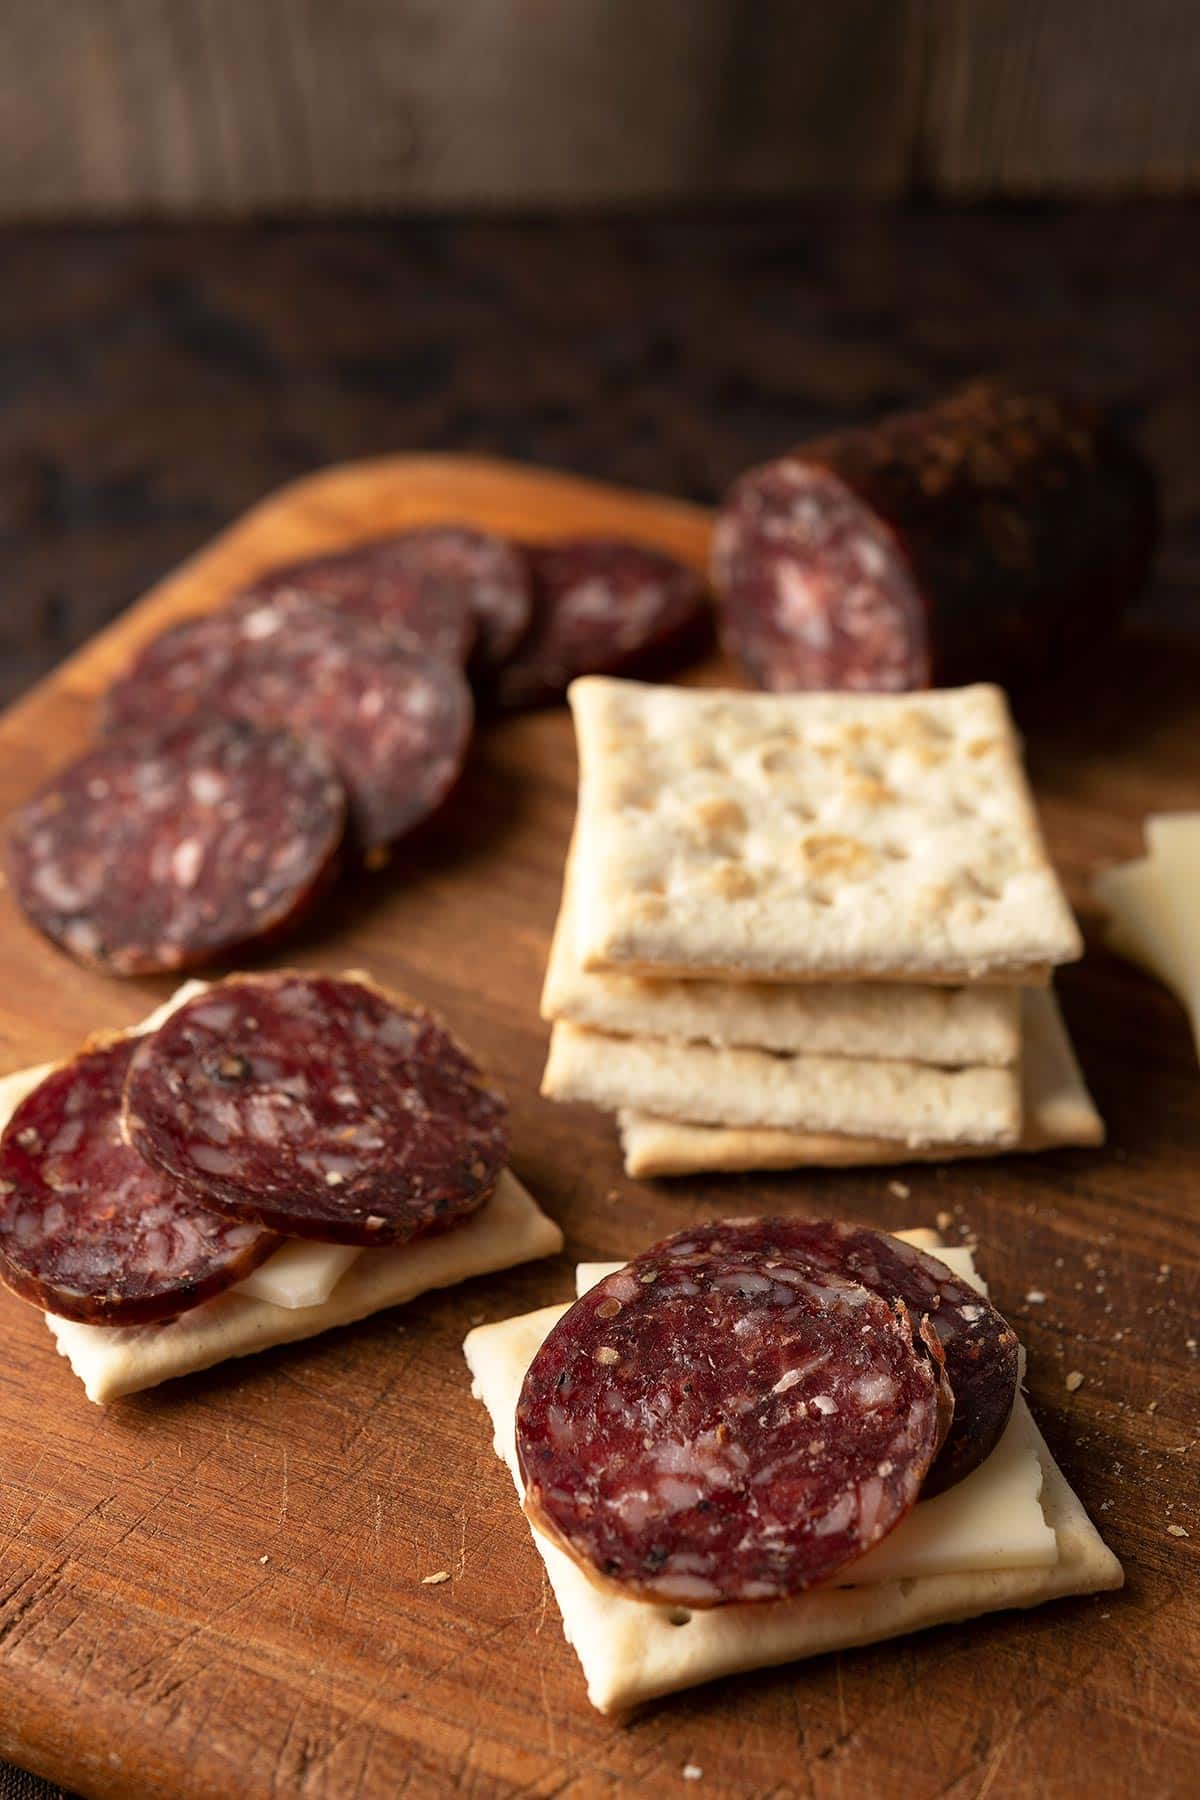
This venison summer sausage is called boerenmetworst, literally “farmer’s dry sausage,” and it is a proper summer sausage from the Old Country. You make the links, let them ferment for a few days, then smoke them very gently—you don’t want them to cook. Then you hang them to dry for a few weeks before eating.
Note that this summer sausage is fully cured, like salami. If you want to make it more like the modern versions, let the links hang for only two or three weeks, so they are still a little soft.
There is a distinctive flavor to Dutch (and Afrikaner) sausages that comes from the liberal use of coriander, ginger, cloves and black pepper. Allspice is another common addition, and if you want to add some, you can mix in a ½ teaspoon.
These are the main flavors you will get in most venison summer sausage you would get from the processor, too, which is why I use them.
Getting Started
No matter what summer sausage recipe you use, you will need some equipment. First and foremost, a smoker. Summer sausage is smoked, period. If you don’t have a smoker, and you really, really want to make summer sausage, you can cheat by using smoked salt. It’s not the same, but it will get you close. Ish.
You will obviously also need a meat grinder and a sausage stuffer, plus casings. My go-to source for all of these are my friends at The Sausage Maker, a family owned outfit out of Buffalo, New York. Great products at a good price.
Typical Midwestern venison summer sausage is stuffed into quasi-edible collagen casings, which I don’t like. Feel free to use them if you do. I prefer natural casings, either beef middles or really wide hog casings. The Sausage Maker sells 38-42 mm wide hog casings that work very well.
You will also need a set up to ferment and to dry your summer sausage. This can be as simple as a plastic sheet draped over a clothes drying rack, which I use often, and then a cool garage or basement. I’ll get into the details of both steps in a bit. But know that you need these to make a proper venison summer sausage… or any dry cured sausage, for that matter.

Starters and Cures
You will need both. Cures are various formulations of salt mixed with sodium nitrite or sodium nitrate. These are there for a variety of reasons, but mostly for food safety. Nitrite prevents botulism and other bacterial nasties. It is vital to use it.
And all those stupid “uncured” products you see in the market are lying to you: They are plenty cured, using celery extract, which is… sodium nitrite. This is not the place to debate their use, but suffice to say you need it. If that’s a stopper for you, this is not the recipe for you.
You need Instacure no. 2 for this recipe, which is salt + sodium nitrate. This allows you to hang dry your venison summer sausage for weeks. The no. 1 cure is for smoked products that are not hung to dry for more than a week or so, if at all.
The starter is an insurance policy against bacterial disaster. Basically all dry cured sausage, including summer sausage, is fermented. That’s the tang you taste. Various cultures prefer different levels of tang, and in this case we do want some acidity, so we use either the F-LC or FRM-52 starter culture, which gives you a more Northern European style sausage.
You will notice that I use more than what is called for on the package. That is intentional, and it’s for your safety. When making dry cured sausages at home, unless you are an expert, you will want to overdo it a little on the cure to ensure that every bit of your summer sausage gets some.
The starters introduce good bacteria into your links that help them ferment correctly. I have done batches without starters, and they have worked, but not all of them. You’ll know if they don’t, because the sausages will stink. Use the starter.

Summer Sausage Tips
These apply to most dry cured sausages, not just venison summer sausage.
Cut your meat and fat — it has to be either pork fat or fat trimmed off beef roasts or steaks — into chunks that fit into your grinder, add the salt, and the curing salt, toss well, and let this sit, covered, in your fridge for up to 2 days. One day is ideal, and even 6 hours will do. This helps develop myosin, which will give you a tighter bind when you stuff the links later.
Cold is key. Everything you work with needs to be cold as you make the sausages. Once made, they can handle warmer temperatures.
And by cold I mean so cold your hands hurt when working with the mixture, which is around 30°F or so. You want all your liquids to be cold, too. Yes, even the vinegar. Side note: Don’t overdo it on the vinegar here, because its acidity can break your bind in your sausage and turn it crumbly.
Chill your equipment and bowls and meat in the freezer for an hour or so. And when I say equipment, I just mean the business end, so blades, auger and meat tray. Not the motor.
Grind is up to you. I prefer my venison summer sausage finely ground, through a 4.5 mm die. But you can get away with a 6 mm die, too. Grind twice, first through a very coarse die, then a finer one. This helps you strip away any stray silverskin that might get stick in the gears.
(Here are all my dry cured sausage and salami recipes.)
The mixing stage needs to be cold, too. This is where you mix the ground meat and spices with the liquids and the starter. This is important because if your mix is warm here, you can get what is called smear, where the fat partially melts and coats the meat bits, shortening the myosin strands within — this is exactly the process in making shortbread, where the fat shortens the gluten in those cookies.
Stuffing Venison Summer Sausage
You never want to use your grinder as a sausage stuffer. I know, the manufacturers say it’s OK. It’s not. Running meat through the auger after it’s been mixed can and does damage or even destroy the bind you just made. You need a sausage stuffer.
Stuff links loosely at first. For a venison summer sausage, you want long links —you’ll tie the ends together eventually. Cut out lengths of casing about 2 feet long, Stuff a little more than 1 foot’s worth, with plenty of extra casing on either side. Do this with all the sausage before moving on.
When you’re ready, gently compress the long links to fill the casing. Keep an eye out for air pockets. Use a sterile needle or sausage pricker (set it aglow in your stovetop flame) to puncture the casing over all the air pockets. Gently compress the links together to squeeze out the air pockets; this takes practice. Tie the ends of the casing together in a double or triple knot.
Fermenting Summer Sausage
Hang the links from a clothes rack or somesuch. I use “S” rings you buy from the hardware store to hang them from the clothes rack rods. Now you need to ferment your links, keeping them warm and moist.
I do this by putting a humidifier under the hanging sausages and then tenting the whole shebang with big garbage bags that I’ve sliced open on one end. I also use a water sprayer to spritz my sausages a couple times a day. Doing this prevents the casings from hardening. Keep your sausages hanging at room temperature (65 to 80°F) at about 85 percent humidity for three days.
Yes, three days at room temperature. This is why you need the curing salts and the starter culture. It will be fine. You can go up to five days here, or as little as two. Three is best in my opinion.

Smoking and Drying
Move your venison summer sausage to your smoker and smoke them over very low heat for up to 4 hours of continuous smoke. It is vitally important that you do not cook your links here, so put ice in the water tray of the smoker and smoke on a cold day or in the early morning. Don’t let the smoker rise above 100°F at all. If it gets too hot, open the door of the smoker or just take the links out.
If you can cold smoke, do that for up to a day.
(Note that typical Midwestern style venison summer sausage is hot smoked to cook. If you want that — it makes a sausage that goes bad quickly, but it might be closer to what you are familiar with — use Instacure no. 1 and smoke until cooked to an internal temperature of 155°F.)

Now you need to dry your sausages and turn them into summer sausage. Hang them in a place that is about 50°F to 60°F with about 80 to 90 percent humidity. In most cases you will need to put a humidifier under your links. I also spritz them with water once a day for the first 2 weeks.
After the first week of hanging, drop the humidity to 70 to 80 percent.
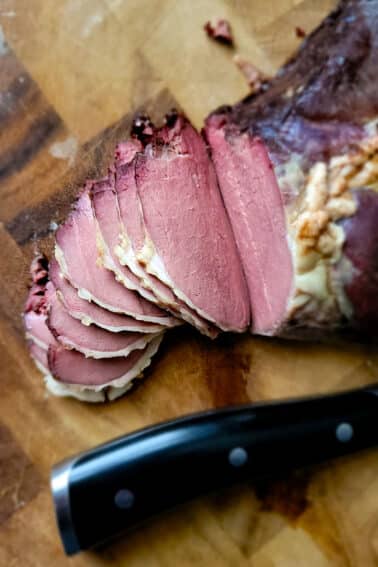
OK, for a typical Midwestern style venison summer sausage, you can stop here. Your links will still be kinda soft, but definitely tangy and half-dried. But if you want to go old school, and you can with this recipe, and make real boerenmetworst, keep going.
On the third week drop your humidity again to 65 to 70 percent and hold it there until a total of 4 to 8 weeks has elapsed since the sausage went into the chamber.
You now have boerenmetworst. To store long-term, vacuum seal them individually and keep in the fridge. They will last indefinitely this way, and the vacuum sealing will keep them from becoming rock hard. You can also freeze them until the Second Coming.
Venison Summer Sausage
Ingredients
- 3 ½ pounds venison
- 1 pound fatty pork shoulder
- ½ pound pork fatback
- 51 grams salt
- 6 grams Instacure No. 2
- 10 grams dextrose, or granulated sugar if you can’t get it
- 1 tablespoon cracked black pepper
- 1 tablespoon coarsely ground coriander seed
- 2 teaspoons coarsely ground mustard seed
- 1 teaspoon powdered ginger
- ½ teaspoon ground cloves
- ¼ cup malt vinegar
- 1/2 cup distilled water
- 10 grams F-LC or FRM-52 starter culture
- Hog casings preferably 38-42 mm wide casings
Instructions
- Cut the meat and fat into chunks that will fit into your grinder. Trim as much sinew and silverskin as you can. Put the fat into a container in the fridge. Mix the dextrose, salt and curing salt with the meats and put it in the fridge overnight. This helps develop myosin, which will give you a tighter bind when you stuff the links later.
- The next day, put your grinding equipment — blade, coarse and fine die, etc. — in the freezer. Mix the ginger, cloves and half of the remaining spices with the meat and fat. Put the mixture into the freezer and let everything chill down until it hits about 30°F or so. It won’t freeze solid because of the salt. Normally, this takes about 90 minutes. While you’re waiting, soak about 15 feet of hog casings in a bowl of warm water, and put the malt vinegar in the fridge.
- When the meat and fat are cold, take them out and grind through the coarse die of the grinder; I use a 10 mm plate. Test the temperature of the mixture, and if it’s 35°F or colder, go ahead and grind it all again through a fine die, like a 4.5 mm. If it’s warmer than 35°F, put the mix back in the freezer to chill. This might take an hour or so if you’ve let the meat warm up too much. Use the time to clean up, and to dissolve your starter culture in the distilled water.
- Once the sausage has been ground twice, test the temperature again to make sure it’s 35°F or colder. I prefer to chill the mix down to 28°F to 32°F for this next stage. Chill the mix and when it’s cold enough, take it out and add the remaining spices, the vinegar and the water-starter culture mixture. Now, mix and knead this all up in a big bin or bowl with your (very clean) hands for a solid 2 minutes—your hands will ache with cold, which is good. You want everything to almost emulsify.
- Stuff the sausage into hog casings rather loosely. For this sausage, you want long links. First cut lengths of casing about 2 feet long. Stuff each with a little more than 1 foot's worth of sausage, leaving with plenty of extra casing on either side. Do this with all the sausage before moving on.
- When you’re ready, gently compress the long links. Keep an eye out for air pockets. Use a sterile needle or sausage pricker (set it aglow in your stovetop flame) to puncture the casing over all the air pockets. Gently compress the links together to squeeze out the air pockets; this takes practice. Tie the ends of the casing together in a double or triple knot.
- Hang the links from a clothes rack or somesuch. I use “S” rings you buy from the hardware store to hang them from the clothes rack rods. Now you need to ferment your links, keeping them warm and moist. I do this by putting a humidifier under the hanging sausages and then tenting the whole shebang with big garbage bags that I’ve sliced open on one end. I also use a water sprayer to spritz my sausages a couple times a day. Doing this prevents the casings from hardening. Keep your sausages hanging at room temperature (65 to 80°F) at about 85 percent humidity for three days.
- Move the sausages to your smoker and smoke them over very low heat for up to 4 hours of continuous smoke. It is vitally important that you do not cook your links here, so put ice in the water tray of the smoker and smoke on a cold day or in the early morning. Don’t let the smoker rise above 100°F at all. If it gets too hot, open the door of the smoker or just take the links out.
- Now you need to dry your sausages and turn them into salami. Hang them in a place that is about 50°F to 60°F with about 80 to 90 percent humidity. In most cases you will need to put a humidifier under your links. I also spritz them with water once a day for the first 2 weeks. After the first week of hanging, drop the humidity to 70 to 80 percent. On the third week drop it again to 65 to 70 percent and hold it there until a total of 4 to 8 weeks has elapsed since the salami went into the chamber.
- You now have boerenmetworst. To store long-term, vacuum seal them individually and keep in the fridge. They will last indefinitely this way, and the vacuum sealing will keep them from becoming rock hard. You can also freeze them.
Notes
Keys to Success
- Obviously to do this right you'll need a smoker and a place to ferment the links, and a place to hang them afterwards. Have all this ready before you begin. Tips on each of these are in the headnotes.
- Do not mess with the amounts of salt, cure or starter. Yes, I use more starter than strictly needed. I do this to ensure that you get enough in the sausage, so the good bacteria will defeat the bad bacteria. It is a food safety measure.
- You really do want the links kinda sweaty those first couple days. Not hot, but moist. This helps fermentation and prevents the links from drying out too soon.
- If you hang these sausages for only 3 to 4 weeks, you will get a consistency a little closer to the modern summer sausage. I don't love this, so I cure fully. It's a personal choice.
- The spices give you a very Dutch or German style sausage. You can vary things to get a different effect, or leave some of the spices out if you happen to have an aversion to one or another.
Nutrition
Nutrition information is automatically calculated, so should only be used as an approximation.

this recipe calls for malt vingaer i was wondering if i could omit this in the recipe as my house hold has 2 celiac and i can not use that would the recipe still turn out?
Sarah: use cider vinegar instead.
For some reason, I don’t see this recipe linked from elsewhere on the site. It seems like it should be listed under venison-charcuterie or salami recipes.
Cheers,
I have made venison salami earlier this year and summer sausage(dry summer sausage) is to be my next challenge. I’ve made a curing chamber that works for both fermentation and curing.
So I was wondering a couple things, basing this on the salami recipe I used:
What are the percentages of the ingredients that are used? This allows me to adjust them , precisely, based upon the weight of the meat.
What ph do you aim for during the fermentation stage?
Chris: Hey there. I don’t really do my recipes that way, sorry.
Hi! First time commenting here but I have used and recommended so many of your recipes. Thanks for all you do.
We are making elk summer sausage with pork fat, used all the amounts as listed, but made 9 lbs. Set up the humidifier “tent” with trash bags over a drying rack and humidifier under. We live in Montana, it’s winter, and keep the thermostat at 65. Some rooms get cold. So I used a small space heater on low to keep the temp right. After the first 3 days of room temp fermenting, we got white fuzzy mold spots!!! On the 4th day as we went to smoke the logs, those spots popped up out of no where. Some the size of a pencil eraser, some the size of a dime, and largest about quarter size. They were almost translucent in the center. After reading much, we decided to wipe them off with vinegar and proceed to the cold smoke. We are no longer going to tent the rack, and I’m doing away with the heater. Any idea about the mold? Suggestions for moving forward? Thanks so much!
Sarah: It got too humid, probably, and/or not enough air movement. Humid and breezy is ideal, but that can be hard to replicate in a house.
I have a question about the Dry Cure Venison Sausage. Within the recipe, you call for 10 grams of the F-LC, while working with 5 total pounds of meat and fat. The package of this we ordered is 25grams, and says it will do 100 kilograms of meat, which is 220 pounds. Per the amount listed in the recipe, since we are working towards a 100 pound batch, we would need 200 grams of this product which is 8 packets, and nearly $200.00. What am I missing? Is there a typo somewhere? Please clarify. Thank You.
Randy: I do this because with small batches, you need more starter because — in general — the meat isn’t mixed as well as in big, semi-industrial batches. That ratio is geared for commercial production, and I am not the only one who suggests using more starter than recommended for safety reasons. So if you are very confident about your mixing, follow the ratio on the package. Anyway, that’s my rationale.
I will be trying your summer sausage recipe and was wondering about if I could add dried Jalapeno to the recipe for one of my batches, if so how much do you recommend. If you do not recommend please let me know. I am looking forward to making it because I like the old-style sausage that you hang.
James: Yes, you could do that. I wouldn’t add more than a cup, but it will be up to your taste. I’d start with maybe a half cup.
Hi Hank,
What are the key uses/ differences between Bactoferm Mold-600 (Formerly Known as Bactoferm M-EK-4) and Bactoferm F-RM-52 – can you use either or both in this recipe? If so at what stage would you add Mold-600?
Thank you!
Zuzanna: Oh God, they are 100% different. Bactoferm Mold is mold. F-RM-52 is a starter culture. I almost never use the mold, as it’s a nice addition to salami on the outside – it’s that white coating on the casing, which helps keep the salami evenly moist inside – but that starter culture is very important to ensuring safety in the meat. You need that, or some other starter culture. And yes, there are salamis made without starter culture, but that’s advanced stuff.
Hi Hank,
I noticed your starter culture to meat ratio is about 0.4%. Reading the packed of culture, it says 25g will do 100kg of meat, which works out to 0.025%. Am I missing something in the math? Why do the numbers not line up? Thanks! A newbie trying to learn.
Dan: I use the “better safe than sorry” rule. Using more culture won’t hurt, and it ensures that you have it throughout your meat. It’s an added safety step.
Hank, been working through this recipe and I accidentally got my sausages up to roughly 115 fahrenheit while smoking. Is this a concern interns of food safe handling going into the longer curing phase? They certainly smell and look great but Im wondering if I now need to treat them more like a store bought summer sausage vs the shelf stable ‘salami’ your recipe creates.
Pat: You should be fine. The cure and starter culture should protect you. But they won’t be shelf stable. Keep them in the fridge.
is there something else i can use instead of the starter culture?
Evan: Nothing replaces it, sorry. That said, a starter culture is an insurance policy against failure. Many people over many decades have made sausages like this without one. If you work clean and cold, you should get the lactic fermentation you’re looking for without it. Pros who make sausages like this check the pH of the meat before long hanging, i.e., while it’s in the room temperature ferment stage, with a pH meter. You could also use pH strips if you sacrifice a bit of the sausage. Make a small one to sacrifice, and when the fermentation is supposed to be done, break it open and stick the pH strip into the meat. It should read fairly accurately. If it’s below 5.3, you’re good.
Will Fermento work instead of the f-lc
Keith: No. Fermento doesn’t ferment. It’s a “fake” product that mimics actual fermentation by adding acidity to the sausage mix. I never use it. Sorry.
Hi Hank , My name is joe downey and I had near fatal heart failure , after a remarkable ( the docs called me the miracle golden child ) recovery , I’m back in the hunt ! I love sausage and such but have to stay away from nitrates and salt . Any recipe suggestions ? Thanks for your inspiring recipes. Joe
Joe: Congratulations on the recovery! But alas, this particular recipe would be a no go for you. You can limit salt in fresh sausages, i.e., the ones you make and cook and eat, but not in cured products.
Almost the same question as above: could I use trimmings from brisket or almost anywhere else? I eat biblically clean which is close to kosher, I really want to figure out the fat issue as I love sausage.
Thanks
Michael
Michael: That is a perfect source of fat for this recipe.
Hi. I am a long-time follower, have all your books, and have made many, many recipes. I have done some venison sausage or salami making in the past, but not much and I want to do more. My question, hard to answer I know, is how old can or should the venison be for use in your recipes. I will invariably have some ground burger or sausage left over after a year and also occasionally a roast or steaks as well. I hate to get rid of those packages, and they have always been kept frozen solid in a chest freezer we have. I guess can those be used here, and if so, going back one year or two or what would you say???
Thanks,
Chuck
Chuck, Hank may disagree but I have used deep frozen meat years later with little issue so long as it has been kept hard frozen and doesn’t have freezer burn. The less surface area, the better. Meaning ground can get oxidized easier than a solid roast. As for fat, sometimes it oxidizes but that is something that you can smell. And if you do, no amount of masking the flavor can offset the taste of rancid fat. It’s not toxic or inedible but it really screws up a good sausage… DAMHIKT.
That gets blended into Fido’s food so it doesn’t go to waste
Chuck: They will be fine for this. I’d use the roasts or steaks instead of the pre-ground stuff.
Do you think I could use my oven for the fermentation phase? It’s a Good quality German brand, with settings for dehydrating food or proofing bread that go down to 75 degrees. I was thinking that if I put a tray of water in the bottom, I could get the temperature and humidity to a suitable level.
Allan: Sounds like you can. I do hang links in my oven to ferment with some frequency, too, so it should work.
I’ll have to try this recipe. My last batch was similar to yours with dextrose and instacure but I fermented it in the fridge and before casing it. It was Pretty good but I’m looking for the dry that you’re talking about. I lived in Germany in the Army and loved their sausages and they were fry. I read after making mine that fermenting needed warm temps and not refrigerated so this confirms that. Thanks
I can attest that this type of summer sausage is the best! Been making it for years! My recipe is a bit more German, but very close to this!
Hank this looks great. I make a lot of cured sausages so am very comfortable with salt and nitrite/nitrate. I would like to multiply this recipe, perhaps by 5x (i.e. 25 lbs) so I have two questions that I’d like your thoughts on:
1 – should I increase vinegar by same percentage or do you think it can/should be cut back as the culture handles a lot of the acidification?
2 – I have a lot of beef brisket trim, if I were to use it could it sub for both the shoulder and the fatback or would you suggest just the fat and still adding some pork?
Thanks
Scott: Yes, I would cut the vinegar back a little, and yes, brisket trim should work well. I prefer pork, but that’s me.
If a guy is aiming for a more “Midwestern style” summer sausage would you still use a starter and ferment a few days before hot smoking to 155°? Or omit that process and just use cure #1, hold over night in the fridge, and then hot smoke?