As an Amazon Associate I earn from qualifying purchases.
If there is a bedrock duck breasts recipe, it is this one. One of the most common requests I get from readers is for step-by-step instructions on how to cook a duck breast properly. And this same technique works for goose breasts, as well as any other dark meat bird breasts, like pigeons, sharp-tailed grouse and the like.
Here’s how to go about it.
I know, some of you are thinking, “I know how to do this already, Hank.” To you I apologize; what’s more, my method is idiosyncratic and is likely to be different from yours — but it works. Every time. I’ve cooked thousands of duck breasts, and that’s no exaggeration, and this is how I cook a duck breast.
So for everyone else, here goes.
A few things before we start. First off, a duck breast is supposed to be cooked like a steak, which is to say rare to medium. That means the proper internal temperature of a duck breast, after the meat rests, is between 125°F and 140°F. No one will stone you to death if your duck breast hits 145, but anything over that and, well, you kinda wrecked it.
But aren’t ducks poultry, and shouldn’t that be cooked to 165°F? Yes, ducks are birds. But they are red meat birds, and should be cooked like beef. Doing research for my cookbook on cooking ducks and geese, Duck, Duck, Goose: Recipes and Techniques for Cooking Waterfowl, Both Wild and Domesticated, I combed through years and years of data on food borne illness from the CDC and found almost no instances of it in ducks and geese.
Hell, you can even eat duck tartare if you want. And I do.
So any duck breasts recipe that tells you to cook the hell out of the meat is either very old — we used to overcook duck on the regular, which is why so many people hated it — or the creator of that recipe has a thing against great tasting meat. Because if you know how to cook duck breast properly, you’ve basically succeeded in making a steak wearing a hat made of bacon.
About that “bacon.” That’s the skin, so be sure to have breasts with skin on them. Skinless breasts require a different set of instructions. I go over those instructions in my cookbook if you’re interested, but the short version is that a skinless duck breast cooks exactly like a similarly sized piece of steak.
Detailed, and I mean very detailed, instructions are below in the recipe. (I’ve also put together a video for this particular duck breasts recipe.) Follow them and you will soon be able to cook a duck breast in your sleep.
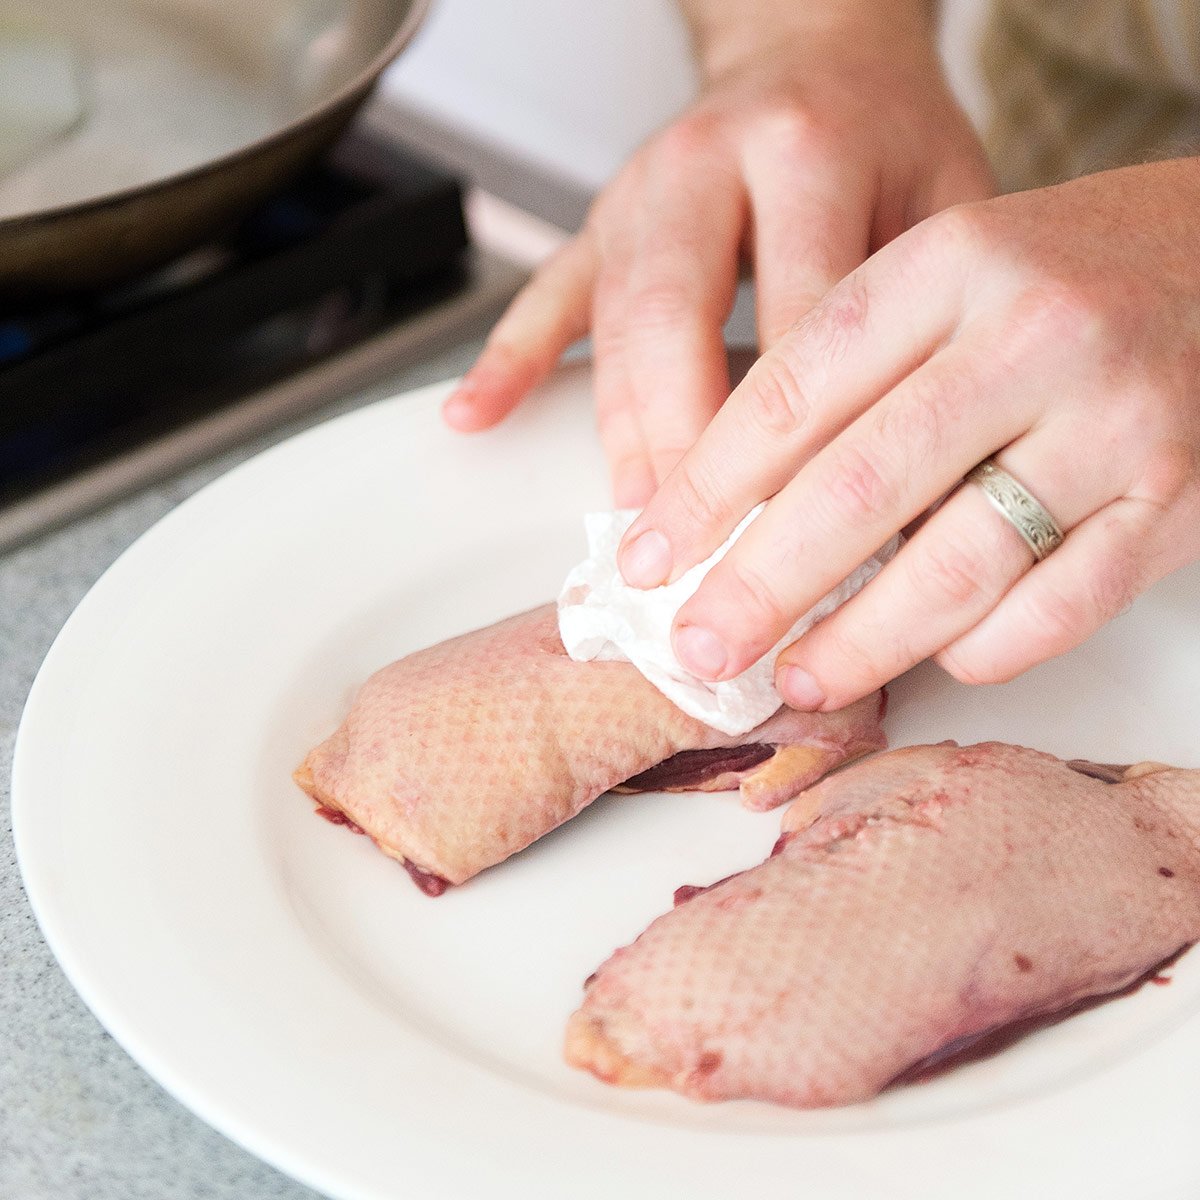
Before you get there, though, I’ll walk you through it quickly. First you want to let your duck breasts come to room temperature. Take them out of the fridge and salt them, then let everything sit for 30 minutes or so. Pat them dry with paper towels.
With a duck breast like this one (it’s a fat pintail duck I hunted here in NorCal), or fatter, you won’t need much fat or oil to start in the pan. I almost always use rendered wild duck fat (here’s how to render duck fat at home), but you can buy duck fat, too. It’s not 100 percent needed, though. You can start cooking duck breasts with a little oil, lard or butter, too.
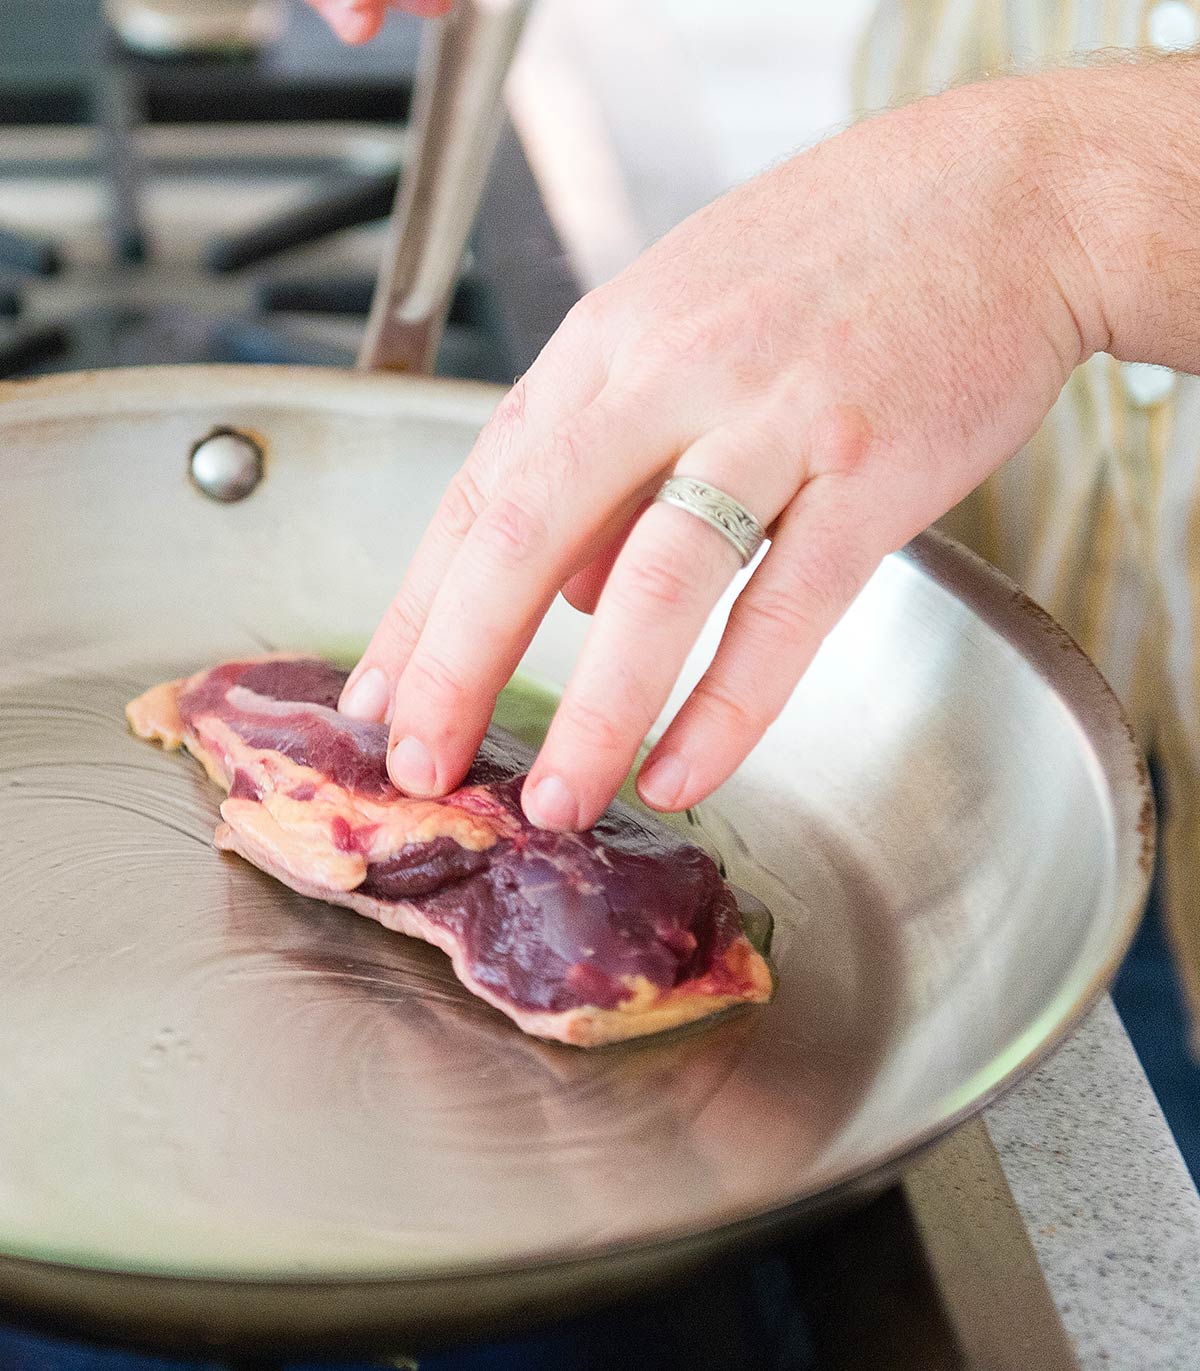
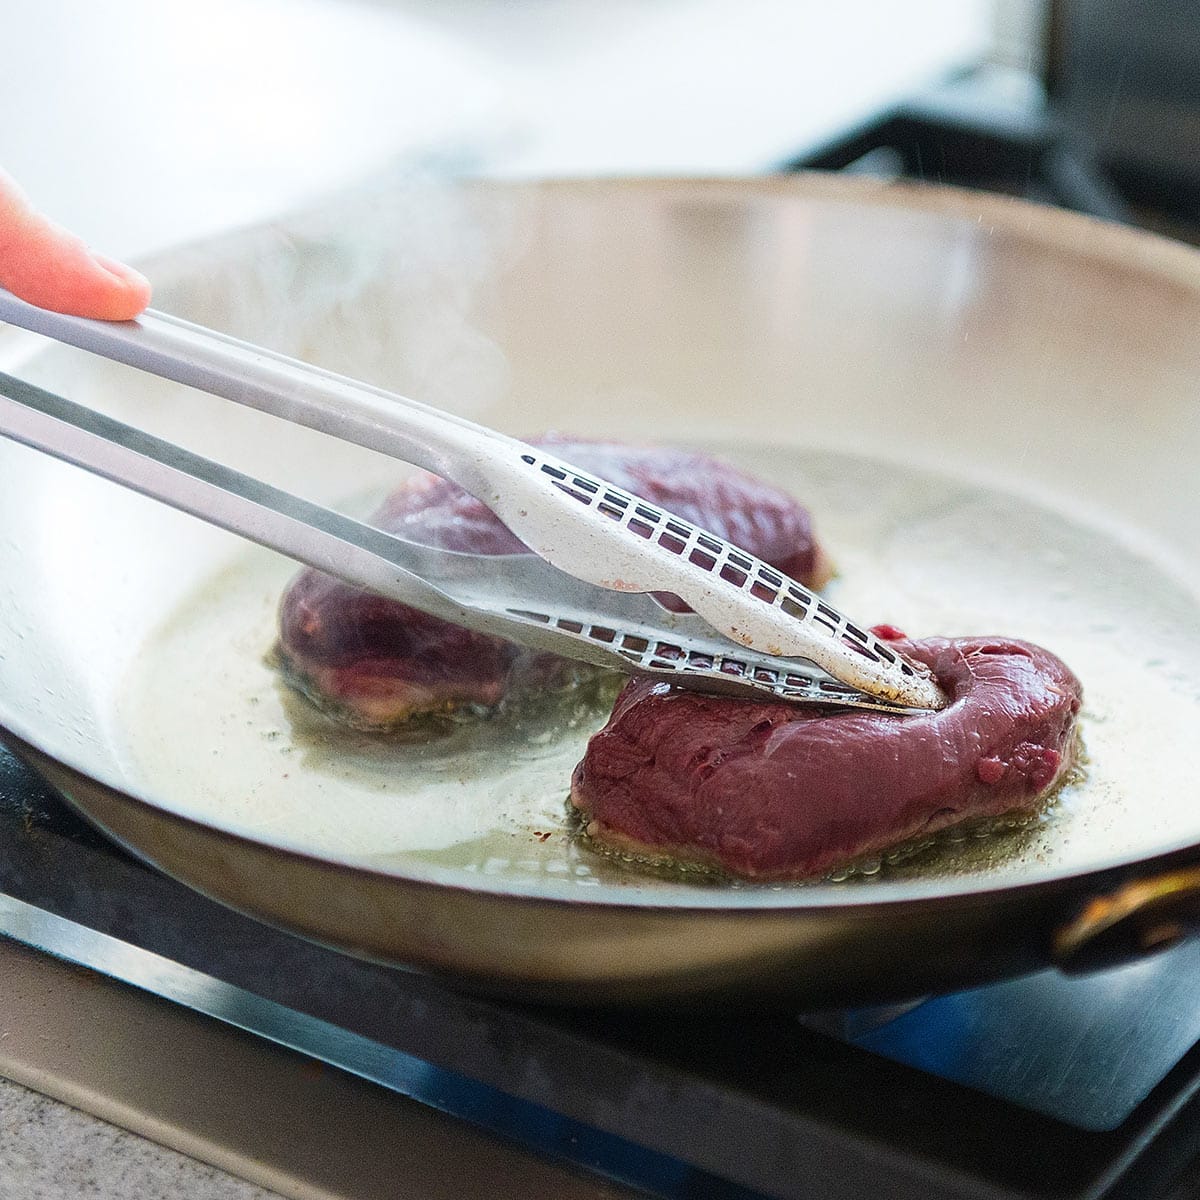
Heat a steel or iron pan — non-stick doesn’t like the high heat we’ll be cooking duck breasts in — over medium-high heat, and just melt the fat. Use a duck breast to smear it around the pan.
Set down the remaining duck breasts (I find I can do about four or five at a time), and let them heat up. If you set duck breasts down in a pan that’s too hot, the skin will contract very quickly and you will get this little oval indentation near the thin end of the breast that won’t crisp.
Regardless, it’s a good idea to use your tongs to press down on this part for about a minute, so it relaxes and gets good contact with the pan. A bacon press works well, too.
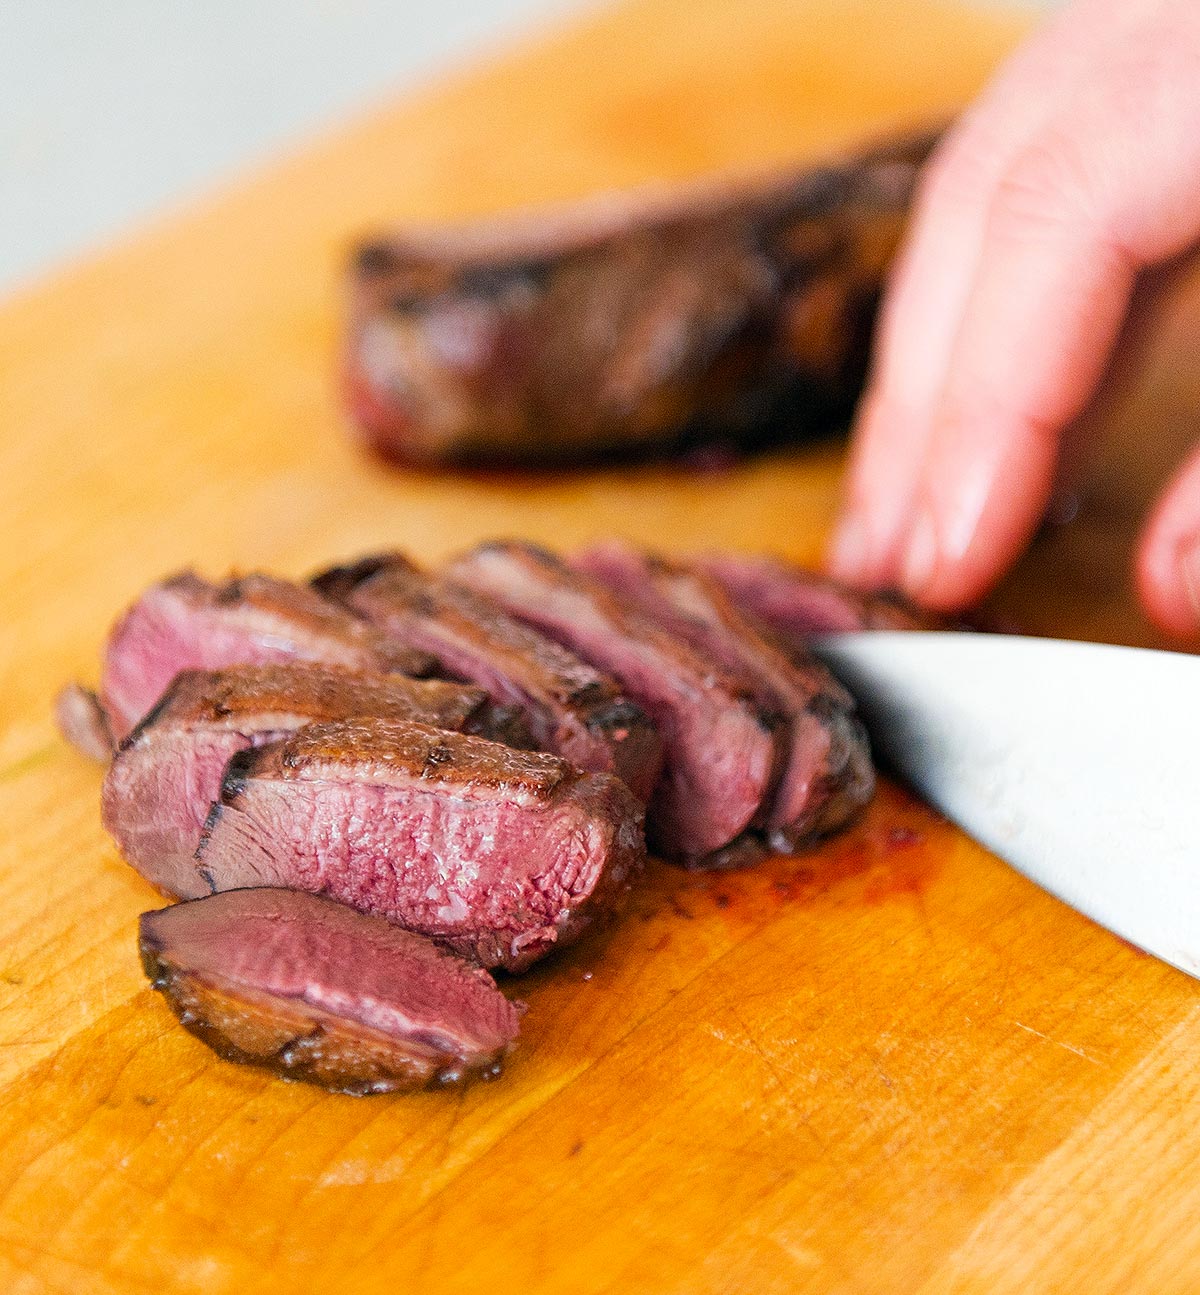
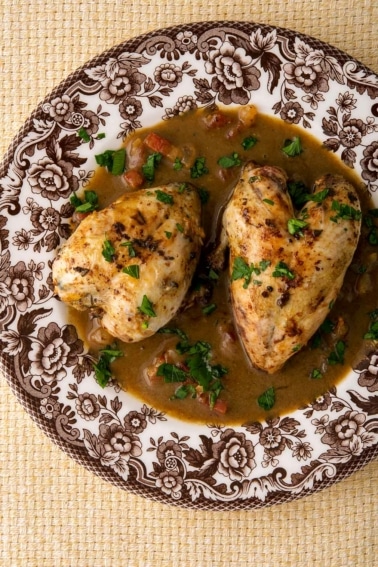
One secret of cooking duck breast is to let it cook about three-quarters of the time on the skin side. This renders most of the fat and crisps the skin, which serves as a barrier to the meat, so that side won’t get overcooked.
You flip the breasts when the skin is browned and crispy — and yes, you can look — then let them cook on the meat side for a few minutes. I have some guidelines for various types of ducks in the recipe card below.
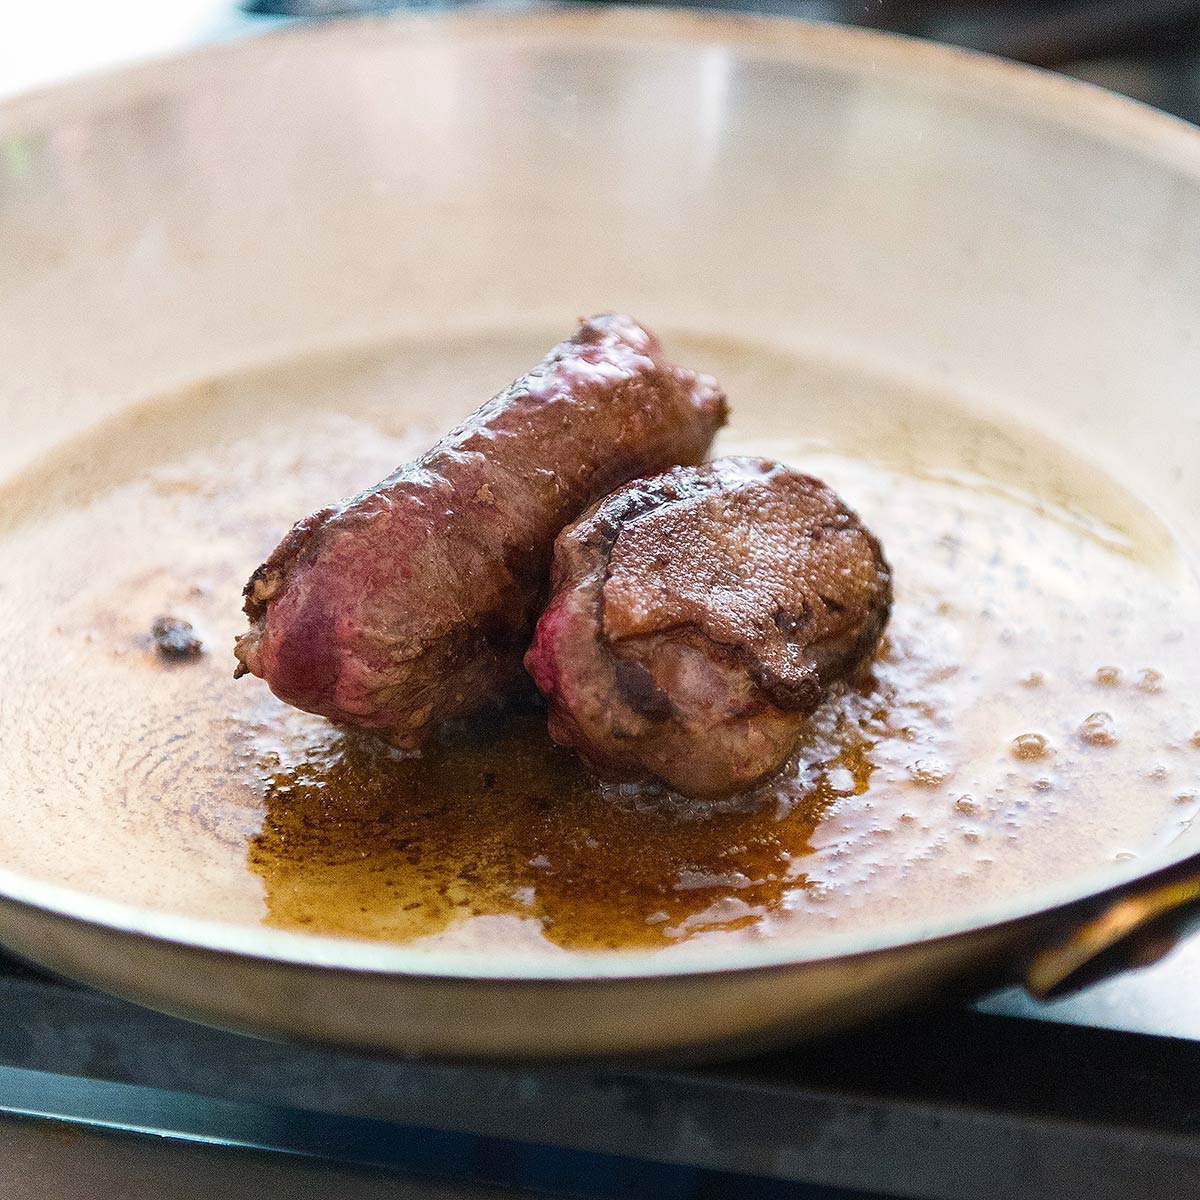
Finally, you want to kiss the fat sides of the duck breasts by standing them up against each other. This is a trick I learned from cooking morbidly obese mallards and pintails that had been living in the California rice fields, and it works well with store-bought ducks, too.
Finally, let your duck breasts rest on a cutting board, skin side up. If they are a little underdone, you can tent them with foil, but I rarely do that because it damages your crispy skin. I do like to grind black pepper over the skin as it rests, though.
Bottom line: this is the duck breast recipe I follow almost exclusively: I really don’t think a nice fat pintail or mallard or wood duck needs more than salt, pepper and a squeeze of citrus or vinegar or a dash of Worcestershire.
That said, I have a long list of wild game sauces here, and many go well with duck. I also have a number of specific recipes that use this technique for cooking duck breasts here on the site, such as:
- Duck breasts with a Nordic beer sauce.
- German duck with turnips and spätzle.
- Old school duck bigarade, a precursor to French duck a l’orange.
- A homey dish of duck breast with apples.
How to Cook a Duck Breast
Ingredients
- 4 duck breasts (breasts from two ducks)
- Salt
- 1 teaspoon duck fat or olive oil
Instructions
- Take the duck breasts out of the fridge. If you are using a domestic duck or a very fat wild duck, score the skin (but not the meat) in a cross-hatch pattern, making the cross-hatches about 1/2 inch across; this helps the fat render and will give you a crispier skin. Salt it well on both sides, then let it sit on a cutting board for at least 15 minutes and up to 45 minutes for a goose breast.
- Pat the duck breasts dry with paper towels. If you are cooking a domestic duck or a very fat wild duck, put 1 teaspoon of duck fat or cooking oil in a large pan; Lay the breasts skin side down and use them to smear the fat all over the surface of the pan. Turn the heat to medium-high. Yes, you read that right: Don't preheat the pan. You want as much fat to render out as possible, so start with a cool pan. If you are working with normal wild duck breasts, i.e., skinny ones, heat the pan over high heat for 1 minute, then add 2 tablespoons of duck fat, lard or some other oil. Let this get hot, but do not let the fat smoke. Only then do you lay the duck breasts in the pan, skin side down. Either way, once the duck breasts start cooking, you will notice the "tails" of skin and fat from the head and the tail side of the fillet contract immediately. As the skin contracts, you will sometimes get a little oval patch on the tail end of the breast that curls up and doesn't make contact with the pan. Use your tongs to press down on this part for 30 to 60 seconds. This gives you a more even sear.
- Let the pan do its job. Cook at a jocular sizzle -- not an inferno, not a gurgle. Think about how bacon sounds in the pan when you cook it, and you have the right idea. How long? It depends. I like my duck medium-to-medium-rare. To do this with small ducks like teal or ruddy ducks, you need only about 3 minutes on the skin side, and you might want to keep the heat higher. Medium-sized ducks like wigeon, gadwall or wood ducks need 3 to 5 minutes. Mallards, pintail, canvasbacks and domestic ducks need between 5 and 8 minutes. If you are cooking a goose breast, you will want the heat on medium-low and you'll need to cook the skin side a solid 10 to 12 minutes. The key is to let the breast do most of its cooking on this side -- it's the flattest, and will give you that fabulously crispy skin we all know and love. Again, I repeat: When you cook a duck breast, 3/4 of the total cooking time is on the skin side.
- Turn the breasts over. When? Follow the guidelines above, but also use your ears: You will hear the sizzle change; it will die down, just a bit. That's when you turn. Lightly salt the now-exposed skin immediately. Doing this seems to absorb any extra oil and definitely gives you an even crispier skin. Let the ducks cook on the meat side for less time. I recommend: 1 to 2 minutes for small ducks; 3 to 4 minutes for medium ducks; 4 to 6 minutes for large wild ducks and domestic duck; 5 to 7 minutes for geese. More than mere time, however, you need to just use The Force to know when your duck is ready. Not in tune with The Force? The next best thing is the finger test for doneness. Use this to determine when you're almost ready. My advice is to go to the next step when your duck breasts are rare.
- Now "kiss" the thick side of the breasts by standing two halves against each other. You will notice that duck and goose breasts plump up and contract as they cook. One side of the fillet will be wider than the other, and this side will need some heat. Just tip the breasts on their sides and cook for 30 to 90 seconds, just to get some good color.
- Take the duck off the heat and let it rest on a cutting board, skin side up. This would be a good time to grind black pepper over it. Teal need only need a minute or two rest, while big Canada geese might need 10 minutes. Everything else benefits from about a 5 minute rest. A duck breast is just like a steak: If you don't rest it, the juices will run all over your cutting board -- and not down your chin, where they should be. You can slice the breast from either end, either side up. You can get thinner slices by starting at the meat end, but you lose a little of the crispiness of the skin. If you are serving a whole breast, always serve it skin side up, with its sauce underneath.
Video
Notes
Keys to Success
- If you don't have rendered duck fat handy, here's how to render duck fat at home.
- It is far easier to control the internal temperature with a room-temperature breast than an ice-cold one. This is why you need to let the meat come closer to room temperature before cooking. The exception is with very small duck breasts, like with teal. These you want to cook cold so they don't overcook.
- Don't use non-stick pans, as they don't like the high temperatures you want to sear meat as well as steel or cast iron.
- It's worth repeating: The key is to let the breast do most of its cooking on this side -- it's the flattest, and will give you that fabulously crispy skin we all know and love.
- Rest your breast. At least for a few minutes, and up to 10 to even 15 minutes for a large goose breast.
- Skin side up, always. You worked hard for that crispy skin. Keep it off the cutting board helps preserve that.
Nutrition
Nutrition information is automatically calculated, so should only be used as an approximation.

You made me rediscover duck. As a carnivore, I eat steak basically everyday. I always thought duck was too tough and meh, but dang I was wrong! I simply used my legendary cast iron and a thermometer and cooked it to perfection. The crust was so beautifully crunchy I almost cried.
My son shared your website with me. Best duck I ever had! Thank you!!!
Delicious! I had an exceptionally large and fatty domestic duck breast to deal with, and this recipe worked well. I did drain excess fat out of the pan several times, otherwise I would have been deep frying.
Crispy skin duck breast with cherry sauce, spinach and polenta
I’m telling ya’ll that this recipe is INCREDIBLE!
Serves: 4
Ingredients
4 small duck breasts
150ml whole milk
600ml chicken stock
150g coarse cornmeal
4 tbsp crème fraîche
100g fresh spinach
sea salt and black pepper
150ml red wine (approx. 1 small glass) 250ml chicken stock
1 tbsp red wine vinegar
2 tsp honey
150g cherries, halved, stones removed
½ tsp cornflour
1 tbsp water
knob of butter
Method
Preheat the oven to 150C/Gas2.
For the polenta, boil the milk and chicken stock, pour in the cornmeal and stir with a wooden spoon as it thickens.
When the polenta starts to thicken, stir in the crème fraîche and spinach.
Lightly score the skin of the duck breast.
Season with plenty of salt and pepper.
Place the breasts skin side down in pre-heated frying pan.
Cook for 5-7 mins or until the skin is crisp and golden.
Turn and cook for 2 mins, then place meat in a baking dish in the oven for 5 mins.
For the sauce, get the pan hot again, add the wine, let it bubble and then add the stock and bring to a boil.
Whisk the cornflour and water mix into the sauce.
Stir until thick and glossy.
Add the red wine vinegar and the honey.
Take off the heat, stir in the cherries and butter.
Slice the duck breasts, place on a heap of creamy spinach polenta and spoon over cherry sauce.
Serve.
Fantastic!! I read it a few times, followed it to the dot, and the meat came out unbelievably tender, moist, and delicious.
30 years of cooking duck breast, and they’ve NEVER turned out this perfect! I especially appreciate the suggested cooking times for wild vs. domestic. (I seasoned with salt, pepper, and light dusting of garlic powder—better flavor than I’ve had in any restaurant). Thx!!!
What a great technique! I do recommend watching the video first. Apparently, my heat was closer to ROFLMAO than jocular. I had to finish this in the oven to keep from burning the fond. That said, it was wonderful. I used the fond for the Maple Bourbon sauce, which my husband daughter really liked. Thank you for the technique. Looking at the easy roast duck legs and this recipe, I am wondering how this would work out low and slow to mid rare, with a reverse sear at the end? Anyway, another great technique. Thank you
Thank you so much for the tip on how to cook duck breast. really do know how to instruct in detail and from a normal point of view rather than some high falootin’ somebody that tries to be all that and then some and makes it more technical and difficult than it has to be. Like you have to have a degree to do something like this.
Hank,
I have your Duck, Duck, Goose cookbook. So many great recipes. In it, you address how to grill duck breasts. However, you contemplate cooking over direct heat. I have an offset grill/smoker, and I usually burn wood in the firebox. When I am grilling steaks, I typically get the grill (the horizontal “smoker” portion) to around about 400 degrees F, though I could get it hotter or cooler if recommended. The cooking surface is an “expanded metal” grating, if that makes any difference.
Do you have any suggestions for how long to grill wild, skin on mallard breasts in this offset arrangement to achieve crisp skin and medium/medium-rare doneness? I am looking forward to trying this recipe, but I don’t have many mallards left in the freezer, and I don’t want to feed any to the cat.
Thanks.
Ronald: I am sorry, I don’t. But if you use the standard “finger test for doneness” on the breasts, you should be OK. I would not walk away while cooking them, however. In all probability, if the meat is about room temp to start, it should take maybe 8 minutes tops.
We’ve been following this recipe for years and you just can’t go wrong – delicious duck breast every time.
HELP – The duck breast I have are small, thin and with no skin or fat on them. How do I cook them? I have several from my husband’s hunting trip in southeast Kansas.
Carla: I’d cook them cold, right from the fridge. Sear hard on the flat side, where the skin used to be. Spoon the hot oil over the top as the breasts sear until the meat turns opaque. Don’t flip. Cook until the meat is medium-rare. Rest, seared side up, and grind black pepper over it. After 5 minutes of resting, serve.
Superb. I live on my own and had one duck breast from the supermarket but I followed the instructions and my little bit of duck was delicious. Found your website by chance and glad I did. Thank you
Correct way to slice a duck breast when wrapping in bacon for the grill?
This recipe is bulletproof! Rare to medium rare center with crispy skin. Very hard to beat. Now I just wish I had more ducks in the freezer!
The duck was fabulous! But my one question is, “How can you cook duck without all the smoke detectors go going off so having to open all the windows when it’s 20°?”
Do you do anything special to your duck breasts after removing the breast up until you cook them? Soak in anything to drain fat etc? Going to try your method this evening with some pintail and other puddle ducks. Thanks
South Texas Coast
Marvellous! My first time cooking duck breasts and your directions were just perfect for the best result, thank you!
I never comment and never read comments. But this is just in hopes that the author read this. Bravo. I love you. First time making duck and this is the level or detail and fun I needed. Xoxo
here for the same! the force is strong with this one
Thank you! I successfully cooked duck breasts that a friend gifted us on the 1st try!!!
My duck breast came out perfect medium rare just like I like it also Nice simple directions I have not cooked up breast for a long time so thank you