As an Amazon Associate I earn from qualifying purchases.
Cutting a whole chicken, pheasant, grouse or turkey is exactly the same process — they are all related, gallinaceous birds, after all. I’ll walk you through how to cut up a chicken or grouse for cooking step by step so you can make the best use of all the parts.
Cutting a whole chicken or game bird is a basic skill you will want to know. For buyers of poultry, buying a whole chicken or turkey is more economical — so if you can cut up a chicken by yourself, you will save a lot of money. And each part cooks a little differently, so you can make the best use of the wings, legs, breasts and carcass.
This is especially true of upland game birds like pheasants, grouse and wild turkeys, Not every bird is worthy of a full-on roast: To me, such a bird needs to be fat, reasonably young and not terribly shot-up. For chickens, old birds like stewing hens are much better cut up than roasted whole.
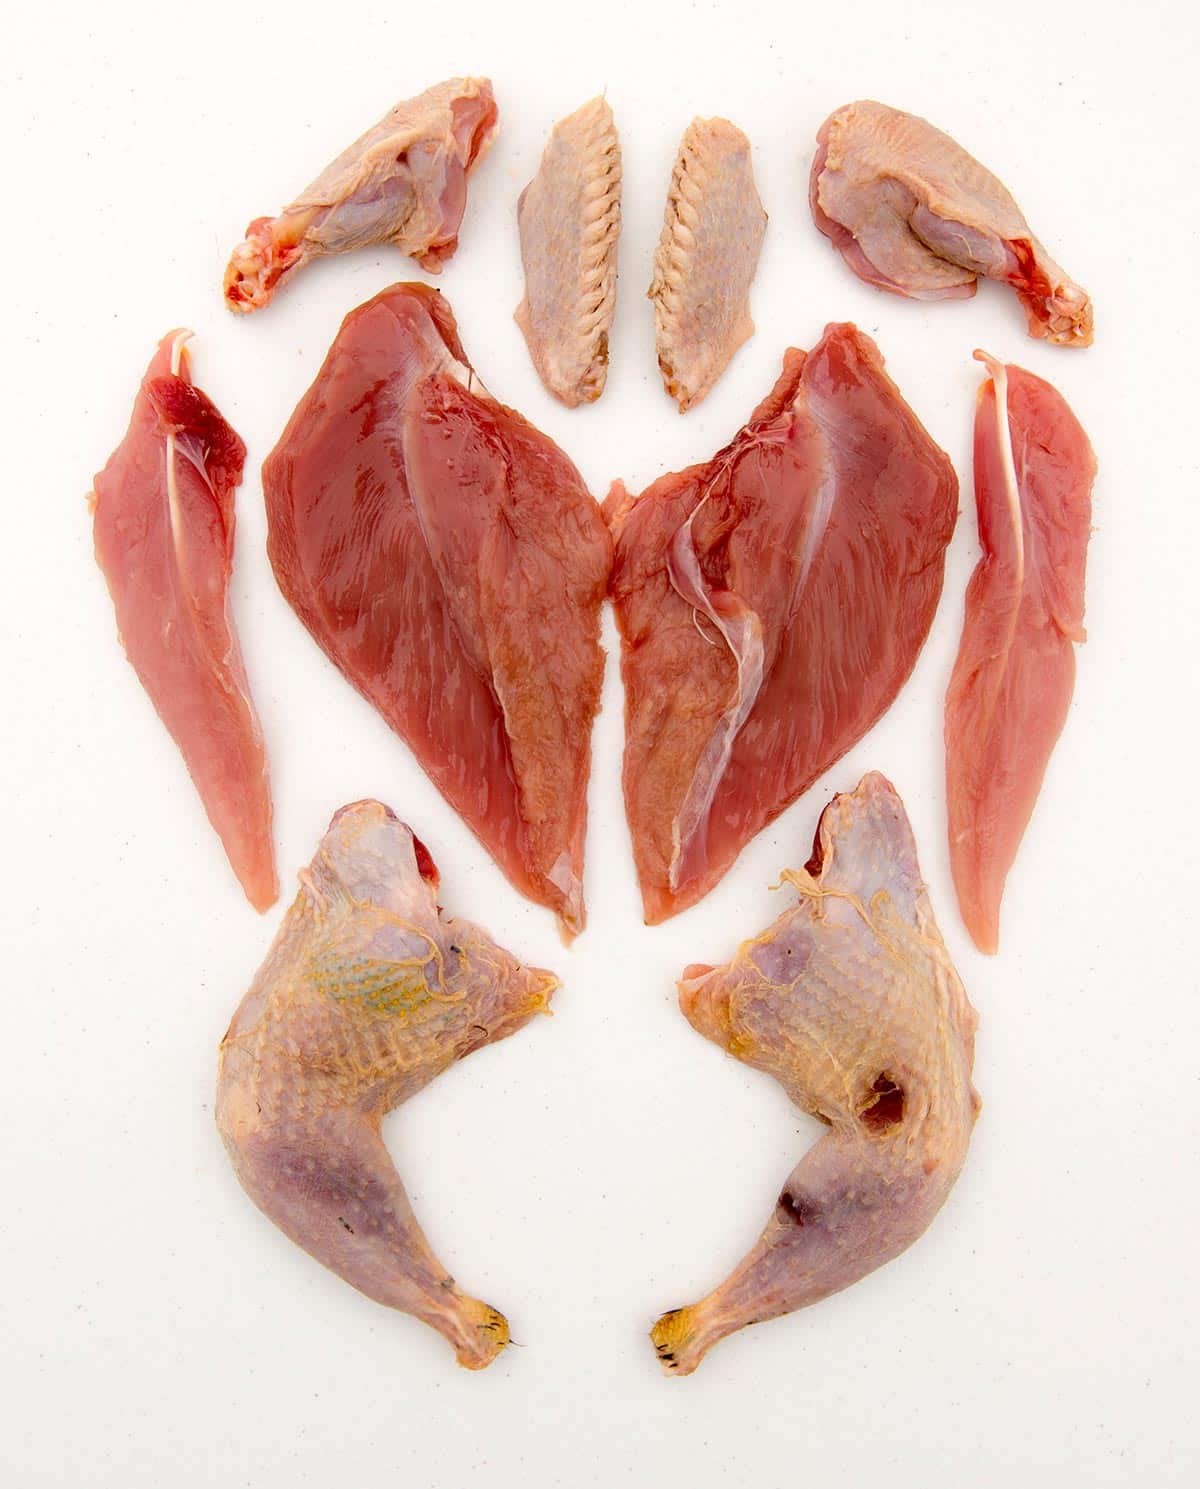
For upland game birds with broken legs, shot-up breasts, that are skinny or very old, I break them down into parts for separate cooking. Breasts get seared, while legs and wings go into their own kinds of recipes. The carcasses all go into stocks and broth. I waste very little. Here’s how I turn a whole game bird into parts:
I am using a blue grouse for these step by step illustrations, but remember that cutting a whole chicken is exactly the same.
Also, this is just one method for cutting up a whole chicken or pheasant. There are many others, depending on how you plan on cooking them.
Cutting a Whole Chicken, Pheasant or Grouse
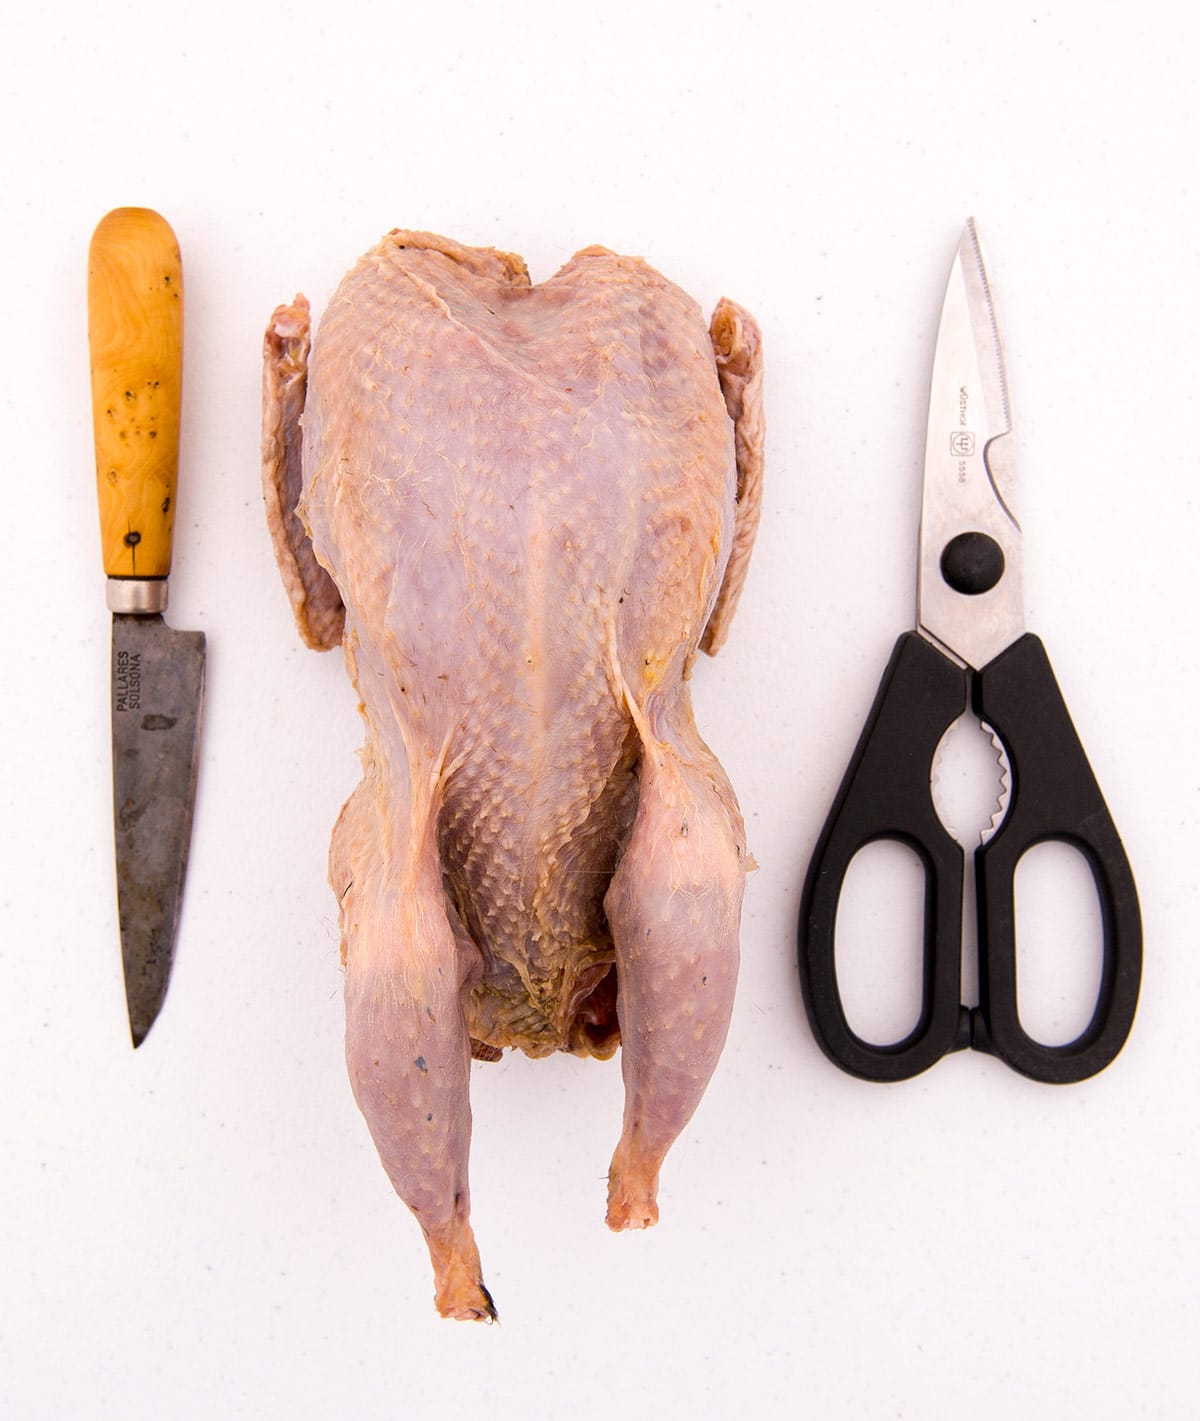
Obviously, start with a while chicken, pheasant, grouse, turkey, partridge or quail. These last two are built the same as a chicken, but are small enough where few people bother to cut them into their component parts; Cornish game hens are similar.
You will want a sharp paring or boning knife, and good poultry shears, I prefer shears with a bone notch that break into two pieces for easy cleaning.
Side note for hunters: This process works for both skinless and plucked birds.
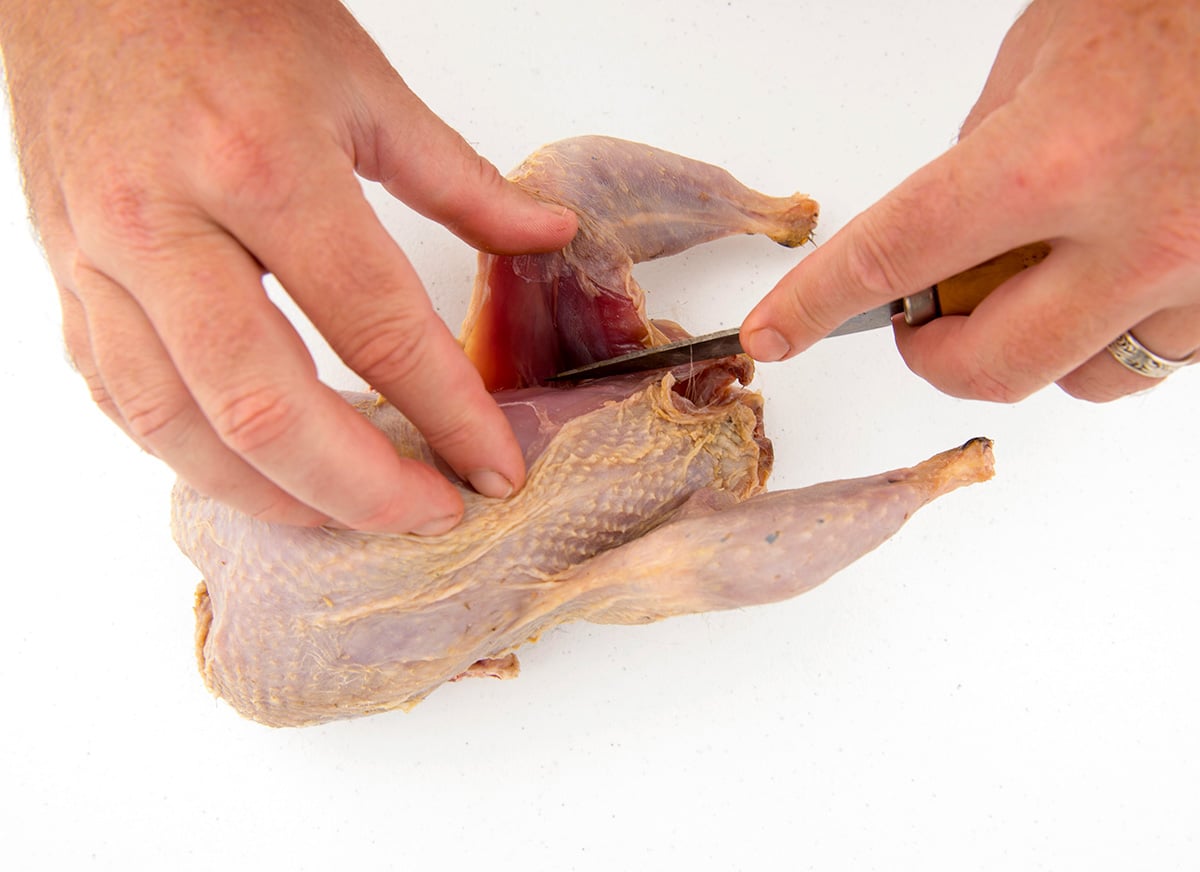
Removing the Legs
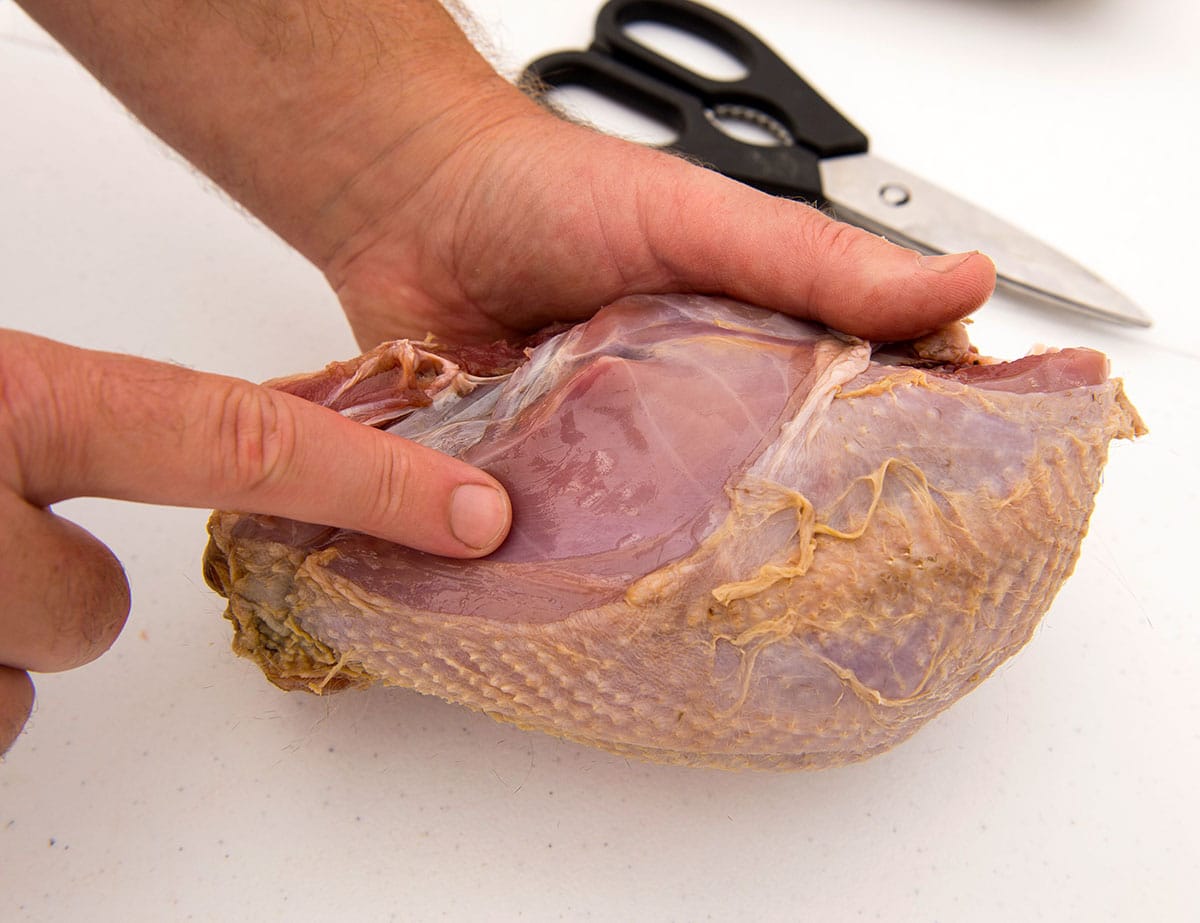
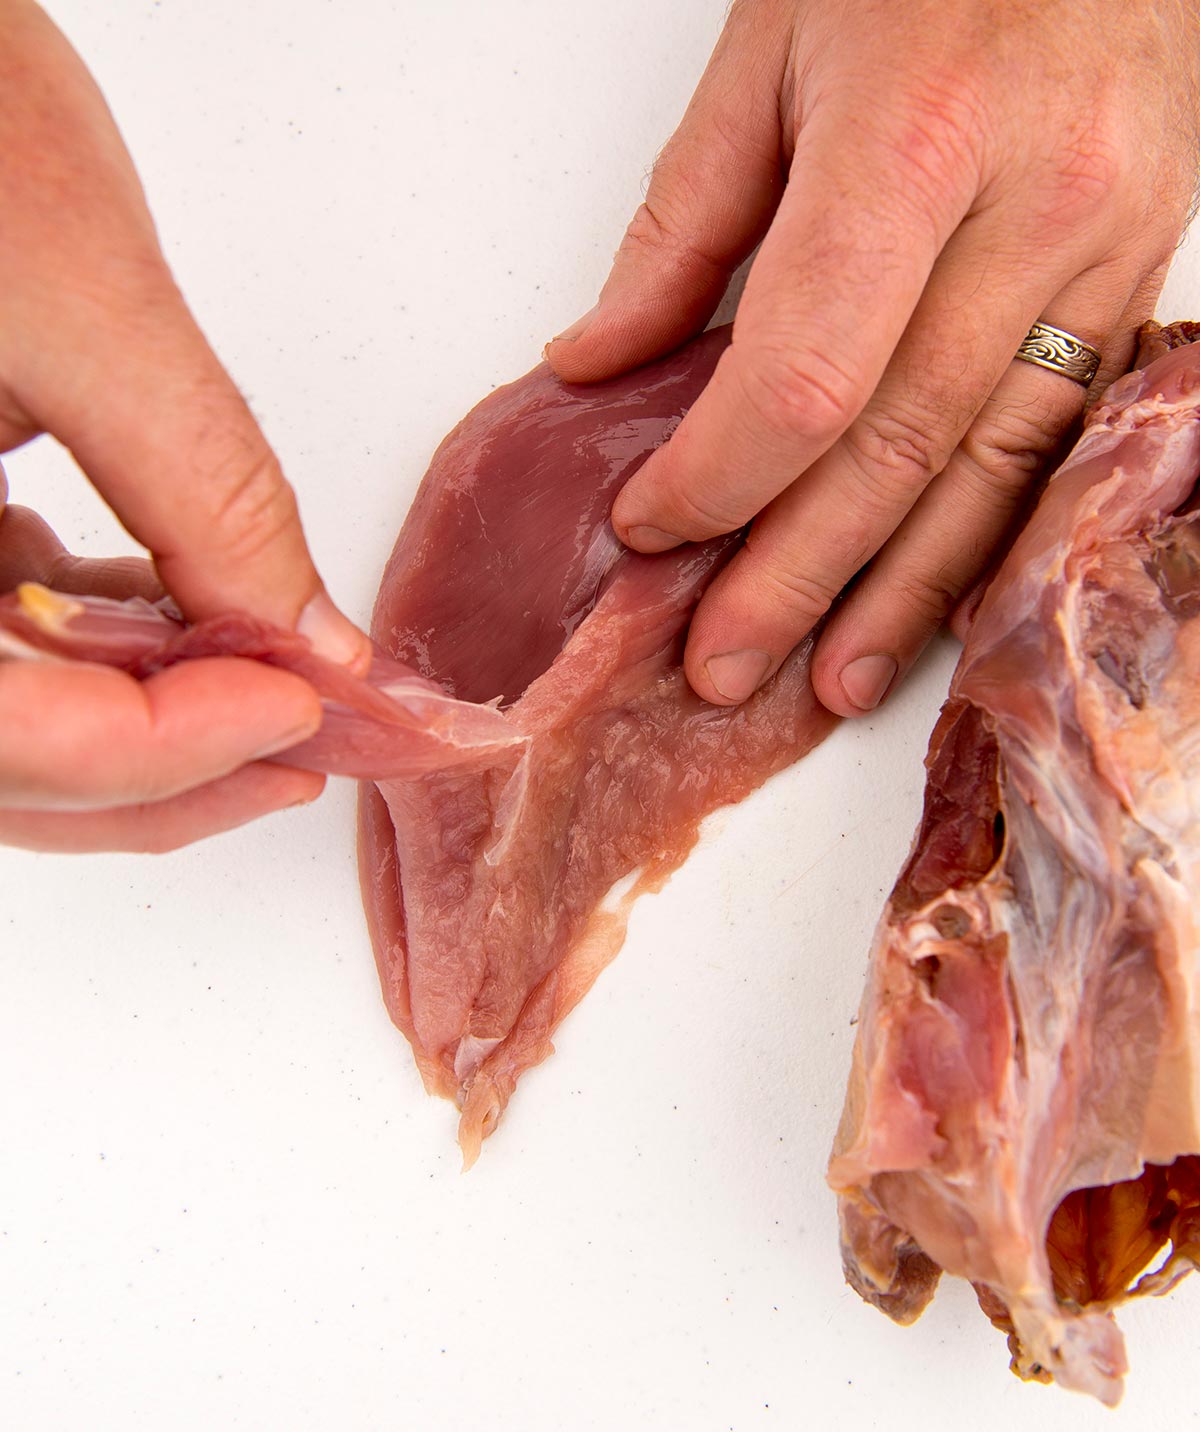
Start with the legs. I press on the gap between legs and breast to push as much skin toward the thigh as I can. Slice down in the gap and you will notice you just sliced skin, not muscle — that’s the key. Gently cut downward until you reach the ball-and-socket joint where the leg is attached.
Snap the leg back toward you to pop open the ball-and-socket joint, which frees the leg/thigh.
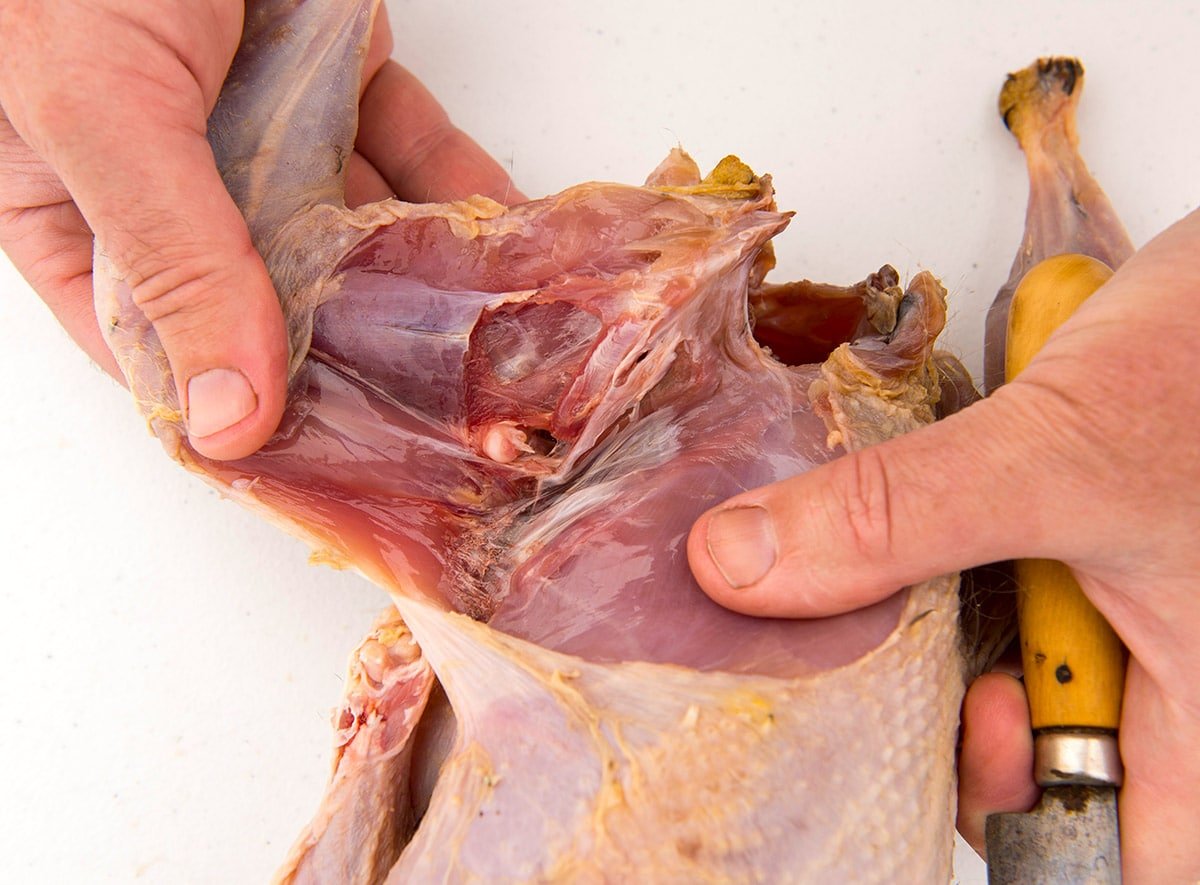
Tuck the knife behind the ball and cut the leg free. As you cut past the socket joint, don’t forget to arc the knife around the little pocket of meat known in birds as the “oyster,” as this is the best part. The oyster is small in grouse, but is large in turkeys, chicken and pheasants.
As you slice down, arc the knife under the back of the bird to get all the meat off the thigh.
If you want to separate thighs from drumsticks, bend the leg a few times to see exactly where the joint is. Place the blade at that spot and slice downward, and you should go right through cartilage, not bone. It takes a little practice to get this correct every time.
Taking off the Wings
When cutting a whole chicken, you will usually want to remove all three digits of the wings, unless you are going to make airline breasts. In that case, you leave the drumette on. The three digits are the wing tip, the flat and the drumette.
With upland game birds, many hunters snip off the whole wing. This is a shame, because the drumette is not only tasty and large in pheasants and turkeys, but leaving it on allows you to make those airline breasts, or it serves as protection for the breast if you are going to roast a whole bird.
I happen to have several great recipes for pheasant wings and turkey wings, if you need a reason to keep them.
Start by snipping off the wing tips, if they are there. Use them for stock or broth. Next, use shears to snip off the flats. There is a joint you can take advantage of so you just snip through cartilage. Bend the wing a few times so you can visualize it.
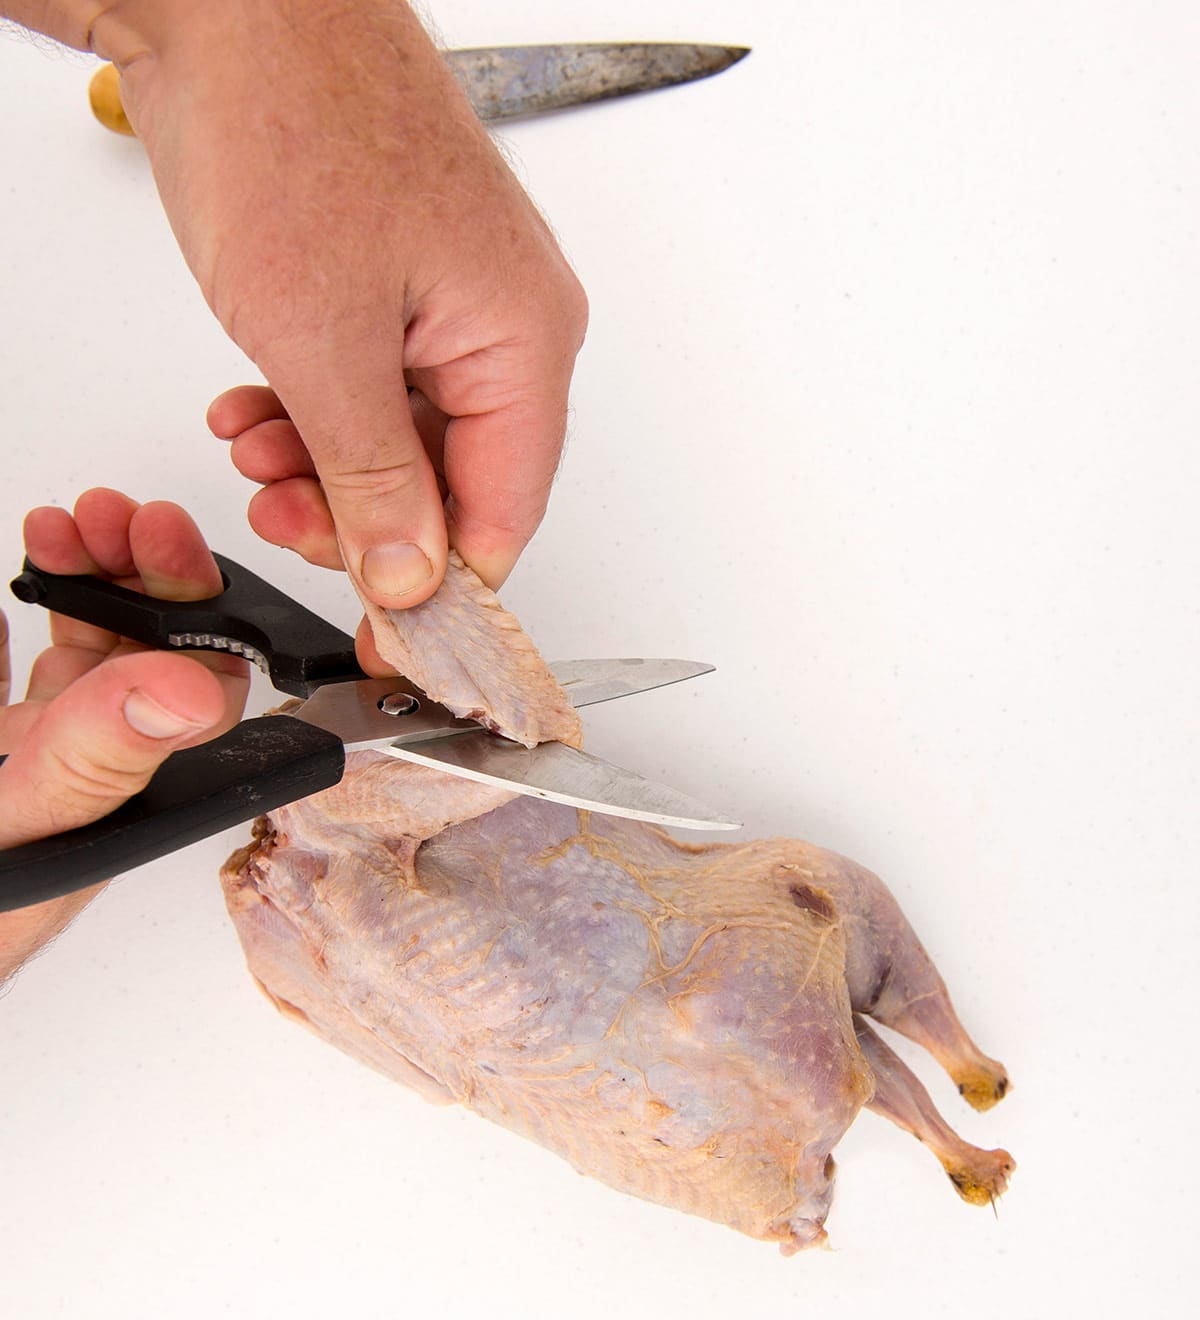
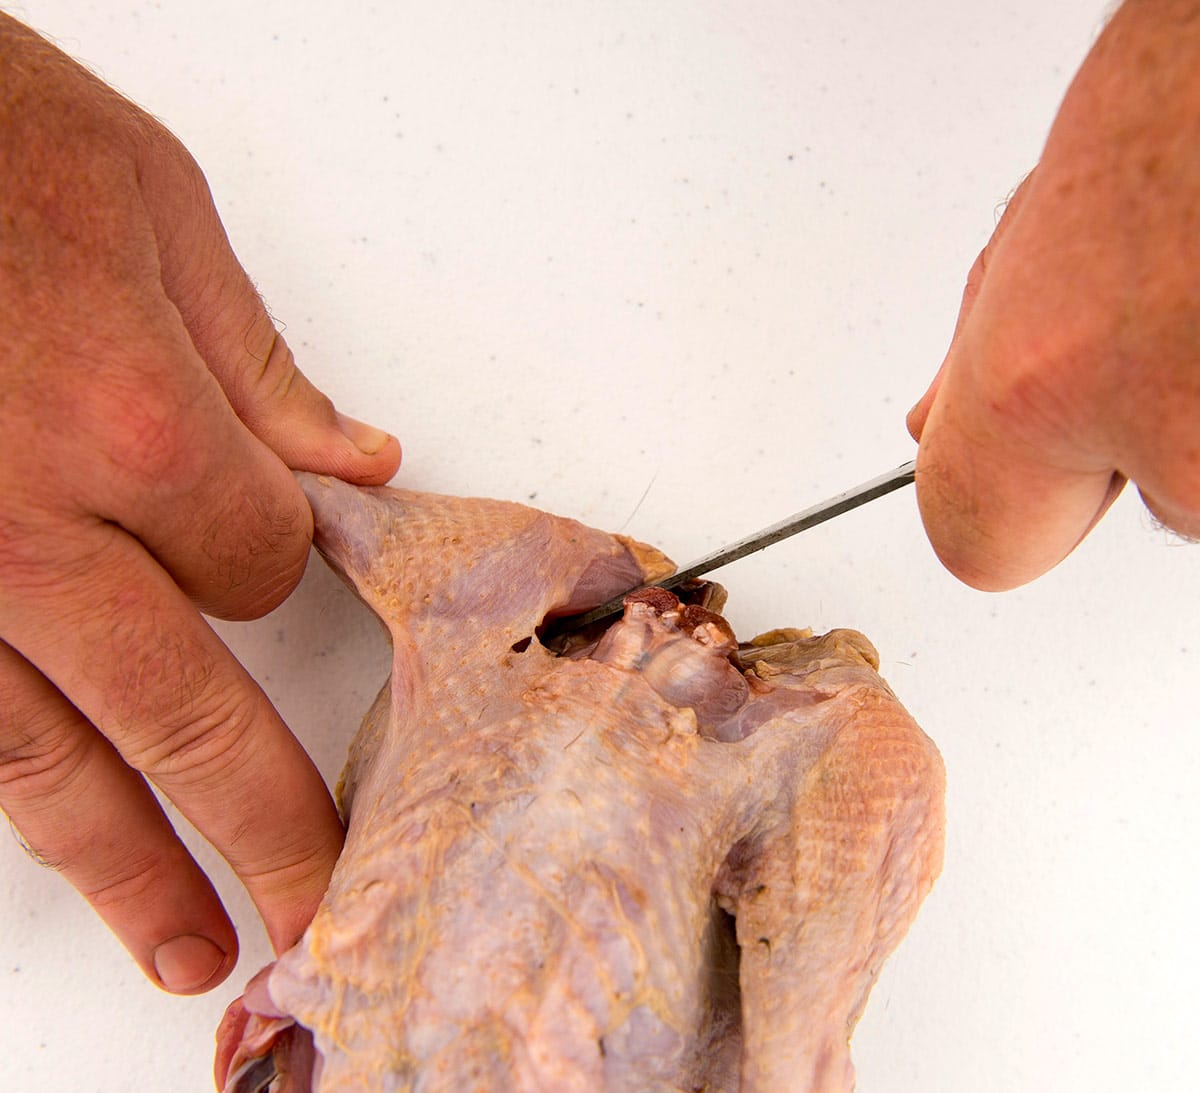
Now comes the hardest part of cutting a whole chicken, pheasant or grouse: Removing the drumette. The drumette is attached at a joint tight under the front of the breast. The easiest way to spot it is to put the bird on its back and move the drumette back and forth. Slice down there.
If you cut in the right spot, you will go right through the soft cartilage and free the wing from the body. Don’t worry if you mess it up a few times; it takes practice to know exactly where that spot is.
Now slide the knife along the saber bone, which is a long, curved bone along the bird’s back that looks like a sword; you can see it in the picture above left. Slide the knife along that bone until you get to the joint, which will now be totally free from the body. Finish by removing the wing by cutting a little extra skin from the neck area.
Do this on both sides.
Breasting the Bird
There are a bunch of ways to breast out a chicken, pheasant or grouse. Some people lift up the whole breastbone and use shears to remove it at the wing joints. This is a nice method that preserves the skin on the breast — kinda sorta.
But chickens, pheasants, turkeys and some grouse are built in such a way that the skin coverage isn’t great once you remove the legs. This is very different from ducks and geese.
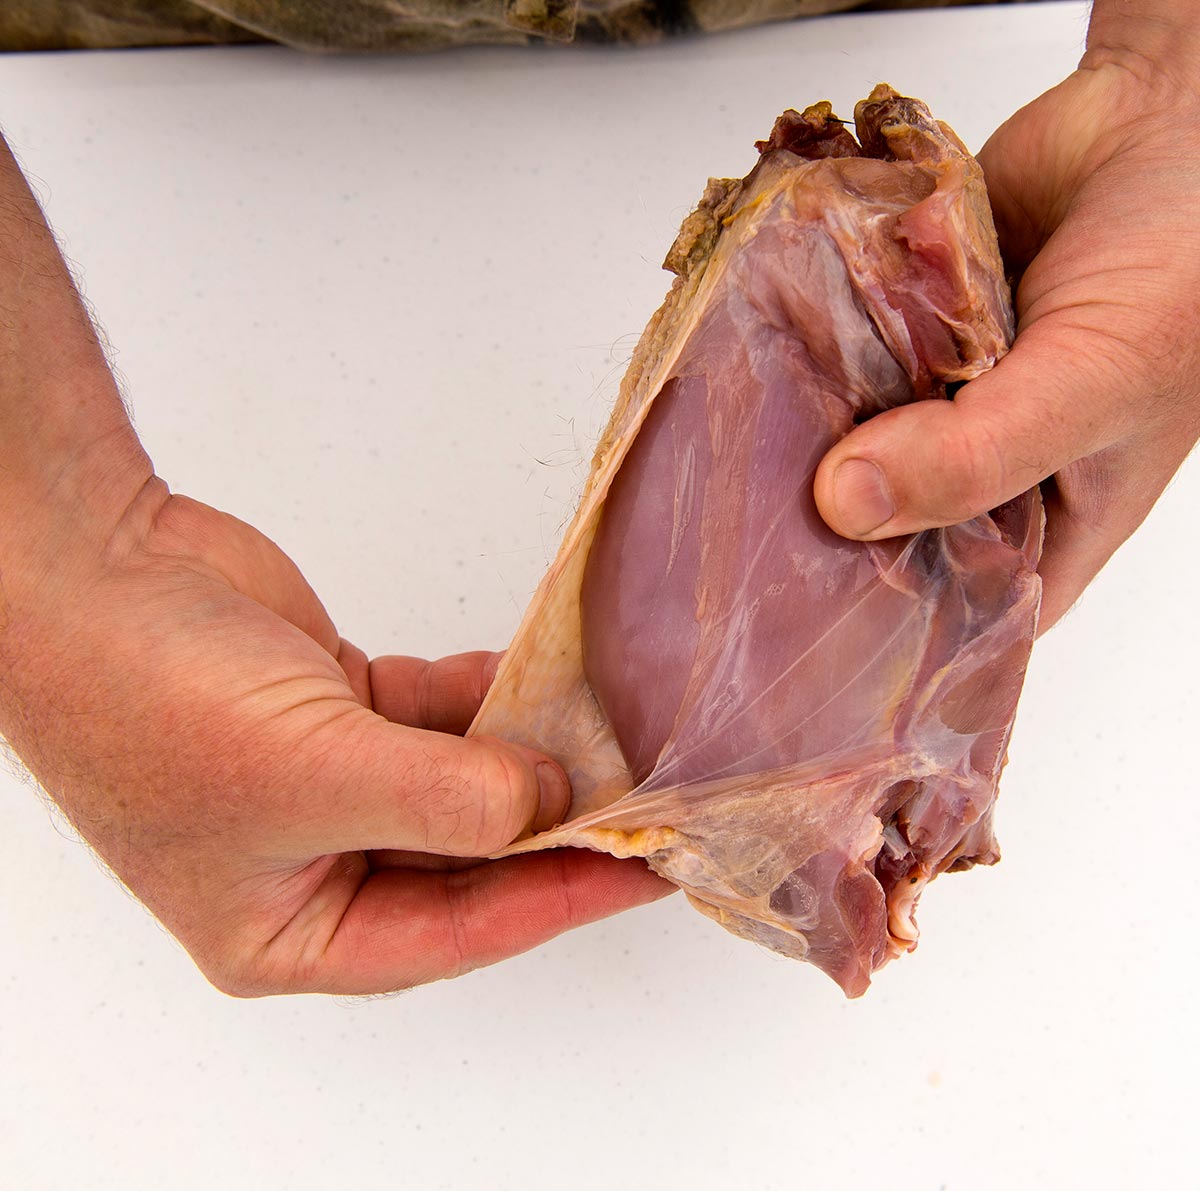
You’ll always have that gap where you removed the legs, so there will always be an area of the breast with no skin protection. So I pull off the skin. Yes, it seems like it’s defeating the point of cutting a whole chicken, pheasant or grouse, but I like to use that stray skin as either a chef’s treat or to make chicken or pheasant skin tacos. Simply cut the skin into pieces and fry them crispy. They’re amazing.
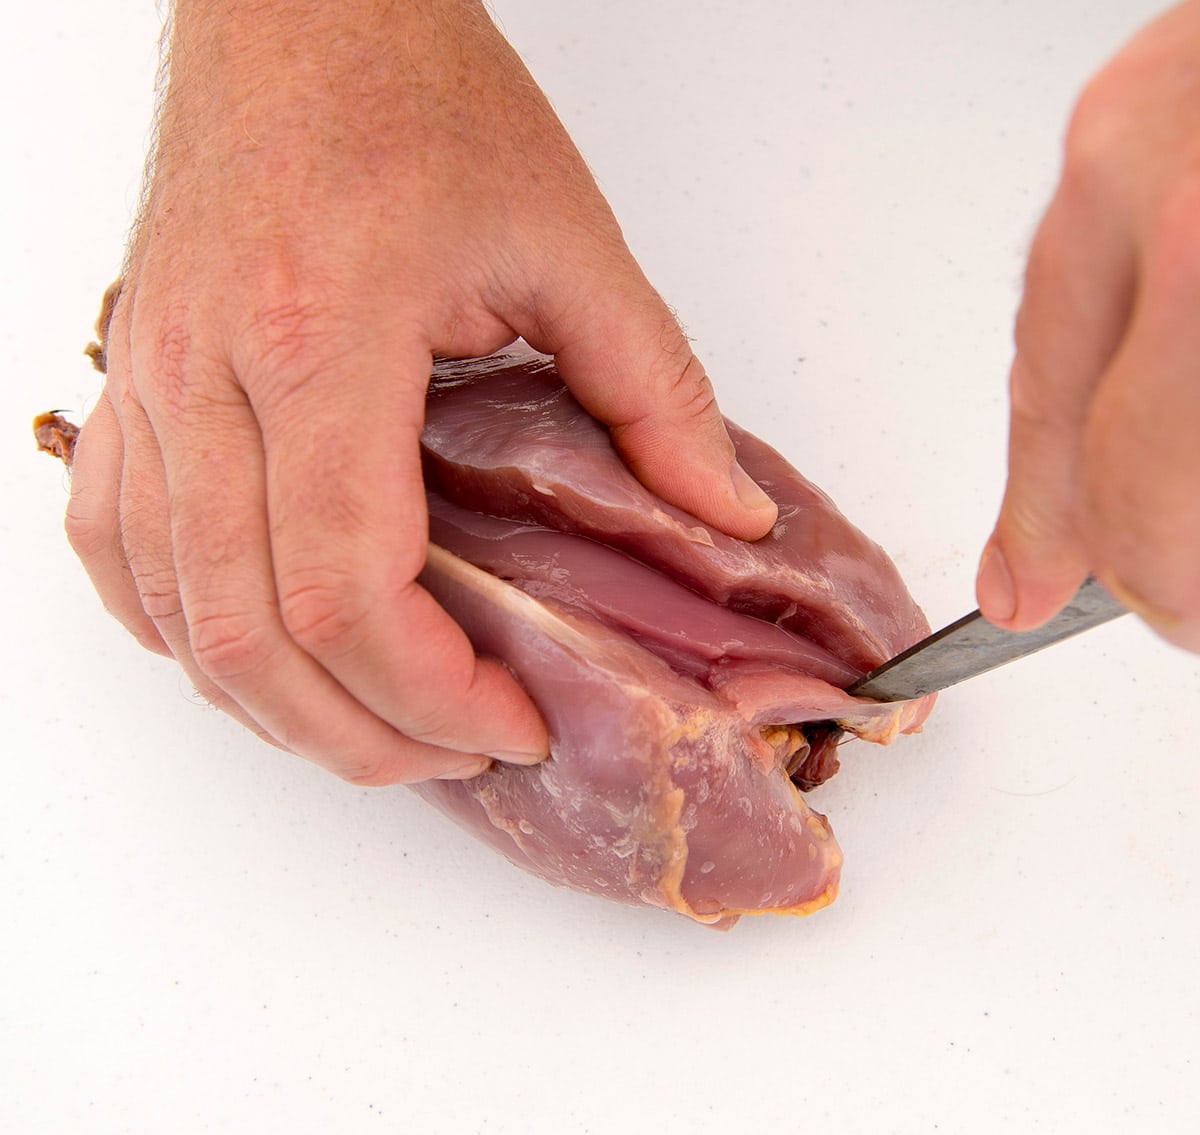
After that, slide your knife down right alongside the keel bone until you hit the breast bone. Tap the point of the knife on the breast bone as you slice back towards the tail, then up to the wishbone. Closely follow the wishbone with your knife.
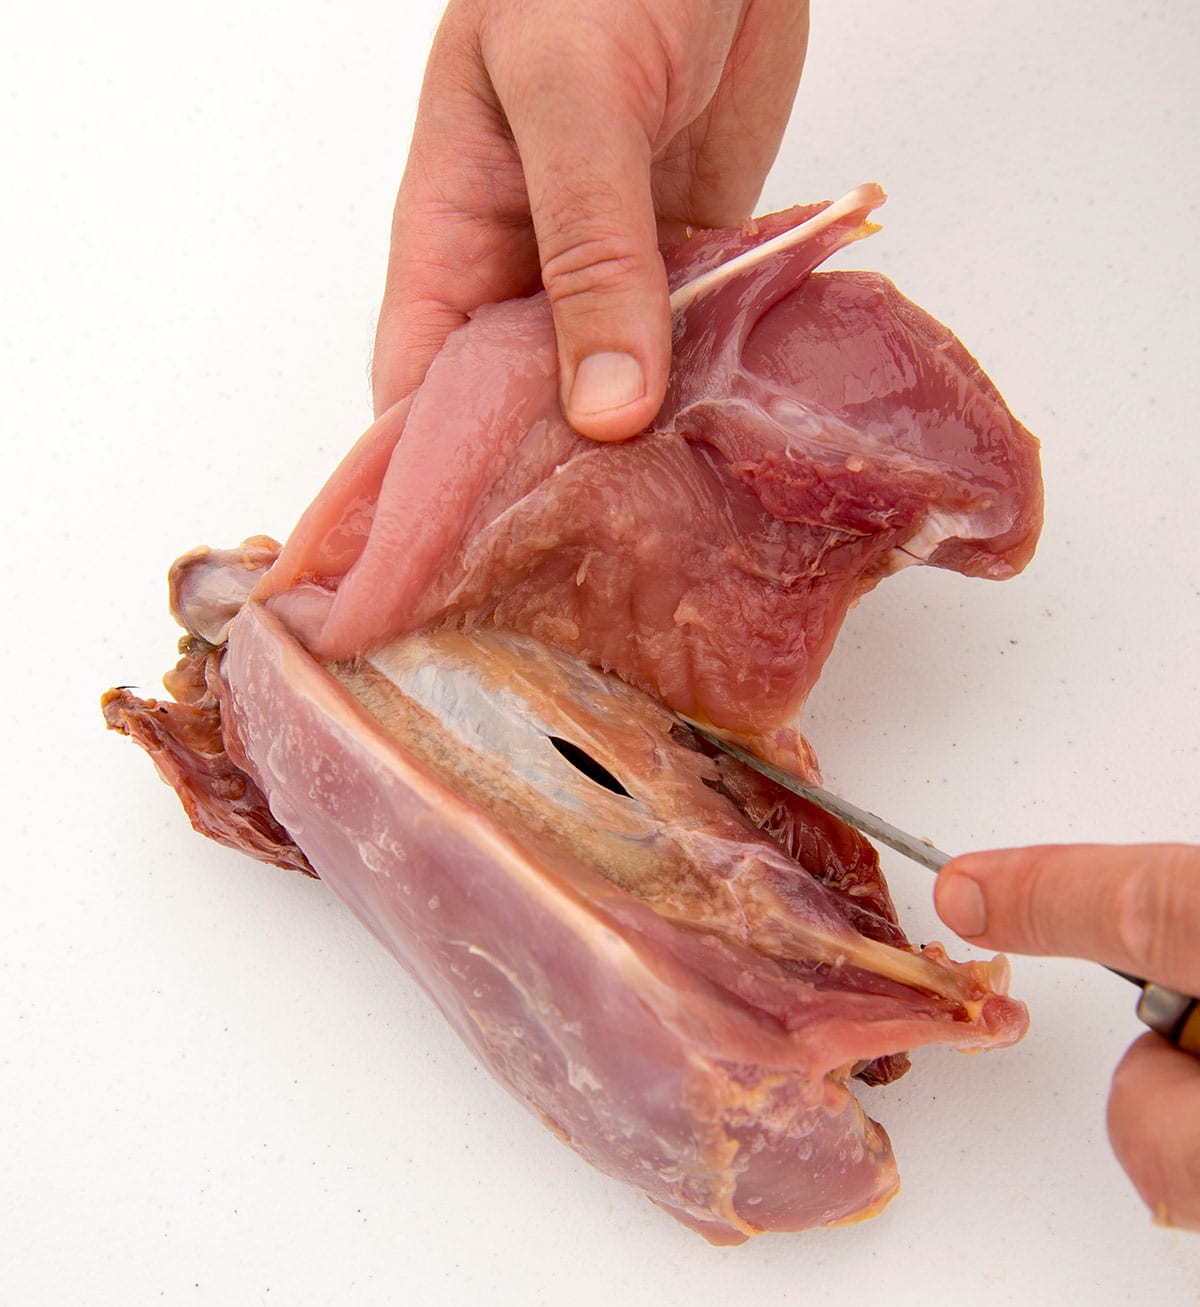
Use you knife to carefully and gently free the breast from the bones. Always have the knife in contact with the bone so you don’t waste meat. If you mess up, all is not lost: Having some meat on the bones makes a better stock or broth later.
Don’t forget to remove the tender from inside the breast. On chickens it’s the same color as the breast. On many upland game birds, it’s lighter in color. You need to remove it because if you leave the tender on the breast when you cook it, it will curl up and cause that side of the breast to cook unevenly.
I save tenders from my birds and when I have enough, I use them in their own dish, like fried tenders or in a stir fry; they are perfect in kung pao chicken.
There you go. Now you’re done.
My advice: Take your time at first, study the pictures and feel free to ask me questions. Cutting a whole chicken, pheasant, turkey or grouse is not hard. Every bird will be easier than the last one you did, and with minor changes, this technique for cutting up a carcass works with any bird: ducks, geese, pigeons, you name it.
Once you get the hang of it, it only takes a few minutes to break down a bird.


Great instructions I will try it next time,
I do have some practice and did something similar but with slighty less finesse.
The lst lot of birds I prepare were some Magpie Geese from Australia’s NT I cooked these a couple of ways , one was as a Chinese inspired stir fry Breasts fillets cut into thin strips with 5 spice which was enjoyed by my guests and ourselves. The second way was fillets sliced in half or 3rds to produce 10mm 3/8″thick slabs which were marinated in beer and rosemary then crumbed and fried – “Goose schnitzels” also a great way to try them.
A friend of mine went out goose hunting for the first time and shared some breast meat with me. Some pieces were really good, but the rest had a very off taste. There was a lot of blood clots in some of the meat. I got as much out as I could. I also brined the meat in the fridge before cooking. The smaller breasts were quite good. Does age of the goose affect the taste? Since they didn’t have experience with goose before, was there potentially something they did wrong in the field or while butchering that would have caused it? Are there other factors?
Hey Hank,
thanks for all you do! When aging a duck or goose do you gut before you hang or just leave the guts in there? If you leave them, for how long. The online blogs seem to be split on this..
Nick: I keep ducks whole but have started aging them in the fridge, so cooler temps. I gut geese, as they are a bit too big to hang ungutted; they hold their inner heat longer.
My husband brings back wild turkeys every fall and every spring. On the breast, there’s a tough membrane. We normally remove the membrane prior to cooking…. Do you do it? And if so, what’s the easiest way of doing it without butchering the poor breast?
Jackie: I remove the first layer of membrane, but leave the second. I use a very thin boning knife to do it.
Love Love Love your books!
Do you have an article on bone broth? I am wanting to try bone broth from deer and hog. And really hope you come to the National NRA meeting in May in Dallas.
Thanks. Will render the fat and make either ramen or pho stock.. No reason to let the bird go to waste. Dog will get the post-stock meat, she made a 200 yard water retrieve, so she is entitled.
Hank, what do you do with Sarcocystis birds? I shot a huge fat mallard that has rice breast. Should I just render the fat and toss the meat? Help me Obi one….
Dan: Sad. Yeah, that’s what I’d do — or use the carcass for stock. You’ll be cooking the hell out of the broth anyway and it will be perfectly safe.
Love all your tips and videos. I am a first time Wild Duck cooker from Ontario. I was thinking of roasting my ducks in my ‘WolfGang Puck pressure oven then make your simple sauce with potatoes and veg. Do you think that’s a good idea?
Duck Vergin
How do I remove the feathers from a fresh Canadian goose? can it just be skinned and not deal with the feathers? HELP asap
Janice: Yes, you can skin it, or pluck it as you would any bird. If you use the search function on this website, I have detailed instructions and videos.