As an Amazon Associate I earn from qualifying purchases.
I do a lot of pickling and preserving, and I do it for many reasons: To capture abundance, to hold onto seasons past, to transform good into great. It is this last that drives me. Most preserved foods do not outshine their fresh state. Some can be just as good, only different. But a precious few foods undergo a magical transmogrification when they are preserved.
Fresh pork leg transformed into prosciutto is a classic example. As are wine and cheese from grapes and milk. So too with fresh garlic. No matter how much I love fresh garlic, it is but a shadow of these preserved cloves. Eating them for the first time was a revelation, a culinary epiphany: I must have this garlic on hand. Always.
I did not come up with this method of preserving garlic myself. It comes from my colleague Paul Virant, a fellow traveler, cook and preservation junkie who did me the honor of hosting a Hunt, Gather, Cook dinner at his Michelin-starred restaurant Vie in Chicago last fall. It was a wonderful dinner, but Paul was just as eager to show me his preservation sanctum sanctorum, tucked away in an unused room above the restaurant.
Walls of jarred deliciousness rested there. Fruits, green things, sauerkraut. Beets of all shapes and sizes. And a set of jars in the corner stuffed with what looked like roasted garlic.
Paul remarked that they were pressure-canned hardneck garlic cloves; hardneck garlic doesn’t store as well as the typical softneck you get in the supermarket, but it is vastly superior in flavor. So Paul puts up jars and jars of the stuff.
The recipe is from Paul’s book: The Preservation Kitchen: The Craft of Making and Cooking with Pickles, Preserves, and Aigre-doux. Virant’s book is one of two preservation books out now by bona fide chefs; the other, Tart and Sweet by Kelly Geary and Jessie Knadler is also excellent. (As a side note, there is a raft of canning books on the market right now, and I would add one more “must buy” to the current crop of books: Marisa McLellan’s Food in Jars.)
But Paul goes where most other canning books fear to tread: He delves into pressure canning. This preserved garlic cannot be made without a pressure canner.
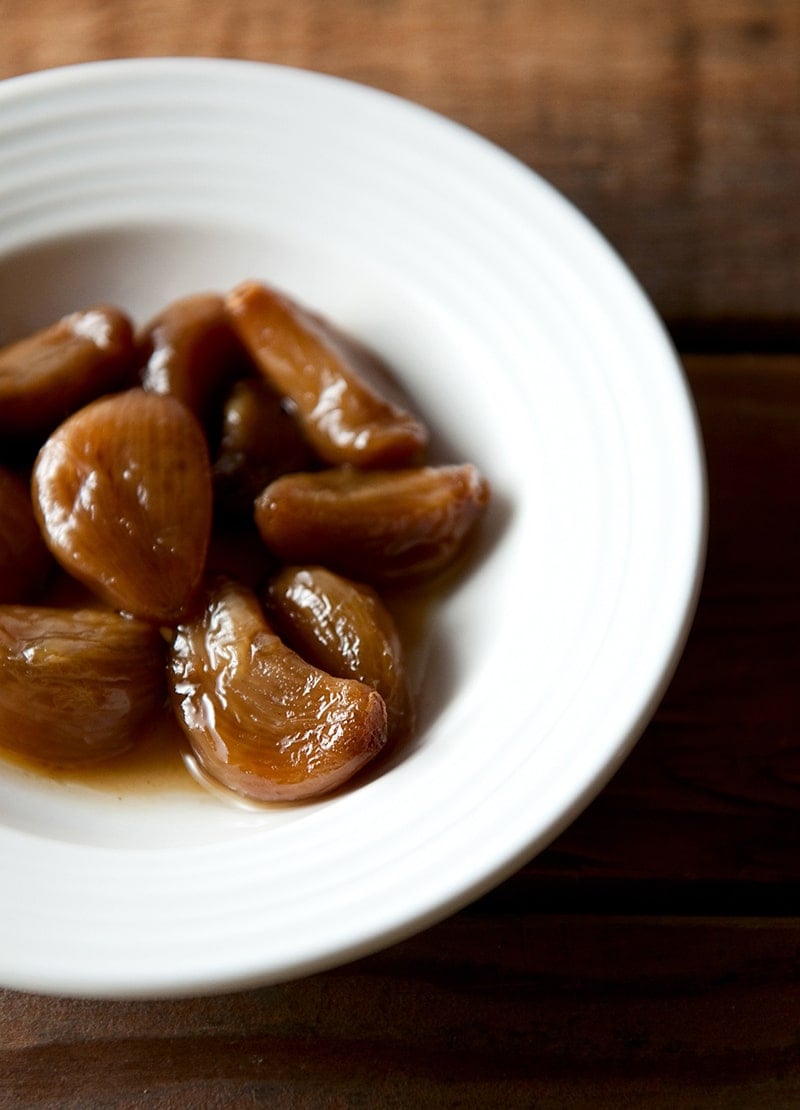
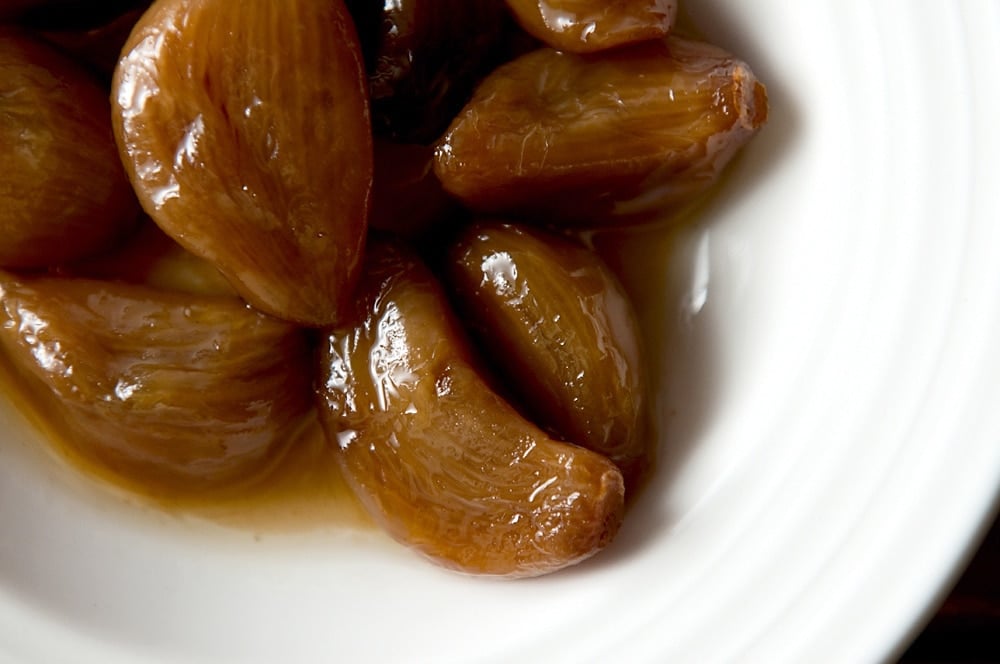
I simply don’t have words to describe how wonderful this stuff is — imagine roasted garlic that holds its shape, sweet, savory, soft, unctuous and just salty enough for you to want to eat another. And another.
I like to put a few cloves on a plate with other things, as an accent. Or you can spread them on bread. Or toss them in with eggs in the morning. They are a fantastic addition to a pan sauce.
I am posting this now because it is garlic season in most of the country. Fresh garlic is all over farmer’s markets now, and while all fresh garlic is excellent, use the hardneck variety if you can find it. It has a hard central stalk in the middle, and its cloves tend to be larger than those of a softneck.

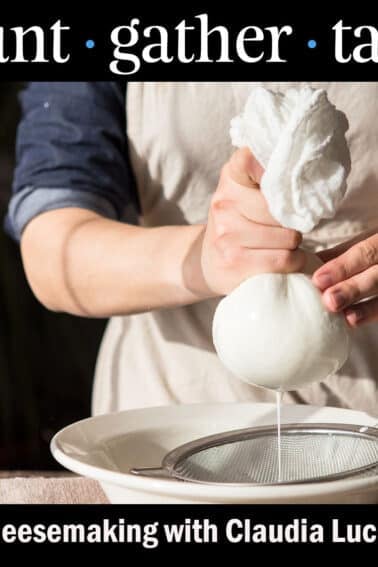
The hardest part of this entire process is peeling the cloves. But that’s not really that hard either. There is a great trick to peeling lots of garlic: Put the cloves in a bowl, top with another bowl of equal size, and shake them vigorously for about 15 seconds. The skins will all knock themselves off. (Here is a video of the process.)
The only other hurdle here is the pressure canner. If you are a hunter, angler, gardener, forager or cook, you really need to get one. They will change your life, in a good way. And all those stories of them exploding are from the 1950s. Modern pressure canners are safe and sturdy. Follow the directions carefully and you will be fine. I admit to being nervous about using the pressure canner the first few times, but I got over it.
If you make this preserved garlic, I guarantee you will, too.
Preserved Garlic
Ingredients
- 5 cups of peeled garlic cloves, about 2 pounds of whole garlic
- 1/2 cup extra-virgin olive oil
- 1 tablespoon kosher salt
- 1/2 cup sugar
- 1/3 cup sherry vinegar
Instructions
- Turn your oven to 220°F. Place 5 half-pint jars on a baking tray in the oven. (Use clean, unused lids for this recipe.) This will sterilize everything. I always put an extra jar in because yields can be variable; large garlic cloves can change things, so it's best to be ready for extra.
- In a large saute pan, heat the oil and cook the garlic cloves over medium heat. Sprinkle the salt over them. Cook, stirring often, until they begin to brown. This can take anywhere from 8 to 20 minutes, depending on the heat you're using and how moist the garlic cloves are. Once they are starting to brown, mix the sugar into the pan and continue to cook until it begins to caramelize, about 2-5 minutes.
- Add the vinegar, turn up the heat to medium-high, and cook this down for a minute or two.
- Remove the jars from the oven. Pack the garlic and the oil and juices into the jars. Leave 1 inch of headspace. Wipe the rims of the jars and seal.
- Put your pressure canner on your most powerful burner. Use your finger to wipe a film of oil around the inner edge of the canner, as this will help create an airtight seal; read your canner's directions for more detail on this. Get your tap water as hot as it will go and pour enough water into the pressure canner to come up about 2 inches. Put the jars of garlic into the canner and follow its directions to seal the canner.
- Turn the heat up to high under the pressure canner and allow it to vent for 7 minutes before setting the weight at the 10 PSI marker. Let the pressure build to 10 PSI before setting the timer. Process 10 minutes for half-pints, 20 minutes for pints. (If you are at altitude, you will need to go up to 15PSI. Follow the directions on your canner.)
- Turn off the heat and allow the PSI to return to zero before taking the weight off the steam vent. Carefully open the canner, making sure you don't get scalded by the steam. Left out the jars and let them cool before storing them in the pantry.
Notes
Nutrition
Nutrition information is automatically calculated, so should only be used as an approximation.


Hi,
so you can’t preserve this recipe using the water bath canning method? I have a pressure canner but it’s sketchy.
Emma: Nope. It’s not safe, as sometimes botulism can hang out with water-canned garlic.
Hi Hank
I want to do this recipe today but I don’t have sherry vinegar. Do you think I can replace it with any vinegar? I am thinking of using malt vinegar for its flavour
Annie: Yes, use malt vinegar.
If you make these, you have to store them in the freezer. Here’s why. Pressure cooking can kill botulism spores, but only at 121C for 30 minutes.
The UCSB Science Line website says “C. botulinum spores can be killed by heating to extreme temperature (120 degrees Celsius) under pressure using an autoclave or a pressure cooker at for at least 30 minutes.” https://scienceline.ucsb.edu/getkey.php?key=1307
Most pressure cookers have a cooking (operating) pressure setting between 0.8–1 bar (11.6–15 psi) (gauge) so the pressure cooker operates at 1.8 to 2.0 bar (absolute). The standard cooking pressure of 15 psi gauge was determined by the United States Department of Agriculture in 1917. At this pressure, water boils at 121 °C (250 °F) (described in vapour pressure of water article). The Instant Pot working temperature at high pressure is between 115 and 117C, so will not kill botulinum spores. Oil has an insulating effect, so the temperature will be lower in the jars.
According to the UC Davis Food Safety flyer, at least 4 outbreaks of foodborne botulism poisoning have occurred from garlic in oil preparations in the USA, either commercial or home made. https://ucfoodsafety.ucdavis.edu/files/250352.pdf Cases in Europe are much more common, because people store food in oil more often there.
Non-proteolytic Botulism spores can grow at refrigerator temperatures. They are responsible for most of the botulism poisoning cases that happen. See this industry paper: https://www.news-medical.net/news/20101001/New-method-for-detecting-spores-of-non-proteolytic-Clostridium-botulinum.aspx
The takeaway: IF there are any living botulism spores on the garlic after pressure cooking, it is NOT safe to store it at refrigerator temperature. You have to freeze it. Botulism spores do not grow and produce toxin at freezer temperatures. https://extension.missouri.edu/p/GH1501
The bottom line: Freeze it. Because botulinum spores are rare, you could get away with using an unsafe preparation/storage method for a long time, and then one day you could kill someone. In my opinion, it is irresponsible to take that risk when you could easily prevent that hazard by freezing your product instead of refrigerating it.
Jessica: I respectfully disagree, as this method is from a chef friend who has had this recipe vetted by food safety professionals, and has served this at his restaurants for many years. But you bring up a very good note about the Instant Pot! I use an old-school pressure canner, which hits the proper temperature, as does my friend. Very good to know that, as you are correct, those 5-7 degrees matter.
Shouldn’t have to sterilize jars in the oven, as they will be in the pressure canner for a minimum of 10 minutes, right? Thanks for the recipe, cannot wait to try it!
I come back to this recipe year after year. Once my farm share members get their allotment of garlic I use the remainder to make this recipe. The processed garlic works great in any recipe, but my husband and I love it as a spread on crackers or toast squares. This recipe was also the first time I had come across oven sterilization for the canning jars. Now, I won’t do it any other way!
Good stuff here, thanks!
I just harvested 250 hardneck from our garden. Thank you for posting this recipe. Love my pressure canner, as I don’t have to eat vinegary peppers. This garlic sounds delicious.
This sounds amazing and I really need a good shelf stable way to preserve the abundance of hard neck garlic I just harvested…my question is, can I make this without the sugar or with drastically less sugar (no more than 1 tablespoon for the recipe) without making it dangerous? What I would really like to do is add 1/2 cup of lime juice instead of the sugar and vinegar but that is probably too much to ask. 🙂
Mary: Yes you can definitely reduce the sugar. And remember, you are pressure canning this, not water-bath canning, so it can be low acid.
Hank, I’m getting 10 lbs of hardneck garlic from a local farmer next month, plan to pressure cook/can all. Question: After prepping the garlic per your recipe I’d like to follow the directions of the cooker manufacturer, which are modestly different–we have beeen pressure canning lots of stuff the past few years–venison, veggies. Btw canned venison is very good and useful, we do a lot in years we shoot numerous does. Easy and good way to use tougher cuts without laborious trimming, etc.
Mike: Ok, so what’s the question?
I only have a stove top pressure cooker. Is that an issue as long as I follow the psi instructions?
Love love love your site and cookbooks and recommend them to many folks. Most recently a very nice walnut rancher from California, I hear that has worked out well for you both.
Lynne: Check your directions. I think so. And thanks for the references! 😉
I tend to dislike sweet preserved foods. I actually eliminate sugar from most recipes except fruit breads. I’m game on attempting this without any sweetener except for the sherry vinegar. Have you done this? What do you think?
We made these a few months ago and they are so incredibly good! My new go-to recipe for preserving our growing garden crop of hardneck garlic. The amount of sweetness is perfect, friends and family have been raving about them and they are great to have on hand! Thanks Hank!
Thanks!
I really like the sound of this recipe – do you have to use a pressure canner due to the acidity level, or can you use a water bath?
Thanks!
Matthew: You must use a pressure canner.
Thank you for your reply will it also be the same as I am using smoked garlic
How long will this stay safe for storage on the shelf
Lisa: Pressure canned? Over a year.
So I made a batch of this yesterday and popped a jar today. I wasn’t really sure if I liked it or not, and then I realized that I’d eaten five cloves in about ten minutes while I was thinking about it…
I did make one mistake. The garlic I used had just finished curing. I should have used a higher heat to get the garlic browned sooner. By the time it started to brown, it was also starting to get mushy. As a result, I didn’t get as much carmelization as Hank’s pictures.
My guess is this dish will appear on antipasto platters as well as used as an ingredient in other dishes. Great stuff.
I adore this recipe! I made it last summer with champagne vinegar and it was gobbled up quickly. I’ll be making it again this year but this time I will know to make more so I’ll have some leftover to can. Thanks for a wonderful recipe. So easy and delicious!!!
Err, That’s BPA free….
Nice to know that lids are now PBA free. I’ll be tossing out my old ones.
I agree with Kim; with pressure canning, pre-sterilizing the jars and lids really isn’t even necessary. When properly done, the process of pressure canning sterilizes the jars and its contents. I’d say just make sure your jars are cleaned of unwanted matter before you fill them with the food you wish to can.
I couldn’t live without my pressure cooker/canner. I use mine almost every day and sometimes 2-3 times a day. For cooking whole grains and beans, using a pressure cooker cannot be beat! If you don’t have one, get one now! It is easily the single most important tool in my kitchen- besides the sink and the stove.
Just an FYI: since this recipe was posted there have been a big change in the lids available in the US. Ball/Kerr changed their lids to be PBA free and in the process changed the handling procedure. While not previously true, now having them in the oven at 220º to sterilize them will cause a seal failure. I would simply clean them well and go as directed even the 10 minute processing time in a pressure canner (for half-pints) should sterilize them.
Kim: Thanks! Will fix it in the recipe.