As an Amazon Associate I earn from qualifying purchases.
With the possible exception of a whole dry-aged ham, to my mind salami is the highest form of the butcher’s art.
The careful crafting of raw meat, salt, spices and time create something very different from a fresh sausage. It is not crazy to call it alchemy. But making salami is no joke. It takes time, an attention to detail (and sanitation), plus a careful eye to troubleshoot problems. Doing this at home is not for beginners.
But when you do pluck up enough courage to make your own at home, this is the salami recipe you should start with. It is the classic, the “little black dress” of a salami, flavored only with salt, black pepper and a bit of garlic. The meat is the star here, not the spices.
Every salami-making culture makes a version of this sausage, and recipes are similar whether you look to Spain or France or Italy or Hungary or Germany — although these last two nations tend to smoke their salami, too.
If you’ve never made fresh sausages before, bookmark this recipe and come back when you’ve made a dozen or so batches. You need to be comfortable with the basic sausage-making process before you take the step of curing them. You also need some special equipment. Don’t try to shortcut salami making. You will pay for it eventually.
First, you need a good grinder. For small batches I use the KitchenAid grinder attachment, but with anything larger than 5 pounds, I use a Weston grinder. You need a sausage stuffer, too. Can you hand-cut the meat and fat? Yes, but it requires a sharp knife and an awful lot of patience.
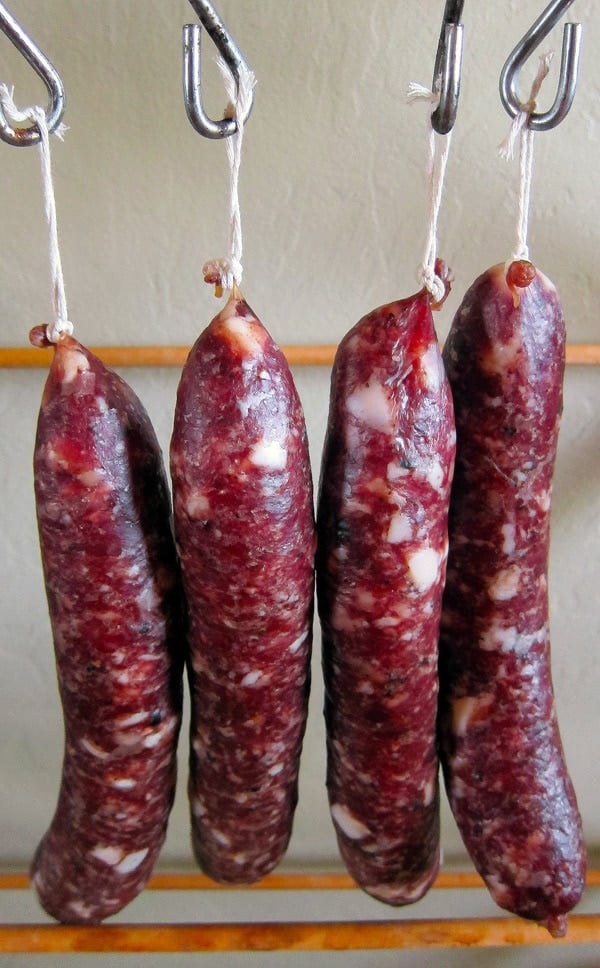
To hang your sausages for the few days it takes to ferment them, I use a simple wooden clothes rack. I also buy “S” hooks from the local hardware store to hang the links. You’ll also need a humidifier both for the fermentation process and while your links are drying. I use this one , and it’s worked well for me for 3 years now.
Finally, you must have a curing chamber; my friends at Elevated Wild have a DIY tutorial here, and I use a fancy Dry Ager, which ain’t cheap, but it’s great.
The salami-making process is this: You make sausage, only with added sodium nitrate (Instacure No. 2) and a starter culture, then ferment the sausages at room temperature for a few days to let the good bacteria in the starter beat back any bad bugs within the meat. Do you need these? Absolutely.

Yeah, I hear you: “But can’t salami be made without them?” Yes. But you can’t. The people who can work in places where they’ve made salami for decades or even centuries, and the ambient air has the good bacteria already; it’s like a sourdough. For you and me, nitrate and starter culture is an insurance policy against botulism and listeria.
The last stage is to hang the links to dry out slowly in the chamber or in a basement.
The key to successful drying is to let the sausages dry slowly, little by little. Why? This does two things: First, you prevent the dreaded “case hardening,” where the outside of the salami dries too fast and prevents the interior from drying properly. And second, the longer you cure your salami, the better it will taste.
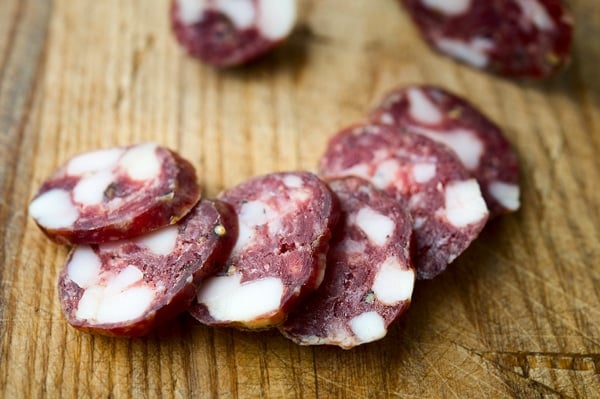
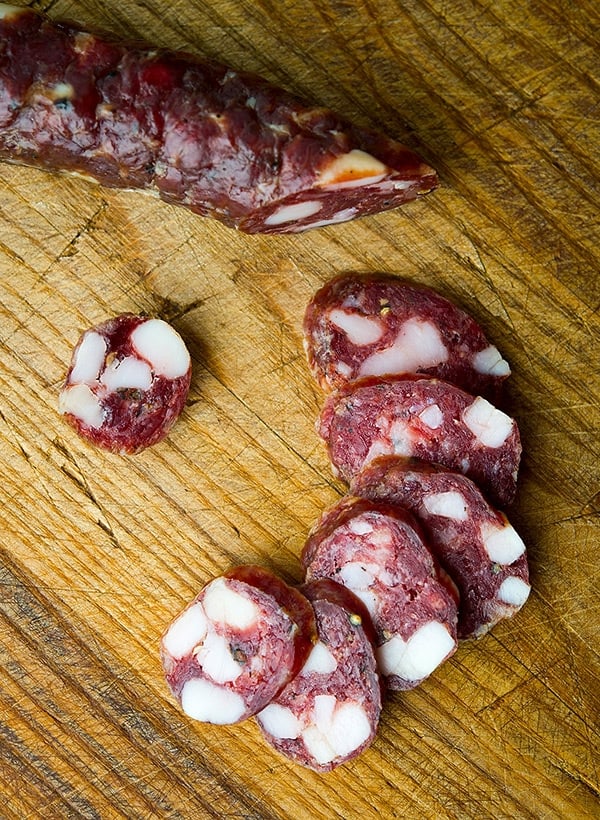
Truly great salami has a distinct funk to it, like cheese. I’ve made a lot of decent salami, some mediocre and a few crappy ones. Only once in a while does everything work perfectly. The batch of wild boar salami in these photos was one such time. I cured these links for more than 2 months, with slowly decreasing humidity until they had that sweetish meat funk we all know and love.
Don’t know what I am talking about? That’s because 90 percent of all salami made in the United States is not cured long enough. It’s fine, but hasn’t had the time to develop. We Americans are always in a hurry.
Follow this recipe, get decent equipment, and you should be fine. But remember: Sausage making is a sprint, salami making is a marathon. You must be careful and clean at the start — remember we’re dealing with raw pork here — and you cannot forget about your salami while it cures or you may be very, very sad. Still, this ain’t rocket science.
You can make salami at home, and when you do, it is one of the most satisfying things you can make with your own two hands.

This is my master recipe for making salami. It works well with most meats, and over the years I’ve done it with pork, wild boar, venison, duck, goose, bear and lamb. The fat is always pork fat, with rare exceptions.
If you have something against pork, use the fat trimmed from lamb or beef steaks and roasts, not suet or kidney fat, which is too waxy.
There is no substituting the Instacure No. 2 in this recipe. Nitrate has been used in salami making for 2000 years, and I don’t intend to break that tradition. And for those of you freaked out by nitrates, know that a serving of spinach or celery will give you 100 times more nitrates than you will get by eating this salami.
As for the starter culture, I know it’s a lot. Technically you could cut the amount of culture a a few grams, but you’d need to make sure the meat is really well mixed to get it distributed right. The amount I use is essentially the “better safe than sorry” approach. If you want to use less, that’s on you.
Finally, I prefer using really wide hog casings instead of beef middles, as is customary in Italy. Why? They’re easier to cure, and are still plenty wide enough to get a nice slice.
I get my wide hog casings, starter culture and Instacure all online from Butcher and Packer.
Basic Salami
Ingredients
- 4 pounds pork shoulder or wild boar meat
- 1 pound pork fatback
- 51 grams salt
- 6 grams Instacure No. 2
- 12 grams sugar or dextrose
- 1 tablespoon coarsely ground black pepper
- 2 tablespoons minced fresh garlic
- 1/3 cup red wine
- 1/4 cup distilled water
- 5 grams FRM-52 starter culture, or T-SPX culture
- Hog casings, preferably 38-42 mm wide casings
Instructions
- Start by setting out 1/2 to 2/3 pound of the pork and dicing it fine. I like doing this because it varies the grind within the sausage from very fine to chunky. To me, this is more interesting. You can run it all through the grinder if you prefer, or if you think someone will get all crazy if they see big pieces of fat in their salami. Cut the remaining fat and meat into chunks that will fit into your grinder. Trim as much sinew and silverskin as you can.
- Put both the diced and chunked fat into separate containers in the fridge. Mix the salt with the meat and put it in the fridge overnight. This helps develop myosin, which will give you a tighter bind when you stuff the links later.
- The next day, put the fat and your grinding equipment -- blade, coarse and fine die, etc -- in the freezer. Mix the Instacure, garlic and half the black pepper into the meat. Put that in the freezer, too. Let everything chill down until the meat hits about 28°F or so. It won't freeze solid because of the salt. Normally this takes about 90 minutes. While you're waiting, soak about 15 feet of hog casings in a bowl of warm water, and put the red wine in the fridge.
- When the meat and fat are cold, take them out and mix together, but keep the diced fat separate for now. Grind 1/2 to 2/3 of the mixture through the coarse die of the grinder. Grind the rest through the fine die. I do this to vary my grind, which makes for a better texture in my opinion. Sometimes I do 3/4 fine and 1/4 coarse, depending on my mood. The key is variability.
- Put the meat and fat back in the freezer while you clean up. Dissolve the starter culture in with the distilled water.
- When the meat mixture is back below 35°F, you can mix it. I put the mixture into a big plastic bin with the diced fat, the remaining black pepper, the red wine and the starter culture mixture and mix it by hand for about 2 to 3 minutes. If you do this, you'll know the mixture's cold enough if your hands ache from the chill. Or, you can put everything into a big stand mixer and mix on low for 90 seconds to 2 minutes. I prefer to mix by hand.
- Put the sausage in the fridge while you clean up. Run some clean water through your casings to flush them and to see if you have any leaks. Cut lengths of casing of about two feet to 30 inches and set all but one back in the water. Thread the one onto your sausage stuffer.
- Pack the sausage into your stuffer and get ready to make the salami. Leave 4 to 6 inches of casing hanging from the edge of the stuffer as a "tail;" you'll use this to tie off the salami in a bit. Start working the meat into the casing, using your fingers to flush any air out of the casing and to regulate the flow. I prefer straight links of about 10 inches to a foot. Remove the link from the stuffer and repeat with the remaining casings and sausage.
- Now gently compress the meat within each casing, watching for air bubbles. Heat a needle or a sausage pricker in the flames of your stove to sterilize it, and prick the links to let any trapped air out. Tie off both ends of the link in a double or triple knot (you don't need a specialized butterfly knot with hog casings) and then tie a loop of kitchen twine to one end, making sure the twine knot is underneath the casing knot you just made: This will prevent the twine from slipping off. Hang your sausages from "S" hooks or somesuch on a wooden rack.
- To ferment your links, you will need to keep them warm and moist. I do this by putting a humidifier under the hanging sausages and then tenting the whole shebang with big garbage bags that I've sliced open on one end. I also use a water sprayer to spritz my sausages a couple times a day. Doing this prevents the casings from hardening. Keep your sausages hanging at room temperature (65 to 80°F) for two to three days.
- Now you need to dry your sausages and turn them into salami. Hang them in a place that is about 50°F to 60°F with about 80 to 90 percent humidity. In most cases you will need to put a humidifier under your links. I also spritz them with water once a day for the first 2 weeks. After the first week of hanging, drop the humidity to 70 to 80 percent. On the third week drop it again to 65 to 70 percent and hold it there until a total of 5 to 10 weeks has elapsed since the salami went into the chamber.
- You now have salami. To store long-term, vacuum seal them individually and keep in the fridge. They will last indefinitely this way, and the vacuum sealing will keep them from becoming rock hard. You can also freeze them.
Notes
Nutrition
Nutrition information is automatically calculated, so should only be used as an approximation.


Thanks mate, fingers crossed. Im working away on and off at the moment which is a pain, but the girl has a good eye on em for me.
Pretty sure they’ll be deerlicious.
Cheers
Hi hank,a question. Im doing this recipe and have followed it precisely. With the exception of a few fennel seeds added and… up until the point you put the product in the temp/humidity controlled unit.
Im going old school on it and am aware of the potential perils.. no time for a fridge project right now unfortunately.
So basically the links are hanging in a cool dark garage in a fly meshed box suspended from the rafters. We are at 1000m here and just coming into spring. Evenings are still chilly with daytime temps averaging about 10(celsius) at the moment. Humidity is sitting safely it seems, between 70 and 85.
My question is: how will the lower evening temps affect the salamis? This morning it was 3 degrees in there.. so basically a fridge.. as far as I can figure its just going to take longer for the entire process to unfold. But am unsure and not finding a lot of reference to it from uncle google.
Thanks
Pottsy: I think you are right. So long as it does not freeze or get too warm or too dry, you should be fine.
Hank,
First I have to really thank you for the info and the recipe. I made this recipe almost to a t about 2 months ago and everything seems to have come out correct.
My only question is about the smell. What should it smell like if it is done properly?
My salami smells. I don’t know how to describe it other than it smells, and I don’t know if that is normal or not since this is my first batch. Can you give me an idea of what it should smell like?
Thanks!
Kevin: It should smell meaty and a little funky.
Can you add alcohol to basic salami recipe?
Shane: Yes. I often add wine.
Thanks for the answers Hank. I have 2 more small questions. And I’m making this recipe today so we’lol see how it comes out.
1. Any reason you don’t use dextrose? I see that frequently in other recipes.
2. I bought bactoferm f-lc by mistake. Do you think that will work the same in your recipe? Everything I have read points to yes with the possibility of a slight flavor difference.
Thanks again for helping out with this recipe and by answering questions!
Kevin: You don’t necessarily need dextrose to make salami, but if you want, add 10 grams. Yes, you can use F-LC. Definitely add the 10 grams of dextrose in that case.
Is there anywhere besides a refrigerator where you are able to get the temperatures down to 50-60 degrees F? I have an old commercial refrigerator that doesn’t work. Rather than try and spend $1300 to get it fixed, I was hoping there was some other way to cool it – maybe with some small air conditioner? Thoughts? What do you use?
Chris: I use a cheap, $75 fridge I bought from Craiglist. Do you have a basement? That would be traditional…
Hi! I have been getting more and more in to charcuterie making over the past few months and am ready to make the jump to salami making. one question, this recipe calls for 20g of the bactoferm, I have seen other recipes that call for a lot less and the package from SausageMaker.com says that one 25g packet makes 220 pounds. Why do you use 20g for only 5 lbs of Salami? Is it just for safety? If so I am totally game to use that much, just wanted to see what your thoughts are.
Kevin: It’s in the “better safe than sorry” camp. Yeah, I’ve used less starter, but I want to be double dog sure it’s well distributed through the meat.
I’m super interested in your blog. Just getting into this delectable hobby. My wife has epilepsy as well as a somewhat weak immune system which is why we (and many other people) stay away from nitrites and nitrates. I think that by saying a person gets just as much if not more nitrates from spinach or celery is only a half truth. Your body reacts differently to natural vs. synthetic nitrates and people need to know these things. Sadly, folks these days will often believe something just because they “read it somewhere” and won’t do their own research. Thank you for all the information you offer us, I’m looking forward to learning much from you!
Eli: Can you show me evidence of your statement that the body reacts differently to celery-based nitrite vs. Instacure?
Thanks so much Hank, I really do appreciate your response. I decided to let half of them sit out for 2-3 days and put the other half right into the curing chamber just in case. Also did one with the Umai plastic wrap. I’ve used that a few times with success, I think. Any thoughts on the Umai? Thanks again
Thanks for the article. I’ve just made my first batch of Salami last night and as I was cleaning up I looked at the bactoferm package and saw that it needs to be frozen. I had not frozen mine, and it was our for about 6 weeks at room temperature. Did I blow the whole project? Or can this be salvaged? Thanks so much, Andrew
Andrew: It should be OK. At room temperature the starter culture will last at least 4 months. The spec sheet says at temperatures above 1°F you get 6 months.
Hank, I’m ready to make salami. I built a cold smokehouse that will double as a good area to ferment the salami. Do you have any recommendation for smoking salami? smoke for a day after fermenting or do you believe it should be skipped? favorite Wood flavor? What kind of red wine do you recommend?
Aaron: Smoke after fermentation but before the long hang time. Wood flavor depends on the salami, but I am partial to cherry.
Lookin forward to making a batch of salami with great anticipation. Been cooking and scratch making recipes for a good while, so this recipe is a good start into charcuterie for me and the wife! I am a disabled vet who stays home and does all of the cooking, and this should really expand some of my menu options for weekend snacks and dinners.
Wheelchair Bob
Can this be done without using Garlic? My son is alergic to the stuff.
Nicholas: Of course!
Myself and kids luv salami.i have mad jerky b4 and I want to take salami on.i think I need to watch and learn cause I’m not much of a reader.
Awesome site! Just a question, no dextrose in your salami? I’ve always heard to use dextrose, but that’s with a 90 degree ferment under smoke. This, I suppose is a more authentic recipe than what I’ve used.
Charlie: Nope, not in this recipe. If you want, you can add up to 20 grams of it. It shouldn’t change too much.
Hi there, me again ! Sorry for another newbie question, but is it necessary to add some dextrose to feed the starter culture ? I’ve just noticed that quite a few salami recipes call for some dextrose. Many thanks for your help in advance !
Alex: Yes. But you can use regular sugar, too. Use a little more than I call for with dextrose.
Where can I get pork back fat? I’m in calif can I order it from somewhere or is there something else?
Any big supermarket can get you pork fat. Just ask. But a better option is a butcher shop. They will all have it.
Hank, I have read your blog with enthusiasm and high hopes for some time. So first, thank you for providing inspiration for making delicious food with personally obtained meat.
I was hoping you could provide a resource for how to dress/butcher wild boar as I may soon have an opportunity to hunt for these in North Carolina.
Again, thanks for writing!
Great post ! I’d love to make this myself one day (I’ve done a few beef salumi projects before) but I live in an area where trichinosis in pork is still a risk; is there anything that I can do to deal with this ?
Sure. Freeze the pork for a month first. My wild boar has that same risk. The other option is to increase the salt in the salami to 3 1/2 percent by weight, which will kill the parasites. That makes a pretty salty salami, though, so I prefer to freeze instead.
New subscriber, first time commenter, here. I just wanted to take a moment to tell you how much I love your posts. Even when I might not be interested in making a particular product, or don’t see how I could with my time and materials, nevertheless, I am always so impressed by your clear and complete directions! Thanks.