As an Amazon Associate I earn from qualifying purchases.
If you want to learn one duck leg recipe, this is it. Easy roast duck legs, and when I say easy, I mean so easy it’s barely cooking.

This duck leg recipe is intended to get you close to the luxury that is confit: tender, melt-in-your-mouth meat with crispy skin. It will work with all store-bought duck legs, as well as with wild ducks and especially wild geese.
I love duck confit, but it can be a project. These easy roast duck legs are very much like it, but it’s a far easier way to roast duck legs than traditional confit, which requires salt and time.
Confit, pronounced “con-fee,” is a French method of preserving meats by salting them down to remove moisture and then cooking very slowly in their own fat. It’s wonderful stuff, and I have a recipe for duck confit here. Why is it wonderful? because you get meltingly tender meat topped with cracker-crispy skin. It’s salty, meaty, easy to eat with a bonus of crisp — and humans are hard-wired to like crisp.
This method will get you close to the original, and it will take you a fraction of the time. The trick is to roast the legs in fat, in a small container that will just barely hold however many legs you happen to be cooking. This, more or less, will ensure that your legs are cooking in a bath of fat, not in the hot, dry air which will desiccate a wild duck or goose leg.
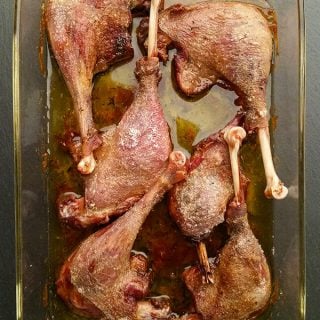
I used the legs from specklebelly geese in these pictures, and I recommend them highly. Canada geese, snow geese, and the legs from big ducks like mallards, canvasbacks, pintails etc. are also good choices, and of course you can do this with store-bought ducks and geese.
You want the skin on them, however. If, for some reason you have skinless legs, you will need to totally submerge them in the fat — and skip the crisping part in Step 3 of the recipe below. Snow goose legs cooked this way, then shredded, are amazing.
Try this duck leg recipe the next time you come across duck legs in the market, or have a good day duck or goose hunting. You will not be sad.

What do you do with your duck legs once they’re cooked? Eat them as is. So damn good. Crispy skin, meltingly tender meat, all they need is a bit of citrus or vinegar to balance them out.
Or you can shred the meat and put it into pasta or a salad, or in a tortilla, or in a sandwich like pulled pork BBQ. It’s incredibly versatile.
Easy Roast Duck Legs
Ingredients
- 2 to 3 pounds duck legs (or goose legs)
- Salt
- Duck fat, butter or lard
Instructions
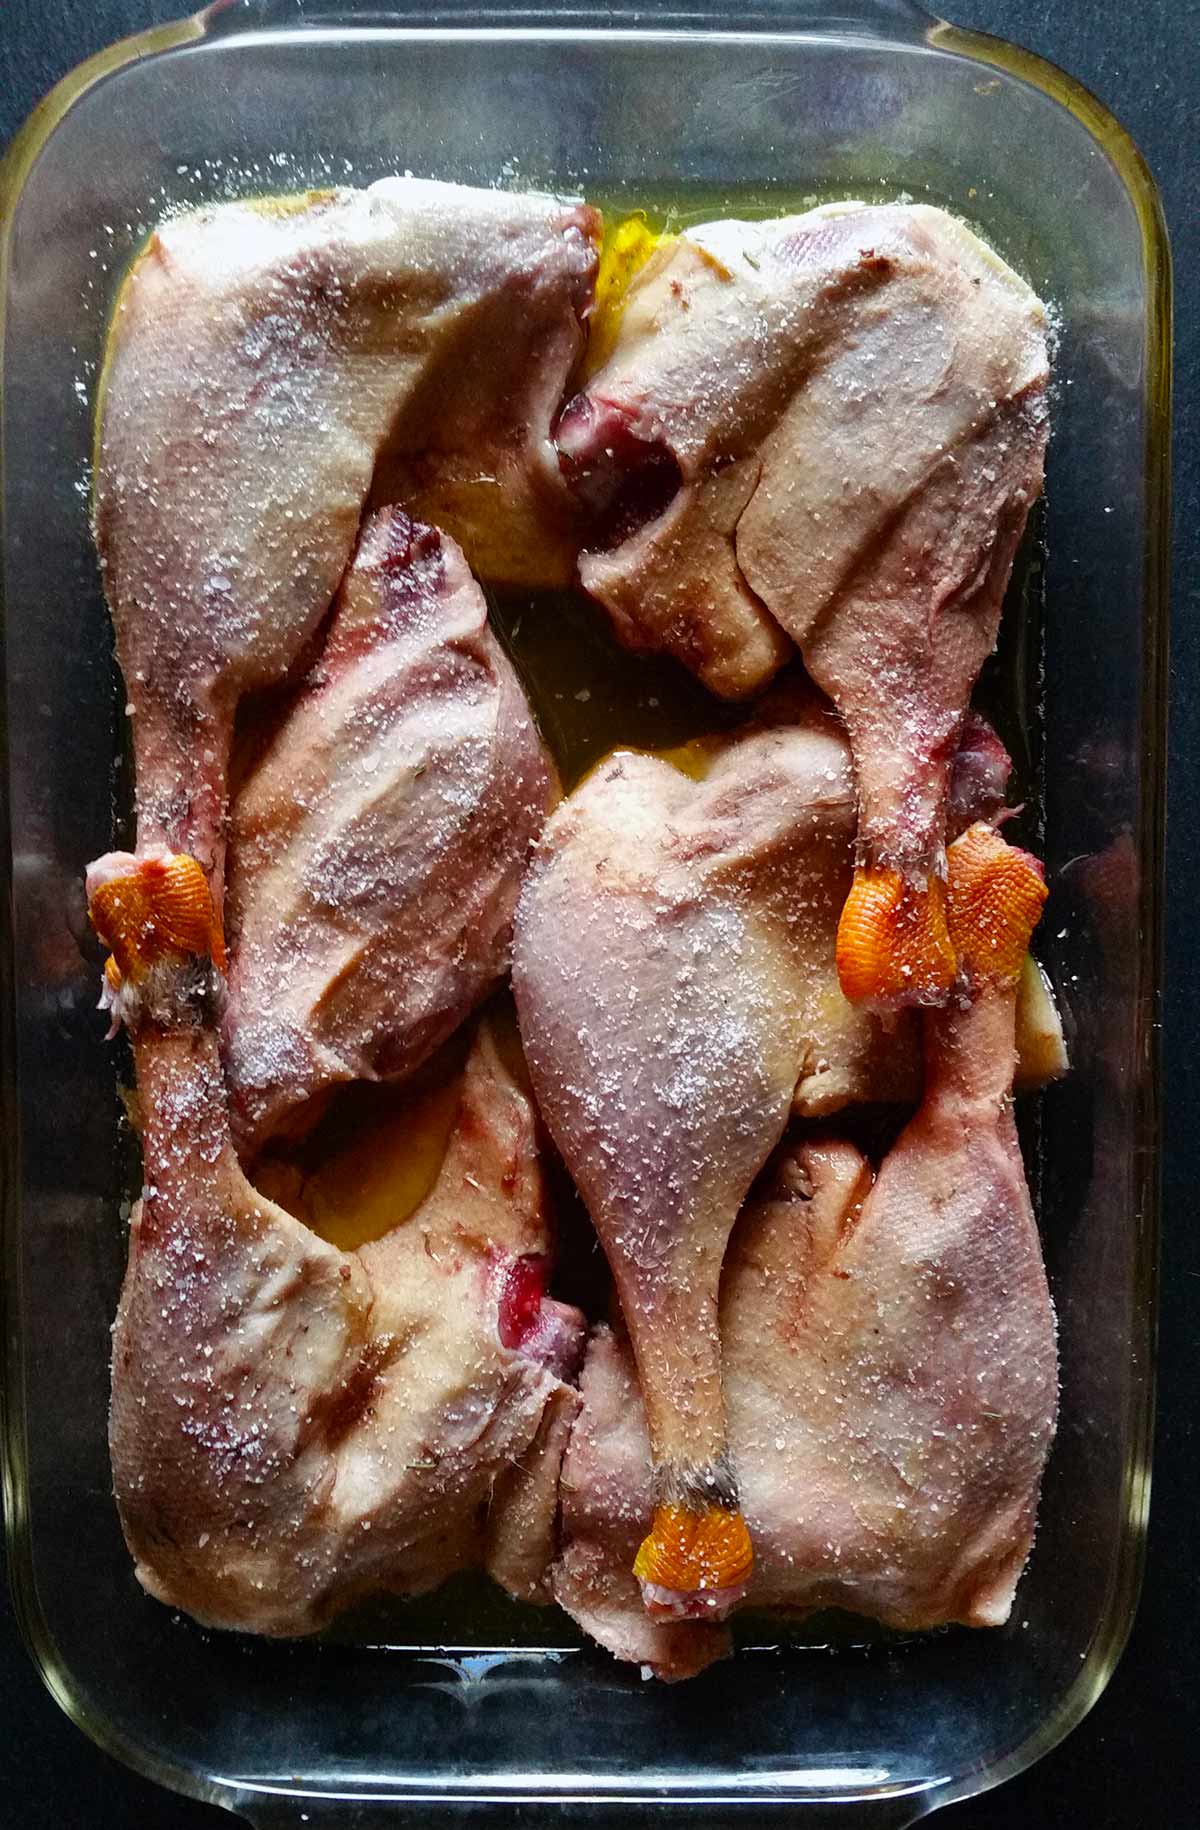
- Pat the duck or goose legs dry with paper towels. If you have store-bought duck legs, prick the skin of the duck all over with a needle or the point of a sharp knife. Do not pierce the meat itself. Piercing the skin gives the fat a place to seep out. Salt your duck legs well and set them aside, skin side up. Let them come to room temperature for at least 30 minutes and up to 90 minutes.
- Put the legs in a small casserole. How small? You want the casserole to be just big enough to hold the legs. Now you need some fat. If the legs themselves are fatty, you will only need to pour a thin sheen of oil or melted duck fat on the bottom of the casserole, then place the duck legs close together, but not overlapping. If the legs are skinny, add enough fat to come about 1/4 inch up the sides of the dish.
- Put the casserole in the oven and turn it to 300°F; if you have a digital oven, you could even go down to 285°F. Do not preheat the oven. Every duck has a different level of fat, so doneness is more an art than a science. But it will take at least 90 minutes, and probably two hours, and even 3 or 4 hours won't hurt them. After 90 minutes, check the duck: It should be partly submerged in melted fat and the skin should be getting crispy.
- When the skin is starting to look crispy, turn the heat to 375°F. Check after 15 minutes. You’re looking for a light golden brown. Remove the casserole from the oven and let cool for 10 to 15 minutes before eating. Save the accumulated fat for cooking vegetables, other meats or for keeping your skin shiny. I strain the fat through a paper towel, but you really only need to do this if you are saving the fat for several weeks or months; strained, it will keep for 6 months tightly covered in the fridge. Well wrapped, the duck meat itself will last up to 2 weeks in the fridge.
Notes
Keys to Success
- You need the meat to swim in fat. It won't work otherwise. If the notion of that much fat frightens you, you can use chicken or duck stock in a pinch. Not as good, but it will keep the legs from drying out.
- Once made, any of the sauces on this page will work well with your duck legs. Or go simple with black pepper and citrus.
- Your duck legs will keep a week in the fridge, and freeze well.
- To reheat, set them under a broiler or toasted oven to re-crisp the skin. The meat is perfectly good at room temperature, so you'll only really want to get that skin nice again. No need to overcook the legs on reheating.
Nutrition
Nutrition information is automatically calculated, so should only be used as an approximation.


Skin side up or down?
Casserole covered or not?
Remember, people are coming here to learn how.
Alyson: I mean, you can see the pictures, yes? Skin side up no cover.
This recipe is incredibly reliable and easy! I found it here: https://www.simplyrecipes.com/recipes/easy_duck_confit/ In spite of cooking this at a low temperature, it splatters quite a bit (even though I will periodically pour off some of the fat. When looking up duck legs and splattering, cooking on a rack is suggested, and adding some water to the pan. It seems that this would break this technique. Any suggestions about managing the splatter?
Kenny: I often put some broth in there at the start, maybe an inch deep. That helps. But at the end, where you crispy the skin, there will be spatter. Kinda the price of admission…
Does this require me to cover the casserole dish or cook uncovered?
Johanna: You cook uncovered.
The timing is described very confusingly to me. First it says that it can cook for 3-4 hours. But then that as soon as the skin gets brown, I take it out and let it rest 15 minutes before serving. Then how can I sensibly make any planning? Maybe it is ready after 90 minutes, maybe after 4 hours. That does not work if you want to entertain guests.
Tommy: Wild foods are variable. You have no idea how old the birds were, so I can’t tell you how long it will take. But you can certainly slow cook them until they’re all tender, turn off the oven, then keep them until your guests arrive.
Delicious! Serve with either a port reduction or a plum sauce.
Hello, can you please indicate if your oven temps are for convention or convection (fan forced). Looking forward to trying this recipe. Thanks.
Lena: I have never used a convection oven, so all temps are regular oven.
OMG was this the perfect recipe for duck legs! I followed it completely and we feasted on duck legs that were as wonderful as any duck confit I’ve had at a restaurant. THANK YOU. This will be my go-to way to cook duck legs from now on.
Came out perfectly. I did it at 285 for about 2 hrs for two legs. I tucked a few potatoes and some garlic cloves with their paper on. Finished at 375 for 15 mintues. Made a simple sauce of mirin and pomegranate molasses (Lebanese/middle eastern stores) and fantastic!
Absolutely magnificent! I’ve confited duck legs before, but this is almost as good and WAY easier. Came our perfect. The wings were amazing done this way as well. Many thanks.
Would the wings be good done this way?
WOW! Delicious and easy to make. Thank you for coming up with this technique. I used my air fryer/oven for this duck. I set the super convection temp at 280 degrees for 60 minutes. The skin was light brown and crispy. I then raised the temp to 350 degrees for 15 minutes for extra crispness. Wonderful flavor, fall off the bone delight.
Made two duck quarters last evening using this recipe. It’s easy, it works, and the duck was fall apart tender, succulent, the best duck or any fowl we’ve had ever! Can’t wait to make it again. And it only took about 2 1/4 hours and less than 1/2 cup of fat (used lard, didn’t have duck fat–it was still delicious!). Duck legs and this recipe will now become a staple in our household.
All the goose legs in my freezer are skinless, but I’ve got plenty of fat. Is this worth trying with skinless legs?
William: Yes. Keep the legs mostly submerged though.
what kind of oil should I use if I dont have duck fat? thanks
Kristina: Lard, butter, or olive oil would be my choices.
Superb! First time trying duck like this. Gosh! What a difference in flavor and texture! You rock, Hank!
Oh My GAWD! I FN love duck, and almost all of Hank’s recipes… However, this is next Ducking level!! H.S. I have no idea how many times you had to screw this up to get it so perfect! My new favorite way to cook farmed duck legs!! I never have enough wild duck to try anything more than confit, but next year I am hunting harder just to try this with multiple species! Thank you for D(F)ucking rocking Duck Bro!
Hi,
I would like to cook the ducklegs in advance and then finish in the oven to warm them and crips up the skin just before serving. Does the cooking time change?
thank you
Heike: Yes, I’d shave off about 45 minutes in cooking time. You could also cook them fully, let them cool in the dish, then reheat under the broiler.
My husband wanted to try something different for Thanksgiving this year so I made duck legs for the first time. I followed your instructions exactly, and they were absolutely delicious – perfectly cooked, with crispy skin and moist, tender meat. I also used your recipe for Cumberland sauce and it complemented the duck beautifully. Can’t thank you enough. 5 stars!!
can you cut up a whole duck and cook it the same way?
Cyd: Yes… but I personally dislike breasts cooked this way.