As an Amazon Associate I earn from qualifying purchases.
If you are interested in making homemade sausage, you are in the right place. I have been making sausage for decades, and I’d like to share with you my comprehensive tutorial on how to make sausage at home.
I’ve learned a lot in the decade-plus since I first wrote instructions on how to make sausage. Each year I learn a new tip or trick, a bit more about meat science, how to get a better bind, which casings are better than others, etc.
This will be a fairly comprehensive article on homemade sausage, meant to get you started, with a sample sausage recipe at the bottom. But understand that making sausage is a process, one you will not perfect the first time out. Perfection comes with practice, precision, plus a little luck.
Table of contents
Why Make Homemade Sausage?
Fair question. After all, even small supermarkets sell several kinds of sausages. The reason is that making your own gives you control. Control over the meat and fat, control over the seasonings, control over the grind, the size and thickness of the links, control over whether your homemade sausages are smoked or fresh.
Anyone reading this who hunts or raises livestock will also want to learn how to make sausage. After all, it’s a wonderful thing to make when you bring home a deer, or some ducks, a mess of pheasants, or after your annual hog slaughter.
Making sausage can be as easy or as hard as you want. Whipping together a batch of homemade sausage without casings is as easy as making meatloaf, which is very similar actually.
Casing links is a little trickier, but it ain’t rocket science. Oh, and yes, there is a little science to know about sausage making.

Basics
At it’s core, sausage is meat + fat + salt, kneaded until it binds to itself. That’s it.
Obviously most of us want to add more seasonings, or maybe stuff the sausage into casings. Or smoke it. We’ll get to all of that below. Let’s break the magic equation above down to its components.
Meat for Homemade Sausage
Any meat will do. I’ve made sausage with lots of weird things, from woodcock and beaver to standards like pork, beef and chicken. I’ve even made fish sausages. My collection of sausage recipes is broken down by general meat type, so that should help you choose one after reading this tutorial.
Unfrozen meat binds to itself better than thawed meat, and pork binds to itself better than other meats. A good compromise is to use your thawed game meats and some never-frozen pork shoulder or belly.
The gnarlier the meat in terms of connective tissue, the more times you will want to grind it. Most sausages I make are ground twice. More on that in a moment.
Fat in Making Sausage
Let’s talk fat. Homemade sausage almost always has pork fat in it, because, well, it’s superior to other fats in terms of melting point, availability and flavor. The best pork fat is fatback, off the back of the hog. Belly is OK, but a little soft. Shoulder is a nice compromise and easy to get.
Leaf lard, or any fat from the interior of any animal, will be harder than fat on the outside of the animal. It’s so hard — meaning it has a higher melting point — that I won’t use it from lambs, goats or cattle, whose fat has a higher melting point to begin with.
Oh, and if you want to use fat from deer, elk, moose or any other cervid, read my article on cooking deer fat here. Short version: Use very little in homemade sausage. Note: pronghorn aren’t cervids, so their fat is fine to use.
Beef fat, or that from other bovids like bison, nilgai, oryx, yak or musk ox, is perfectly fine when harvested from the outside of the body cavity. It can be too hard when taken from the inside, but it does depend on the animal’s diet.
Bird fat is too soft for making sausage, unless you are making an emulsified sausage, like a hot dog.
Never use lard. Previously rendered fat won’t work in normal homemade sausage.
In terms of percentage, you will want no less than about 15 percent, and no more than about 35 percent. I shoot for about 20 to 25 percent normally.
Salt and Curing Salt
You need salt to make sausage. Period. The very word sausage comes from the Latin salsus, meaning “salted.” My recipes use kosher salt because it’s readily available and lacks additives like anti-caking agents, which can mar the flavor of your links.
I use Diamond Crystal kosher salt. If you use it too, my volume measurements will be the same. Morton’s kosher salt is cut differently, so volumetric measurements won’t be the same — you’ll have to go by weight.
Which is why salting by weight is way, way, way better. When you do that, you can use whatever salt you want in homemade sausage. I really like using salt I’ve harvested from the Pacific Ocean for this, because, well, I am weird like that.
Along those lines, avoid weird salt. Like those black and bright red Hawaiian salts. Or flavored salts. Also avoid salt with really big crystals because it won’t mix evenly in your sausages.
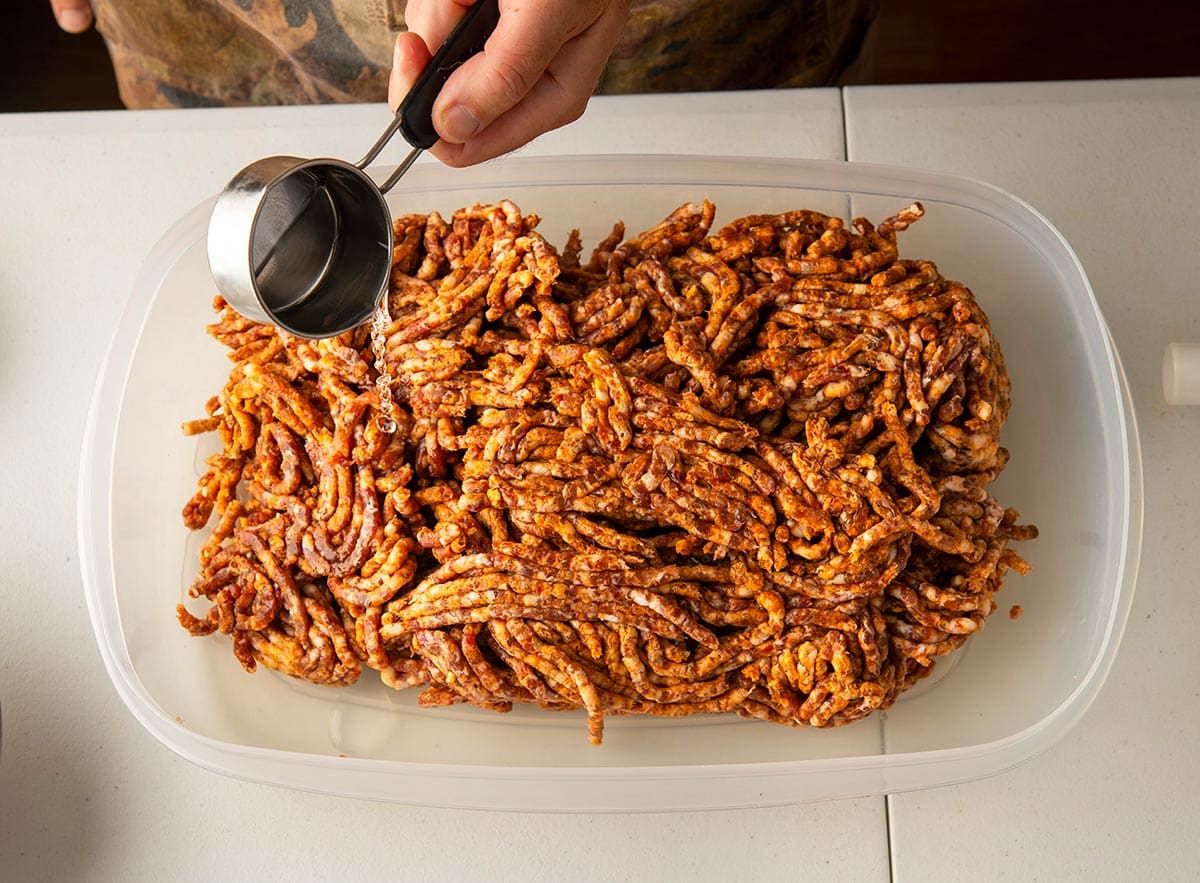
A general rule for fresh homemade sausage is to use between 1 and 2 percent salt by total weight of the meat and fat. So for a standard 5-pound batch, which is 2268 grams, at minimum, I’d use about 23 grams of salt, which is about 5 1/2 teaspoons. In reality, I prefer my sausage saltier, so I add about 1.5 percent by weight.

Curing salt is not evil. There, I said it.
For the purposes of this discussion we’re talking about sodium nitrite, which is used in smoked sausages. It is there for food safety — it can prevent listeria and botulism — as well as flavor. It’s why hams, pastrami and corned beef have that rosy, hammy flavor.
And for everyone who thinks they’re not getting nitrites by eating “uncured” products, know that the manufacturers are lying to you. There’s a loophole in the regulations that says if you use celery powder, you can say you aren’t curing meats. Well, celery powder is loaded with sodium nitrite, so there you go.
Anyway, rant over. Use one or the other when you are making smoked sausages.
Additives
Not all additives are bad in sausage. I’ve used a lot of them, rejected most, and a few I have turned to repeatedly because they give you a better link. What I am talking about are things like vegetable fibers, dry milk, binders, etc. that can improve the texture of homemade sausage.
Dry milk and a product called C-bind, from The Sausage Maker (it’s carrot fiber) will both help your links retain more moisture. Not usually a problem with fresh sausages, but very useful for smoked sausages.
Butcher and Packer has a “special meat binder” that is really good, and you only need tiny amounts to improve the bind of your sausage. They don’t say what it is, but I imagine it’s ground up fairy wings or gold dust or something…

Equipment for Homemade Sausage
Alas, you cannot make homemade sausage without equipment. At the very least you need a grinder. I will not condone making sausage with a food processor any more. I used to, and you might see it as an option in some old recipes here, but it’s gross. Don’t.
Can you make homemade sausage without a grinder? Um, you can, but it’s a terrible process. You need to hand mince pounds of meat and fat without it heating up, then jam it into casings through a wide funnel. I’ve done it, and it sucks.
Grinders
At the very least you need the KitchenAid grinder attachment, which is fine for very small batches. I have used mine, off and on, since the early 2000s. But it’s not for anyone serious about things.
I use a Weston 1/2 horsepower commercial grade grinder. I like it a lot because it’s sturdy and it’s all steel. Some cheap grinders have plastic innards that will die if, say, you get a piece of bird shot jammed in the blade; good grinders have an emergency shut off that prevents the motor from seizing.
Another good grinder I’ve used is a LEM grinder. I recommend the 1/2 horsepower and the 0.35 horsepower models. Don’t bother with dual grind grinders. They jam easier and are hard to clean.
Stuffers
For the love of all that’s holy, don’t use your grinder as a stuffer! Running finished sausage that you worked so hard to get a good bind through an augur that shears apart that bind is crazy. Buy a stuffer or just make uncased sausage.
I hate the Weston stuffers because they leave too much meat in them when the plunger is all the way down. A few other companies use this design, and it’s silly. Butcher & Packer, the Sausage Maker and LEM make good stuffers.
Yes, it’s a few hundred bucks, but they last forever, are easy to clean and they make really good links.
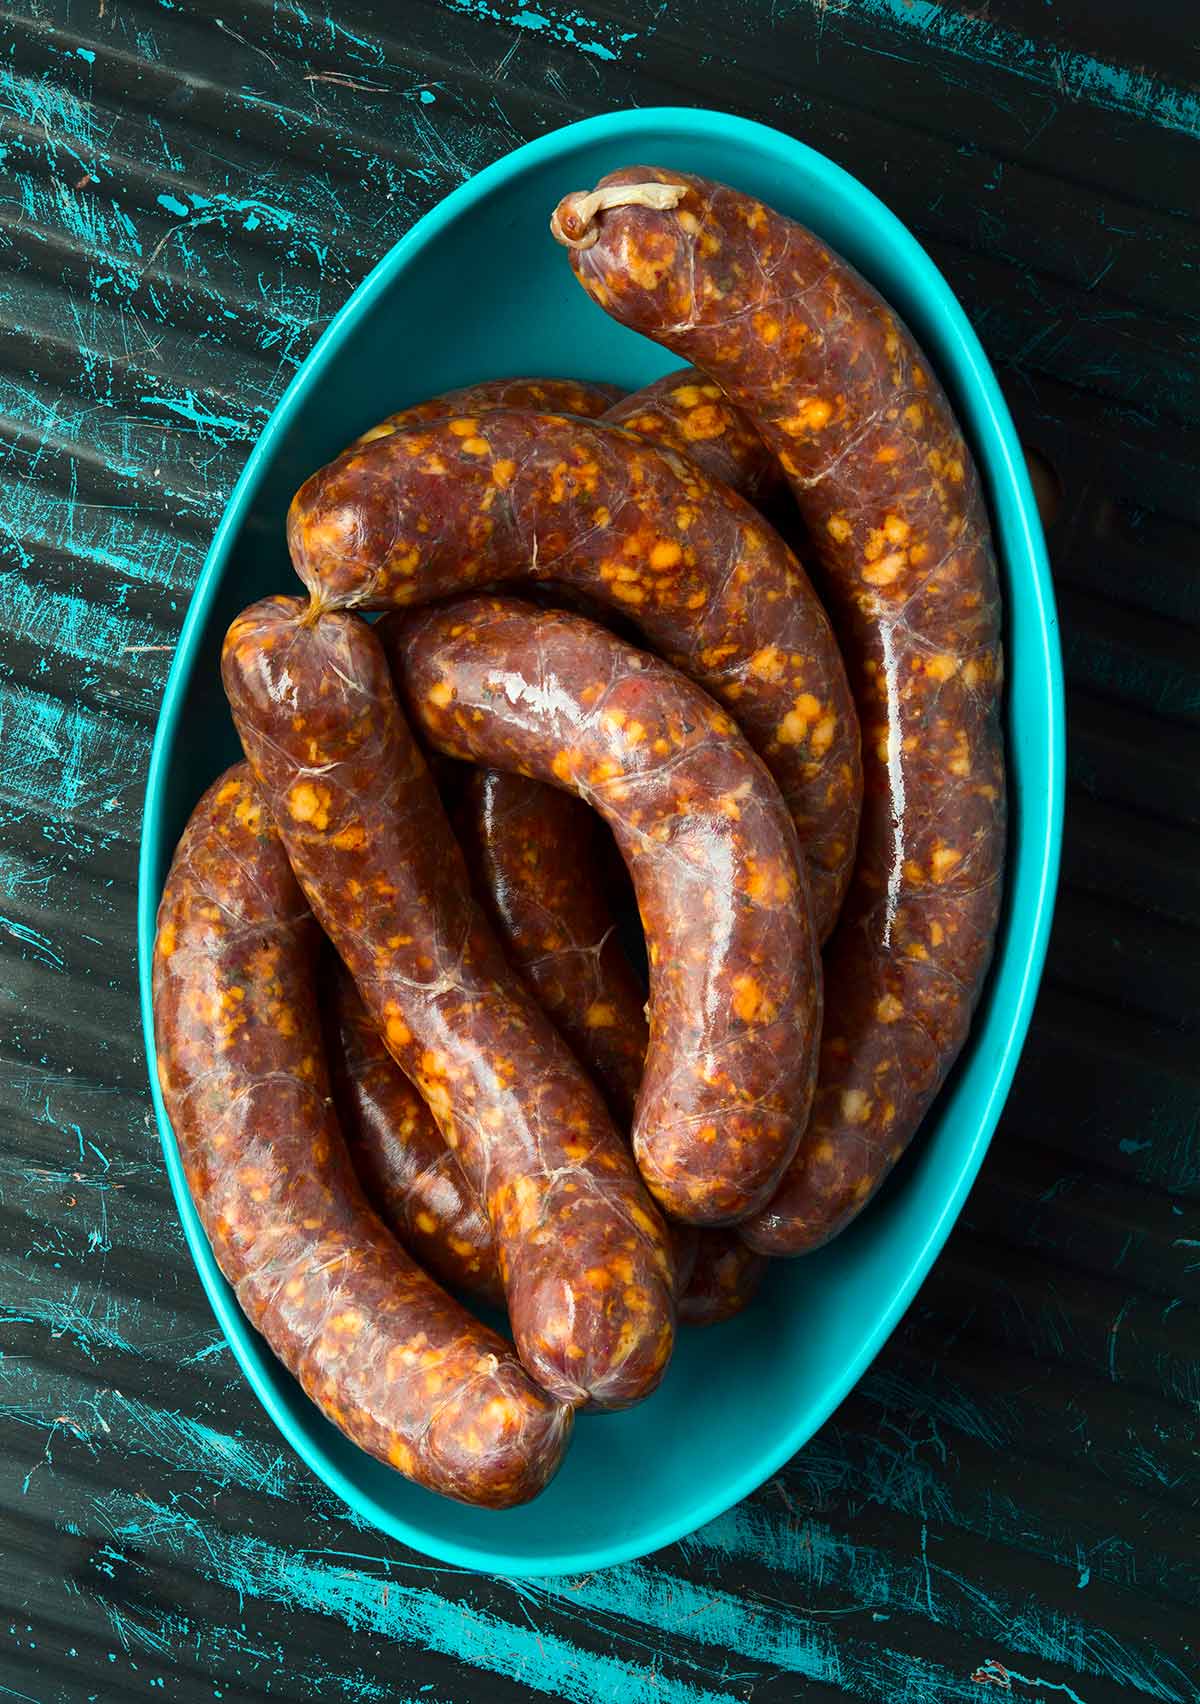
Casings
I only use natural casings. I don’t like collagen casings because they are barely edible, if at all, and when they are they taste nasty. But you do you.
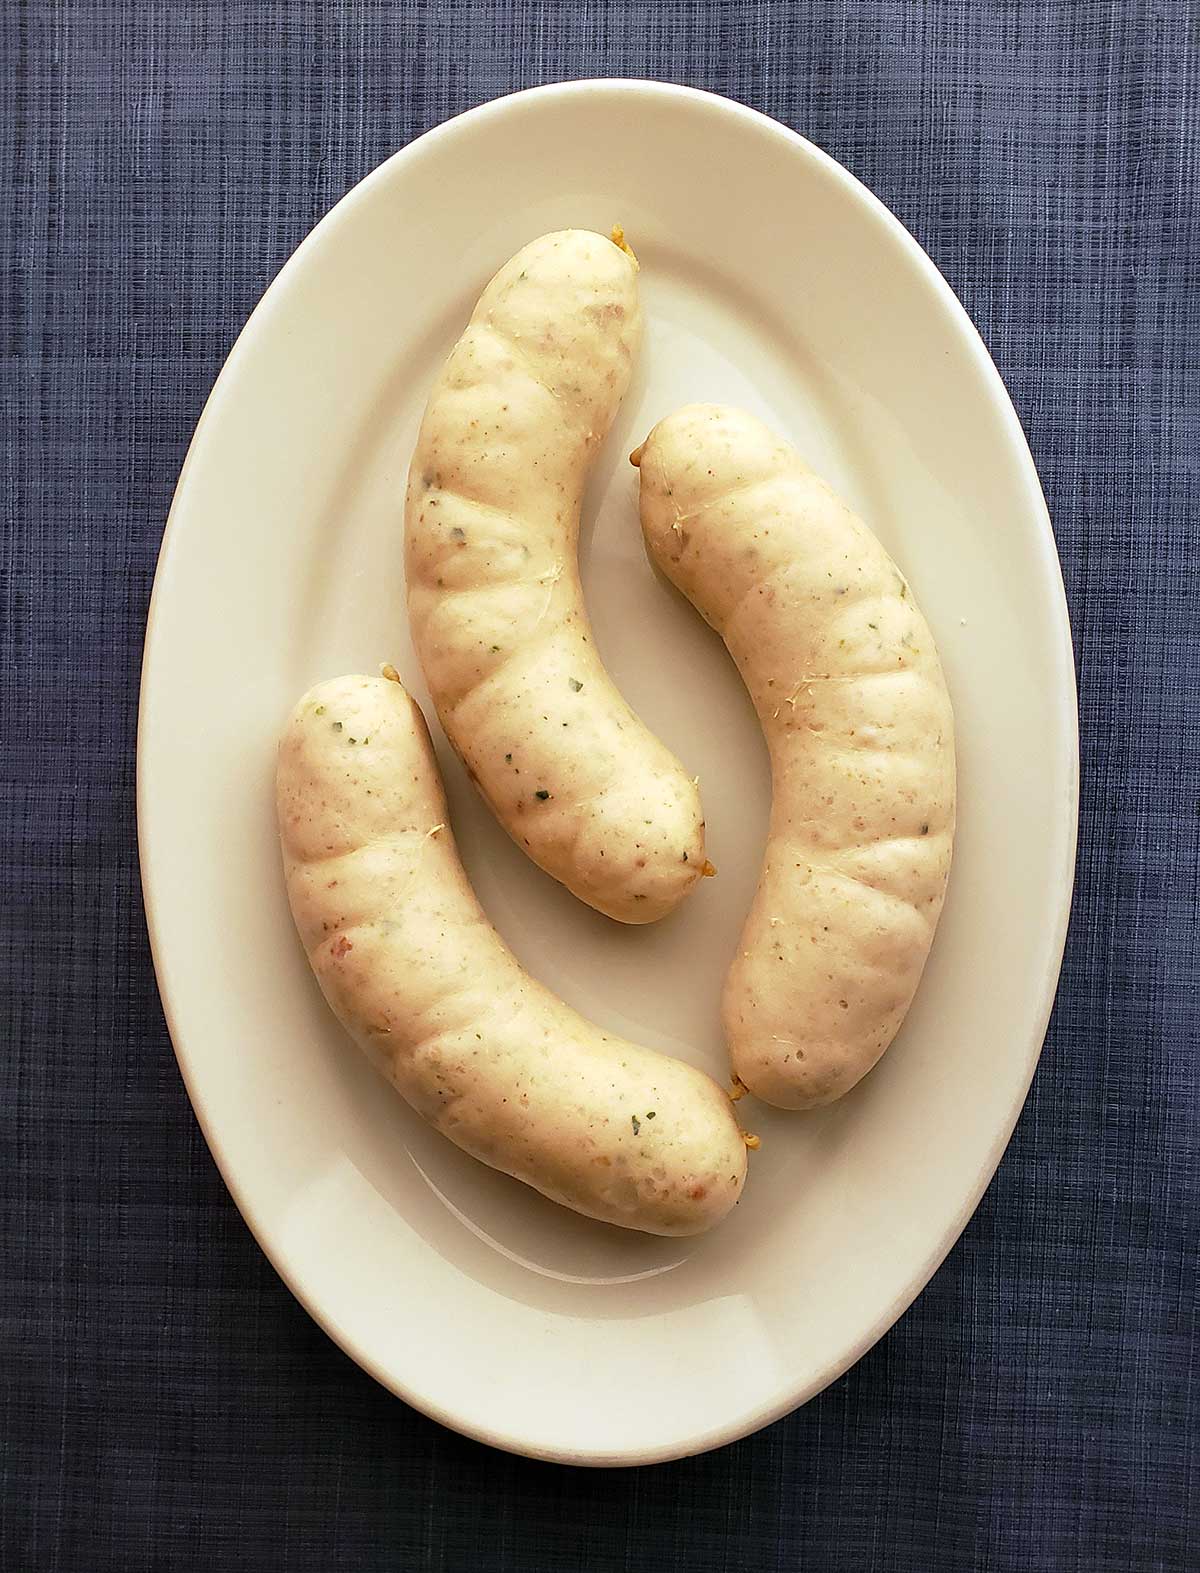
Hog casings are the norm, and they come in a variety of widths, which have some traditional recipes associated with them. Bockwurst, for example, needs a wide casing. Weisswurst needs a skinny one, or even a sheep casing.
Sheep casings are awesome when you are done making sausage with them, but they rip easily and will cause you to swear while trying to fill them. Consider getting “pre-tubed” sheep casings, which are easir to put on the stuffer.
Beef casings are very wide and are only really used in fresh sausages for recipes where the eater can’t eat pork. They’re mostly used in salami.
The gold standard of casing companies is Butcher and Packer. No one else comes close.
Other Random Stuff
I like to have a big needle or a sausage pricker (cue Beavis and Butthead laughter) to pierce the casings of the finished sausage to remove air pockets.
You’ll want something to hang your links from. I use a wooden clothes drying rack.
Spice grinders are useful for, well, grinding spices. Freshly ground spices make a difference.

Actually Making Homemade Sausage
OK, you’re all set. Now what?
A really short tutorial on how to make sausage would look something like this:
- Cut meat and fat into pieces that fit into the grinder.
- Add the required salt and/or sugar, mix then put in the fridge overnight
- Grind once coarsely
- Grind a second time with lots of seasonings.
- Chill the meat well, then add liquid, whatever seasonings you didn’t want all ground up, and mix really well for a couple minutes. You’re done if you are making uncased sausage.
- Put the mix into the stuffer, put the casings on the stuffer, then make a big coil.
- Make the links from the coil. Tie them off. Hang for a while to “bloom.” Cook and eat.
Before we get into the basic recipe below, I’ll walk you through it in pictures.
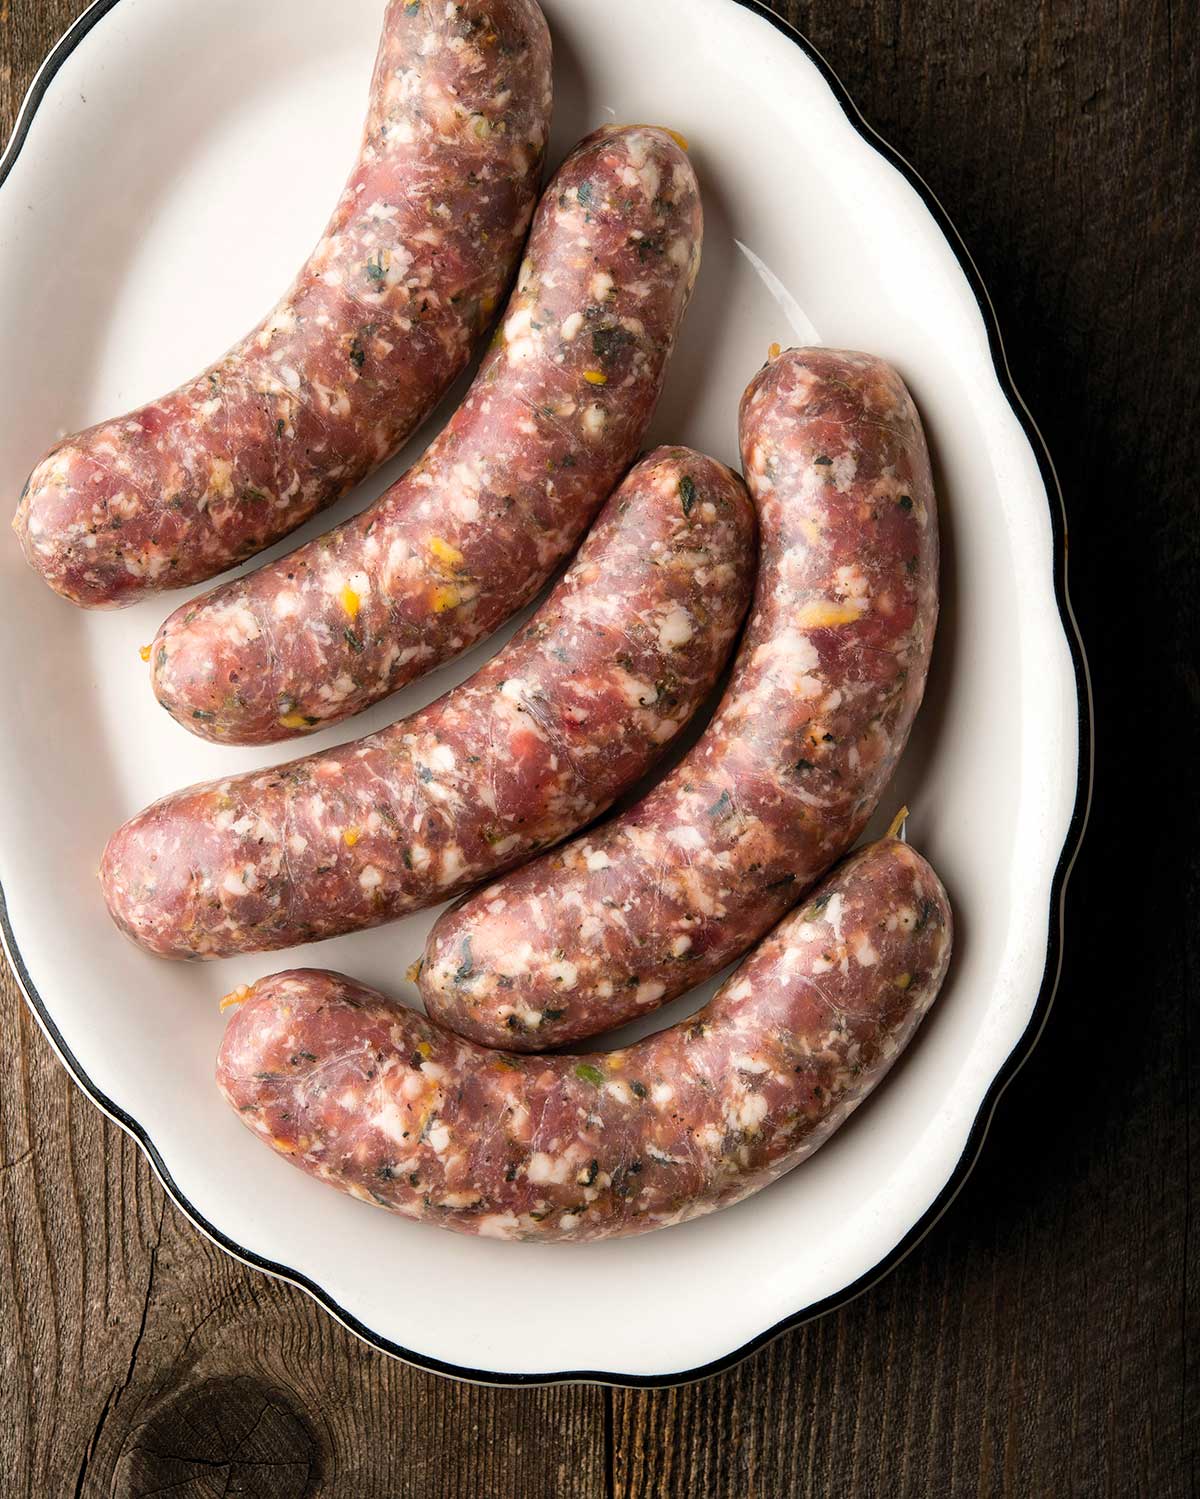
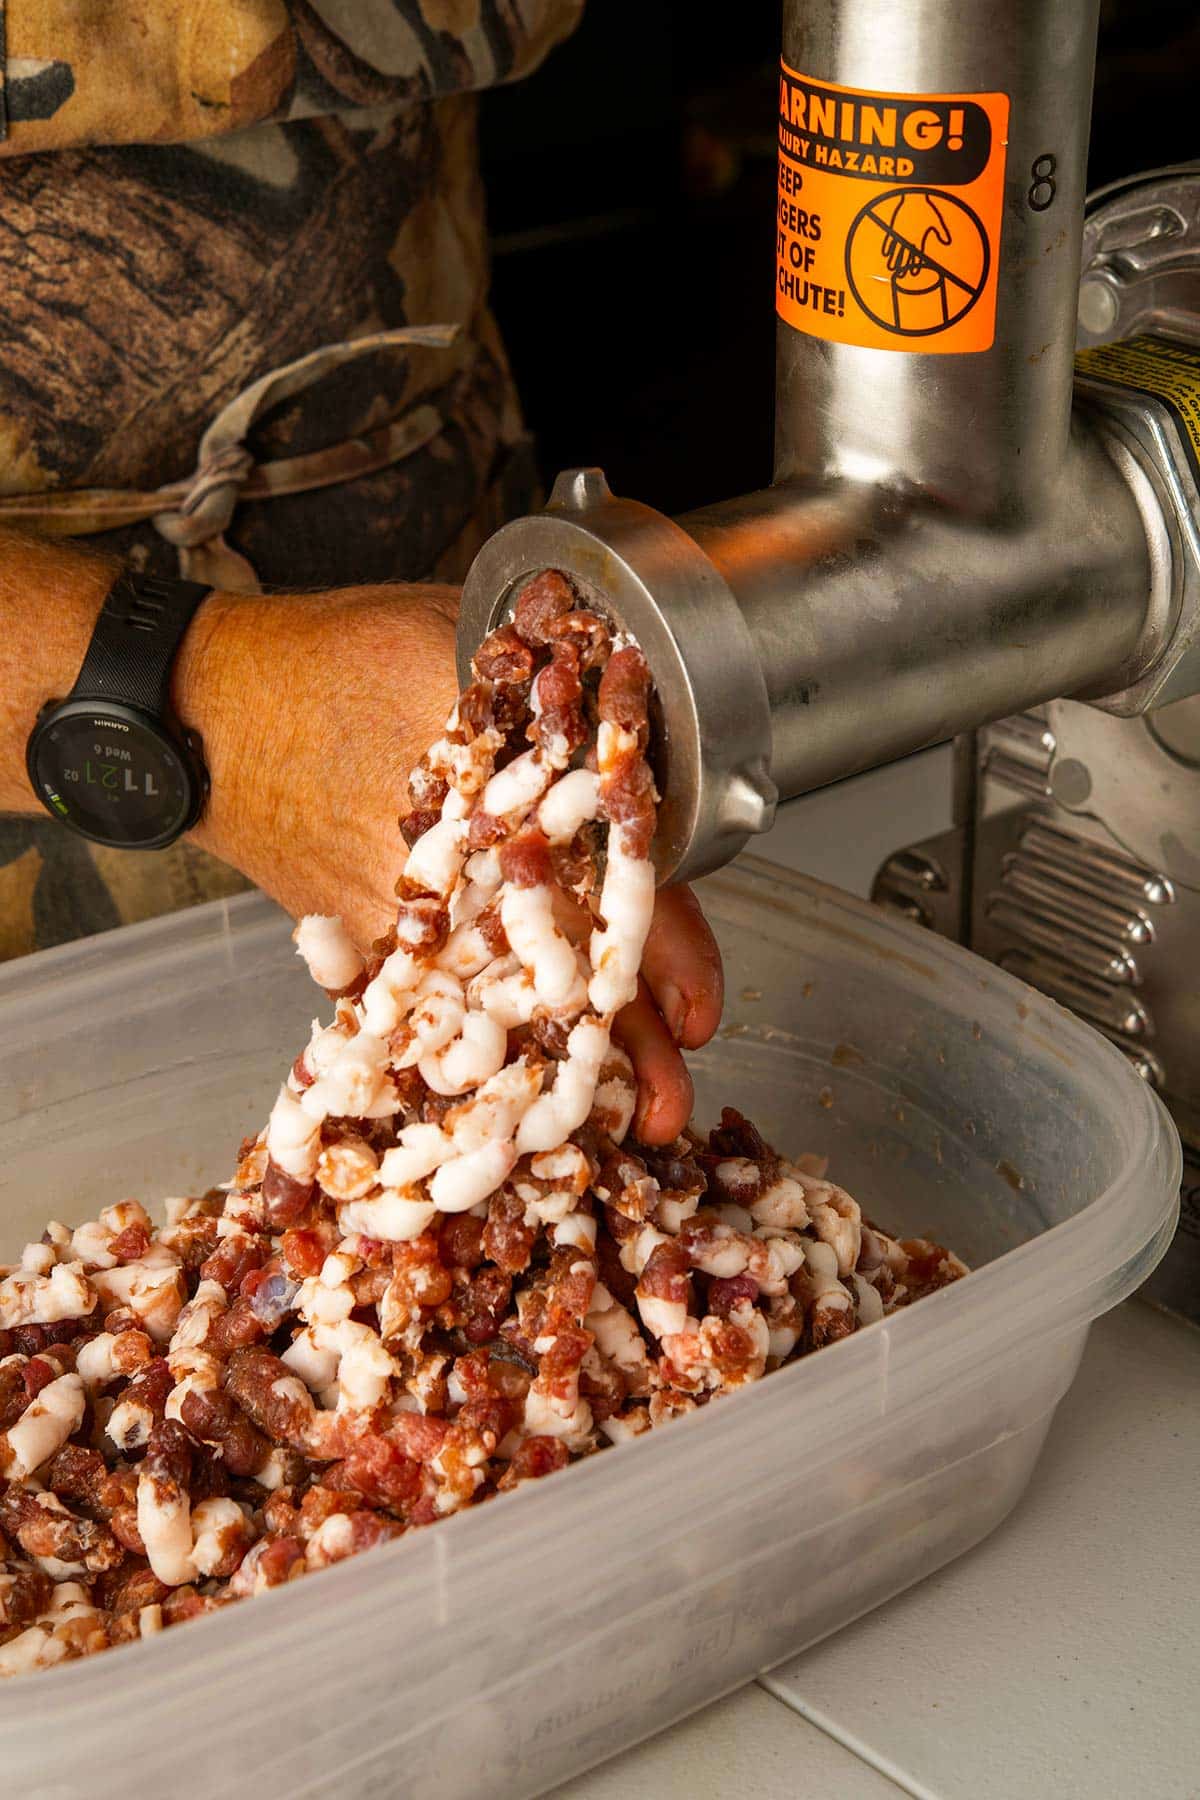
Start with meat and fat. Usually with game, the meat is super lean, so I will go something like 3 pounds of this lean meat (venison, duck, pheasant, etc.) with 2 pounds of something fatty, like pork shoulder. Another good option is 4 pounds of lean and 1 pound of pure fatback.
Cut this into chunks that will fit in your grinder, then add the salt and mix. Set this in the fridge overnight. It will change color and get sticky.
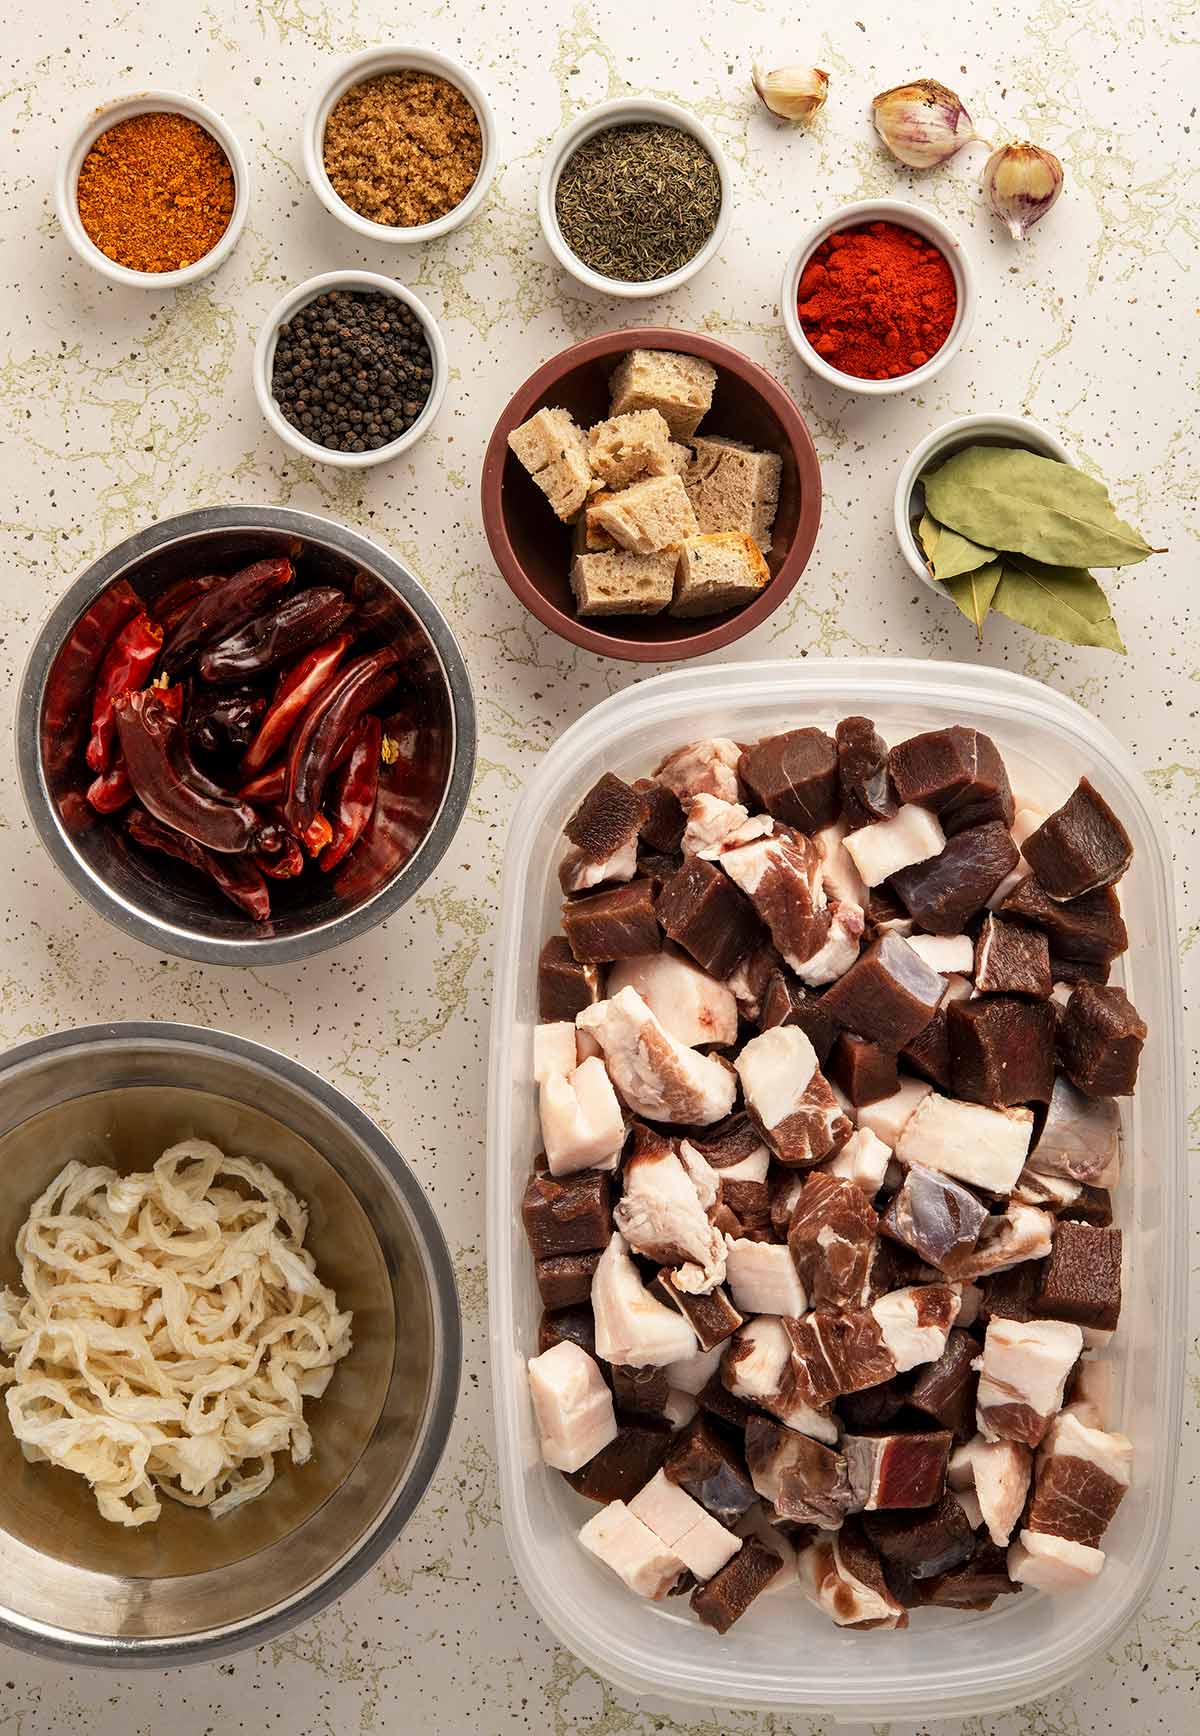
Soak some casings in warm water and get your seasonings ready. I like to freeze my blade, dies, augur and hopper for an hour or more before grinding, to keep things cold — more on that in a bit.
Grind through a very coarse die; I prefer a 10 mm die, but you could go higher if you have one.
Mix all the spices you want fully integrated into the sausage with the meat and fat. Do this carefully, and don’t squash the mix.
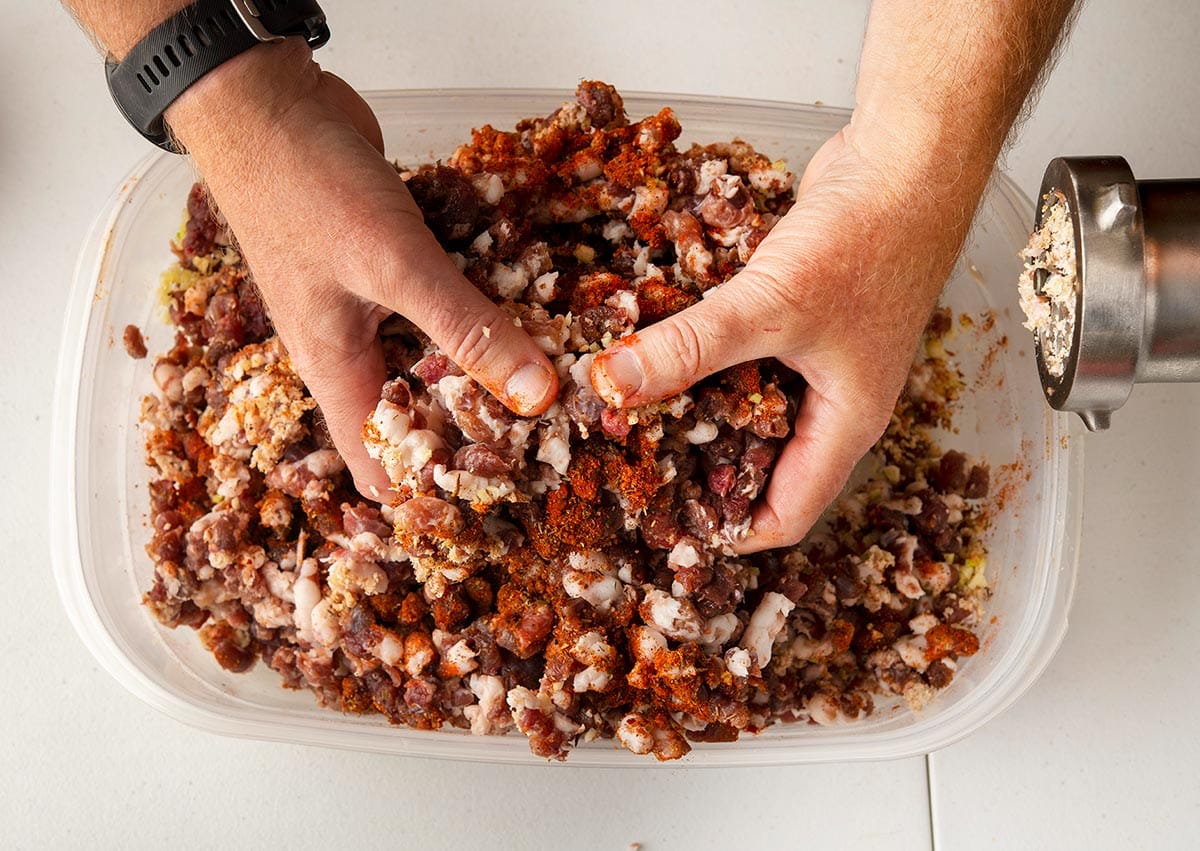
If the mixture is still cold, as in less than about 37F or so, you can grind it again immediately. I do this a lot because I am fast and I start with cold gear.
Beginners with homemade sausage should play it safe and freeze the mixture for 20 minutes or so while you clean up and get ready to grind again.
It is vital for everything to stay cold in this whole process to prevent “smear,” which is when the fat partially melts and coats the meat, breaking its ability to bind to itself. You see this when your sausage comes out crumbly.
When you’re ready, grind again.
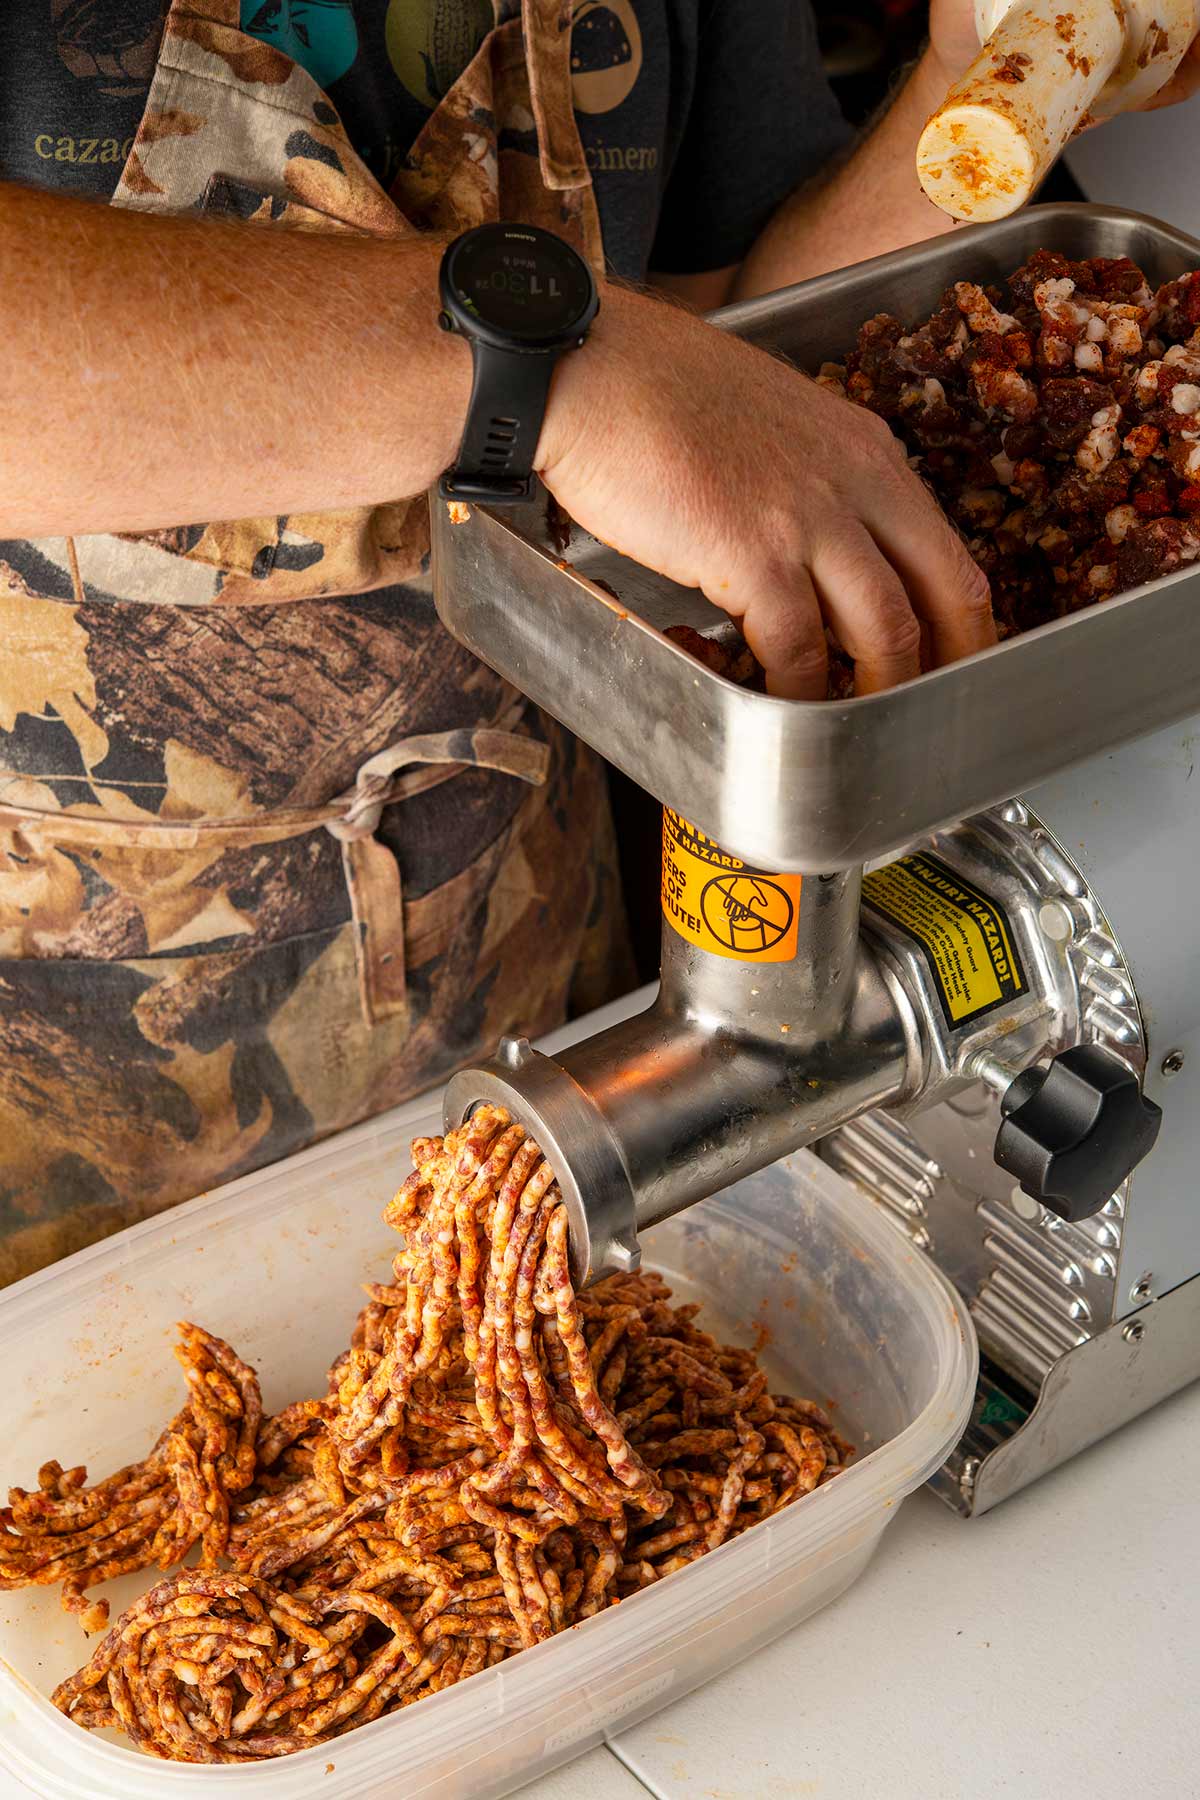
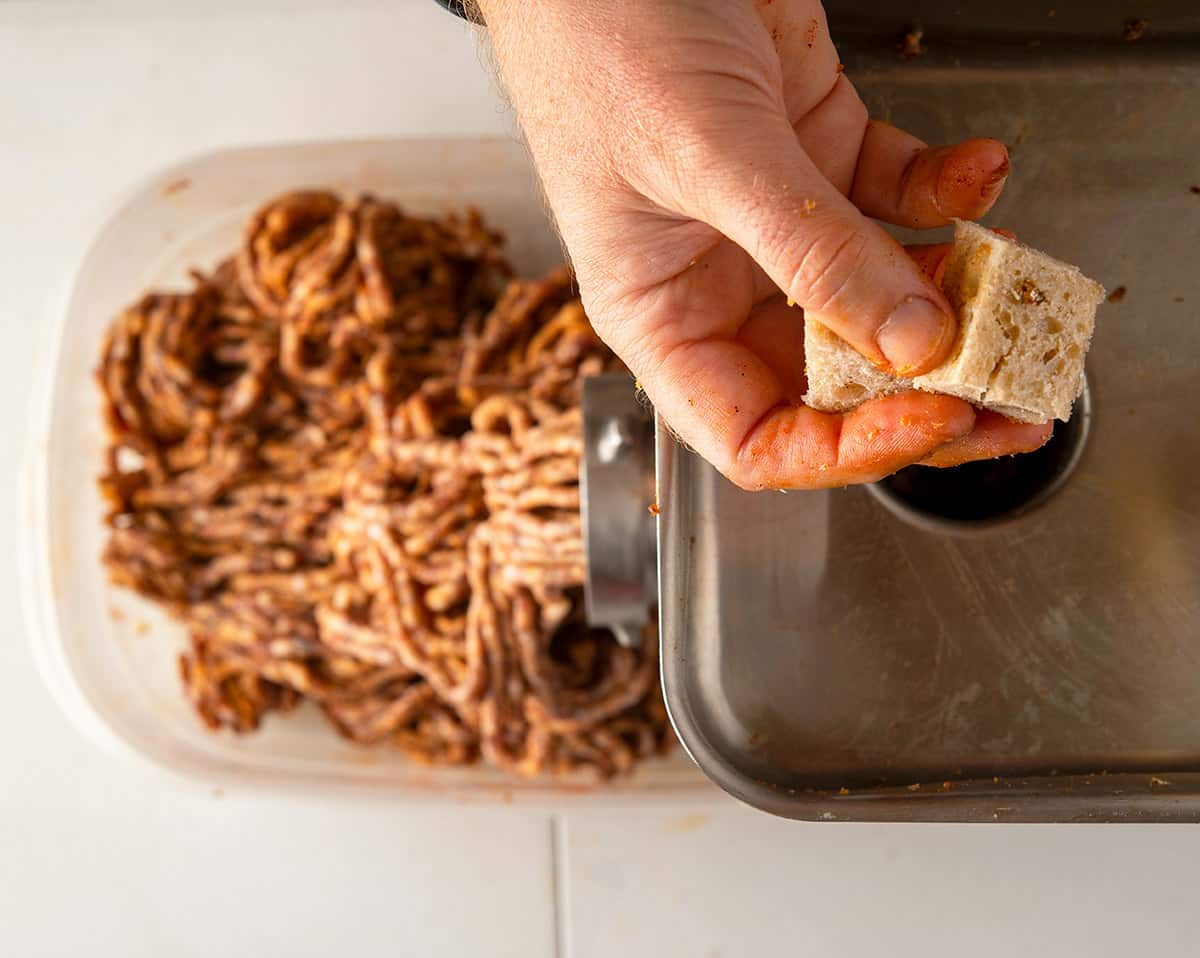
Have a couple pieces of bread, a hamburger roll or something similar handy to finish out your grind; skip this if you are celiac.
The reason is that the bread pushes every last bit of meat through the grinder, so you don’t waste any.
Once you’re all ground, chill the mixture while you clean up. This is important not only to have cold meat and fat, but also because you really do want to clean your grinder right away, or it becomes a nasty, sticky mess. Ask me how I know…
Now you are ready to create the bind in your homemade sausage.
This is when you add ice cold liquid, usually water. Wine, beer, juice, cream are all common in various recipes. Be aware that acidic things will break your bind, so go easy on vinegar if you want a tight, snappy sausage; this is called knacken in German.
You’ll also add any herbs or spices you want the eater to see, like cracked peppercorns or parsley or fennel seeds.
Mix, mix, mix! I do this with my (clean) hands for about 2 minutes. Knead like bread. As it so happens, you are creating the same sort of protein bind that exists in bread. It’s gluten in bread, myosin in meat.
This is the moment in making sausage where meat temperature is most critical. If the fat warms and smears here, you’re cooked. Crumbly sausage. What you’re doing is making myosin that forms a network around the fat, and that won’t work well above 40F.
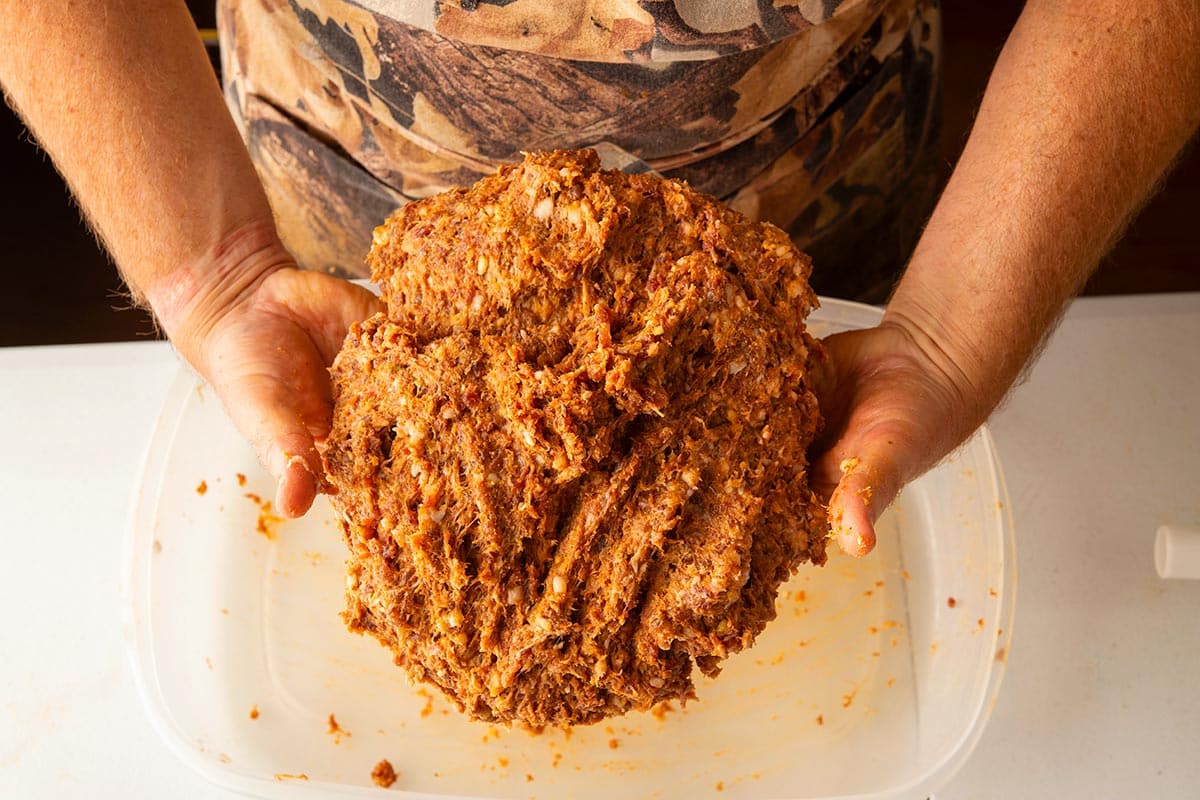
You’re done when you see white streaks on the bowl, and when you can pick up the whole shebang in one piece.
Now put the mix in the fridge and clean up again.
If you are not casing your sausage, you’re done! Portion out your sausage into blocks or make patties.
Casing Homemade Sausage
On to casing, which gives people fits until they figure it out. Casing is arguably the hardest part of making sausage, because you need the casings to be tight, but not to burst when cooking. Oh, and by the way, the most common reason your sausage bursts while cooking is high heat, not an over-stuffed sausage.
As I mentioned above, I prefer natural casings, usually hog casings. They’re versatile for most styles of sausage, and are by far the easiest to find. Many supermarkets have them (you’ll have to ask the meat counter people), and all butcher shops will have them.
First off, you will need to soak your casings in warm water to loosen them up; they’re usually stored heavily salted, and often frozen.
If you want, you can run water through your casings to check for leaks. I used to do this when I bought cheap casings, but I’ve never had a leak in any I’ve bought from Butcher and Packer.
Thread a long length of casing on the stuffer tube; they come in different sizes for different casings. Most are fine for hog casings, but if you work with narrow sheep casings, you’ll need a narrow tube.
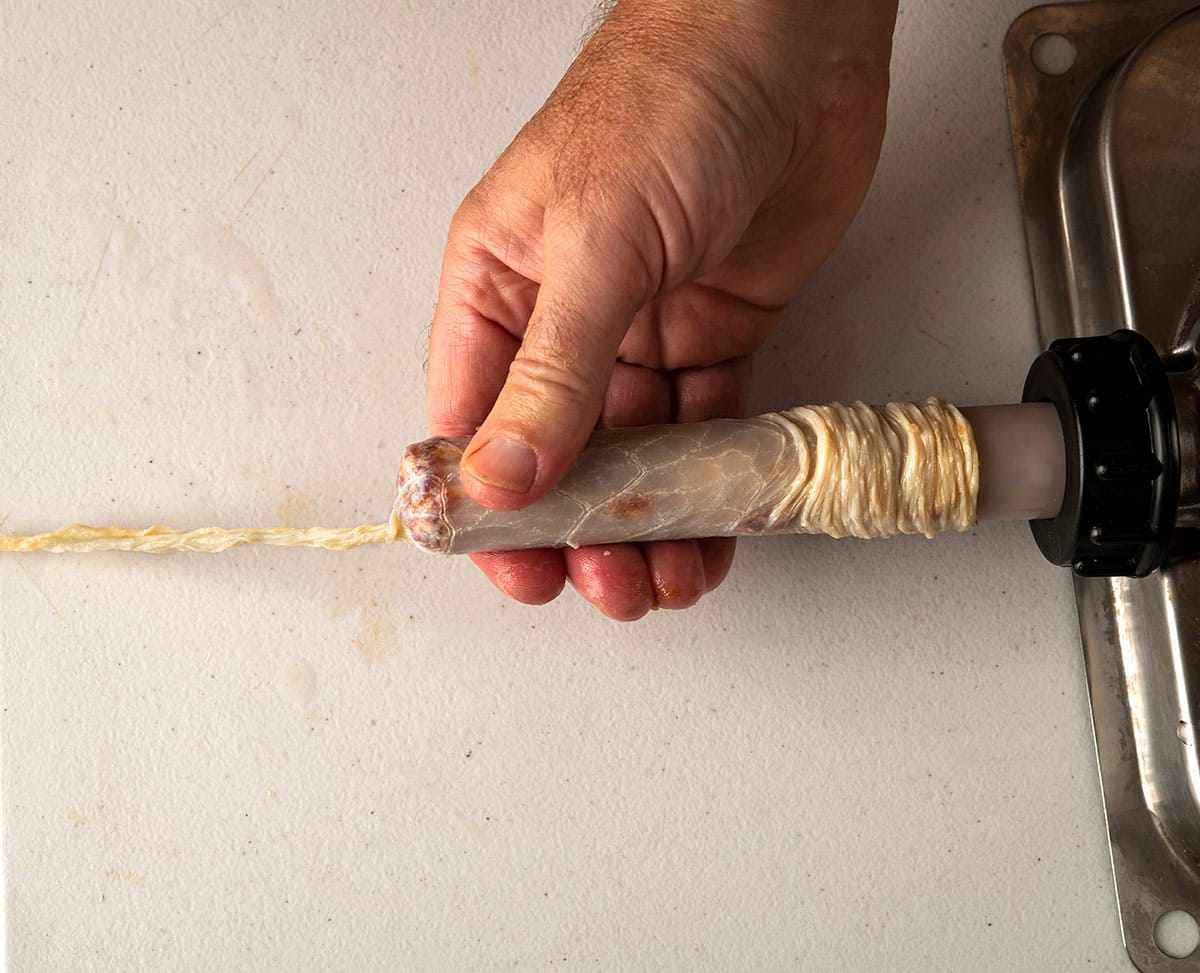
Leave a long “tail” on the end of the casing; this is so you can tie it off easily later. Get the condom jokes out of your system for a while, then crank the stuffer down until you see the end of the sausage come out the tube. Cue scatological jokes, which will remain funny for a half hour or so…
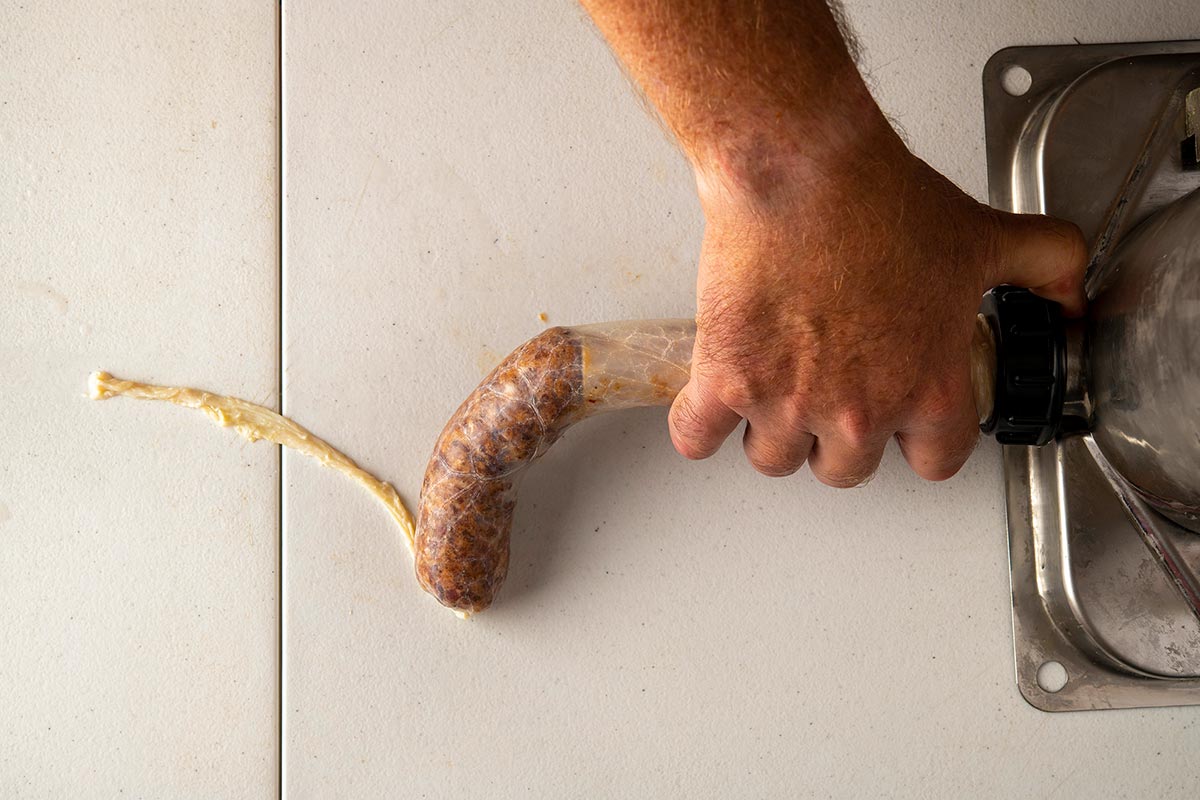
Crank out a full coil, fully but not overly tight — you’ll need to twist off links in a moment. Stuff everything before you make links.
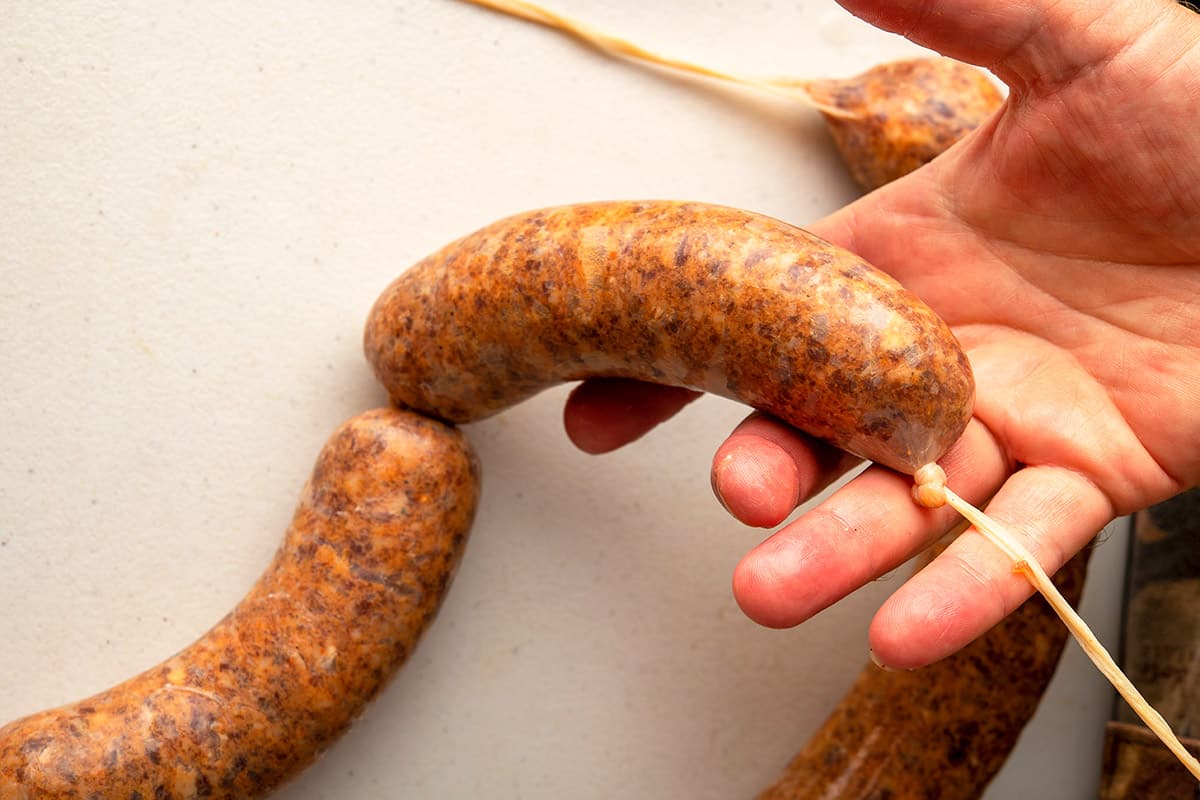
There are a few ways to make links, from tying them off with twine to elaborate twisting tricks. The method I use is simple and it works. The end of the coil is one link. Then you pinch off the next link, spinning it so it will hold.
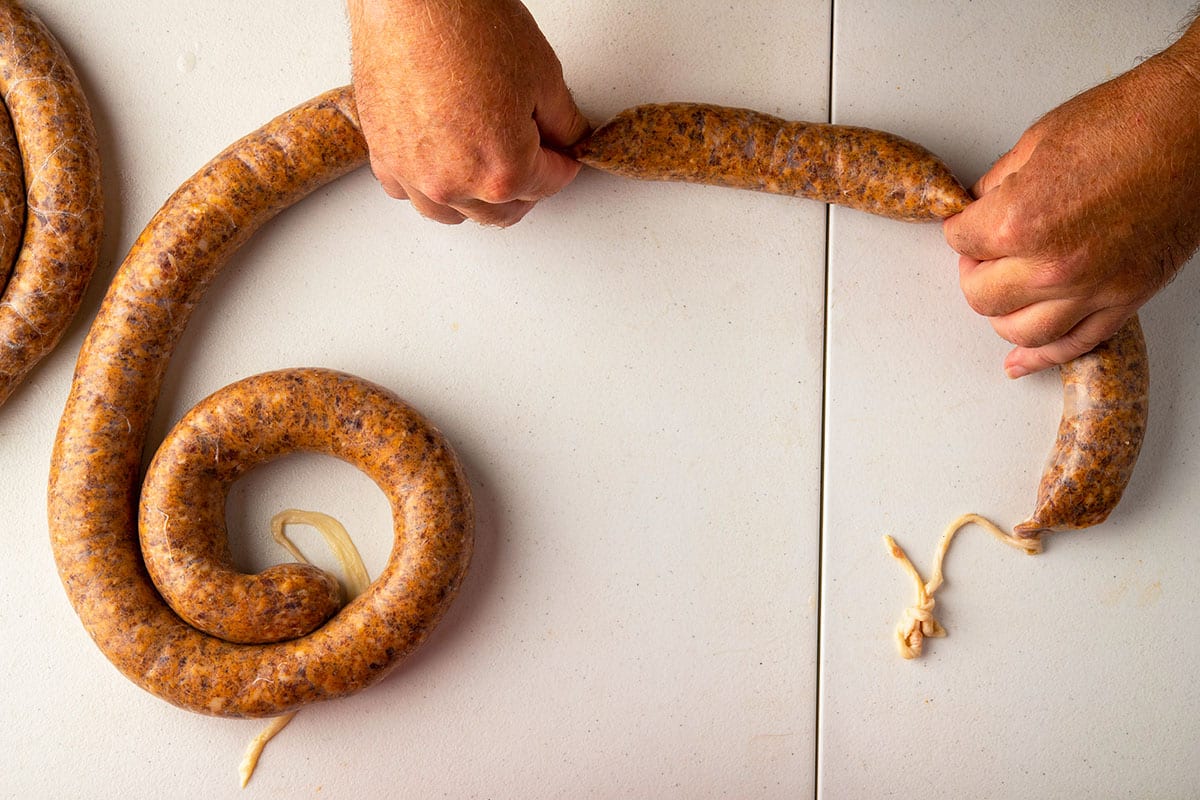
You move down the coil and spin that one the opposite way; this keeps the links from unwinding too easily.
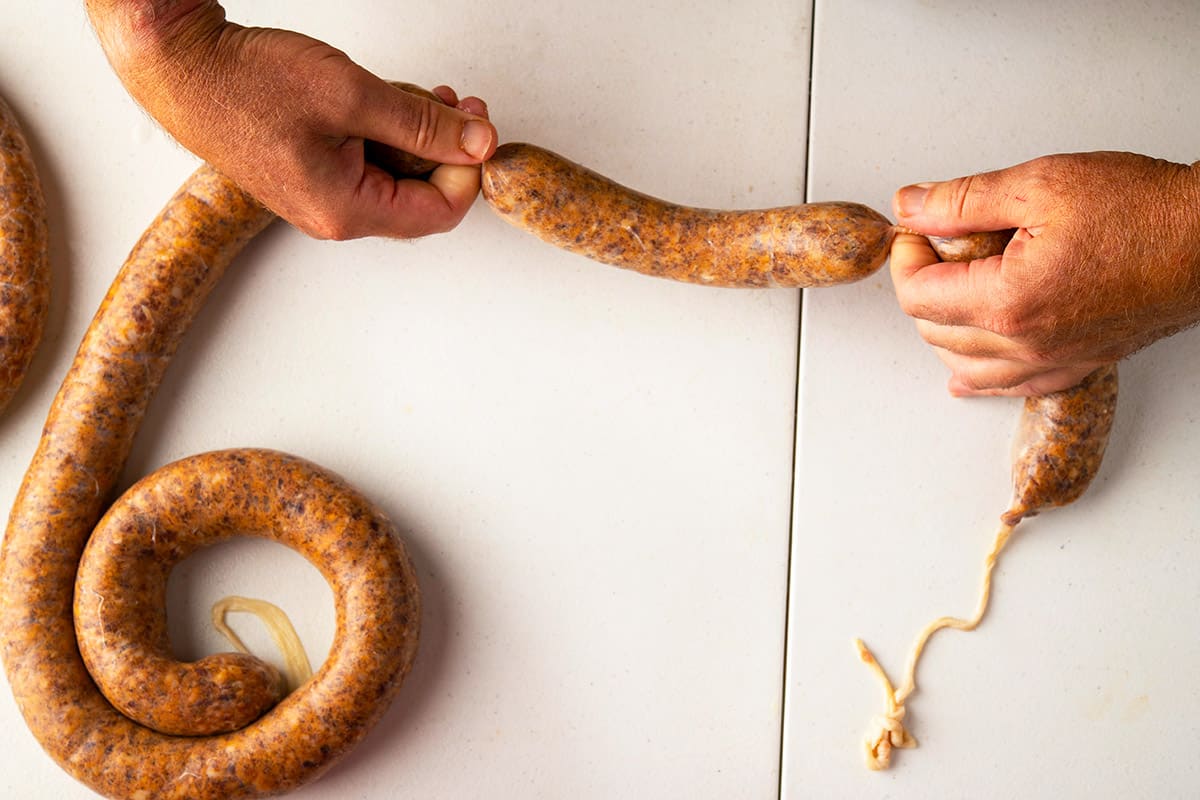
If this is confusing, I made a short video on making sausage links.
Work all the way down the coil until you get to the end, then tie off both ends after gently compressing the meat within those final links.
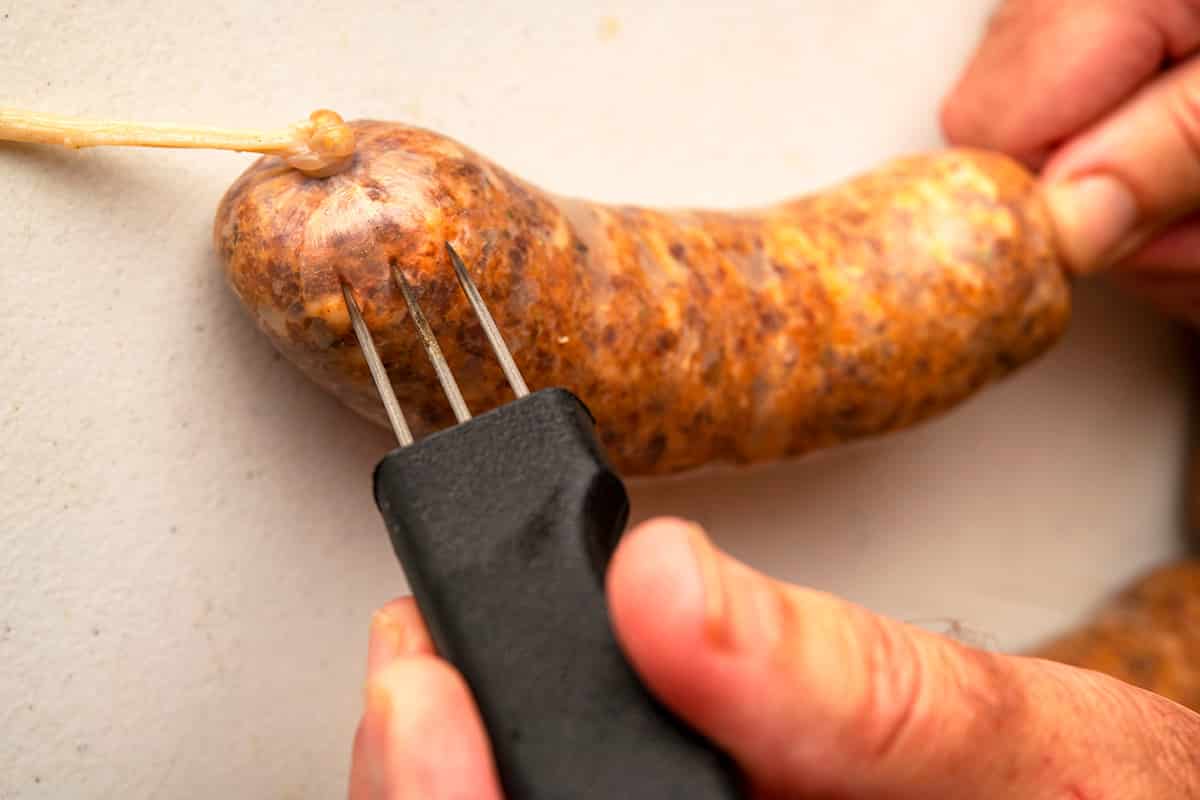
Now you need to compress the meat in each link, looking for air pockets. This is important for a proper bind and snap in homemade sausage, as well as to prevent boiling fat from spraying you when you slice into a link.
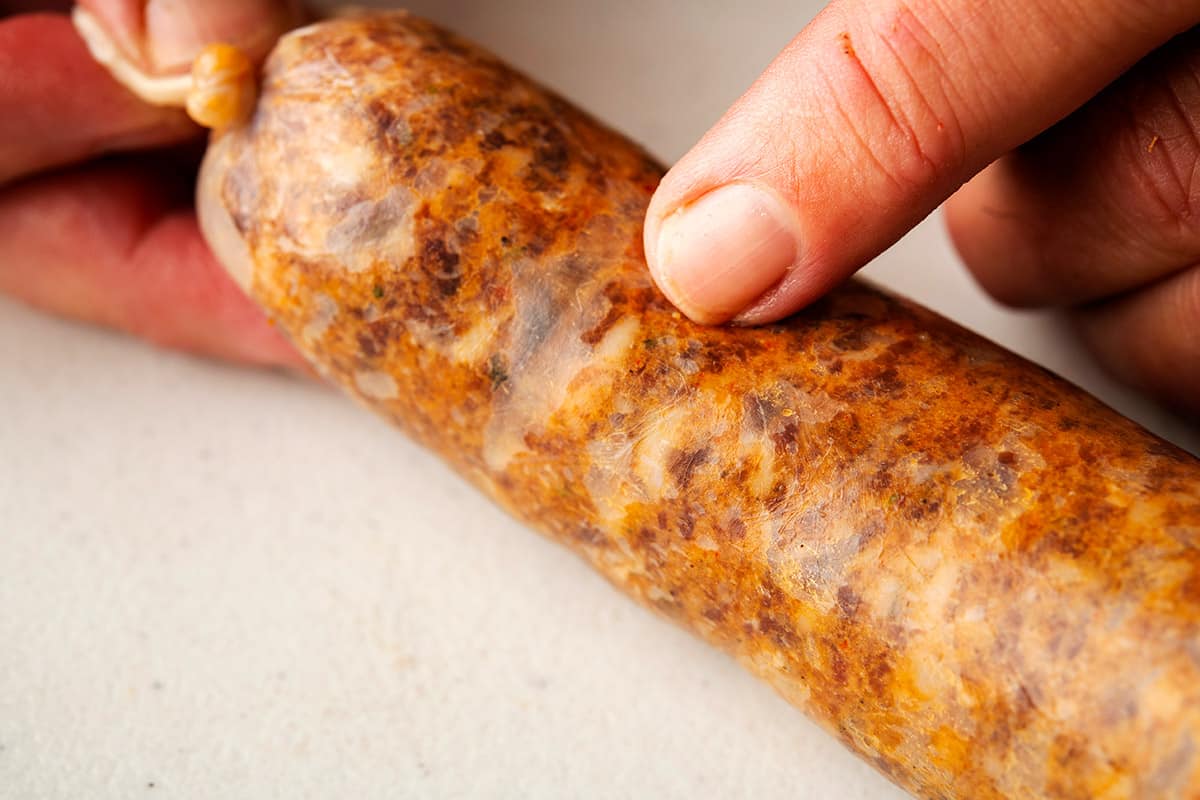
When you find air pockets, use a needle or the awesomely named sausage pricker to remove them. Pierce the casing, then gently compress the meat in the link to fill it.
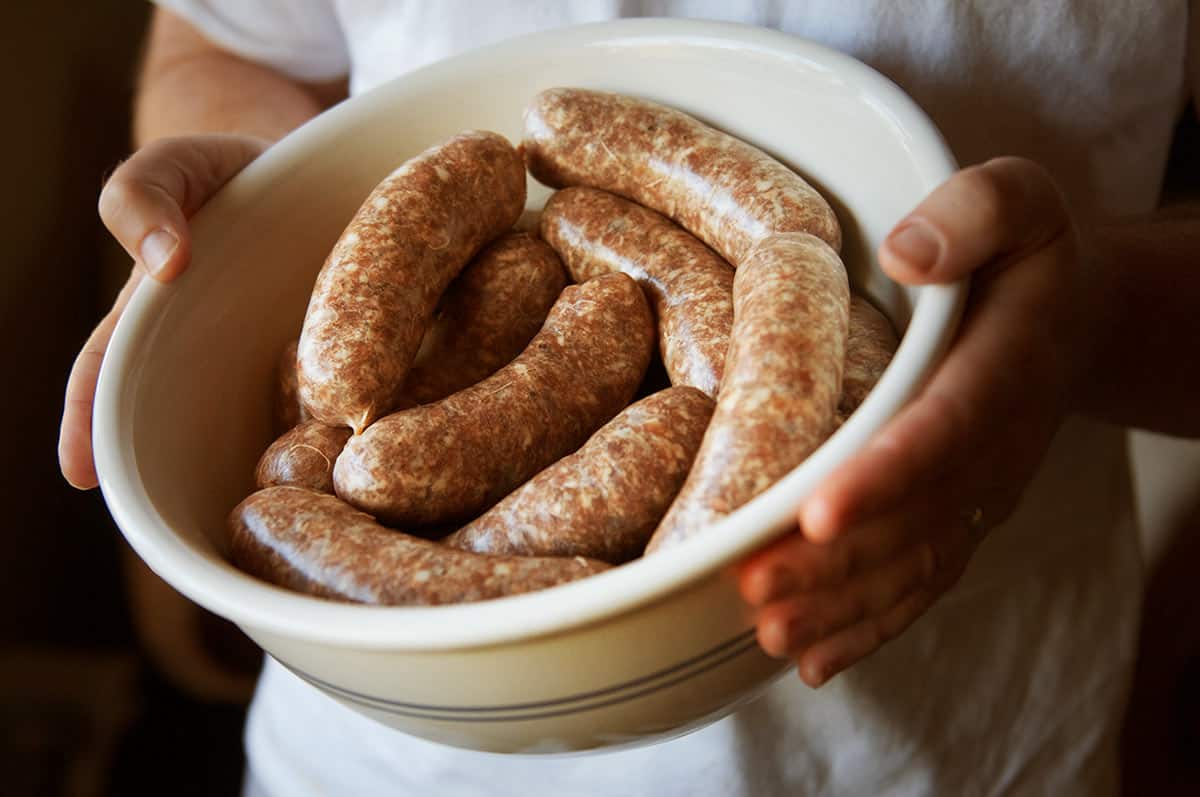
Now, hang your homemade sausage so it can “bloom,” which is the word we use when the links change color a bit, tighten in their skins and dry out just a little.
It’s a good idea to wait a day after making sausage before eating them, as this blooming process really improves the links.
Storing Homemade Sausage
Once made, homemade sausage will keep a week in the fridge. I like to let them sit there a couple days, then I’ll separate the links and vacuum seal them in packets I plan on eating.
I do not recommend pressure canning or pickling sausages, although people do. Just not a fan of the results.
The Recipe
Basic Homemade Sausage
Equipment
- 1 Meat grinder
- 1 sausage stuffer (not needed if you're making loose sausage)
Ingredients
- 3 1/2 pounds lean meat (venison, beef, pork, lamb, etc.)
- 1 1/2 pounds fatty meat (pork shoulder, belly, fatty beef, etc.)
- 34 grams kosher or sea salt, about 2 tablespoons
- 15 grams freshly ground black pepper, about 1 tablespoon
- 1/2 cup ice water or white wine
- Hog casings
Instructions
- Cut the meat and fat into chunks that will fit into your grinder. Mix well with the salt and set in the fridge overnight.
- The next day, put your auger, blade, and dies – I prefer a 10 mm coarse die to start, then a 4.5 mm die afterwards – into the freezer for 1 hour before you grind. If you are making links, soak about 15 feet of casings in warm water. Mix the black pepper with the meat chunks and grind through the coarse die.
- If the meat is still cold, as in below about 38°F, go ahead and grind a second time through the fine die. If the meat has gotten warm, freeze it for 20 minutes or so before grinding again. Optional: If you have some bread, add that after the last of the meat has gone into the grinder; this pushes out every bit of meat so you don't waste any.
- Put the mixture in the freezer while you clean up. You want the meat mixture to be close to freezing before you mix it. When it's ready, add the ice water and, with your very clean hands, knead and mix the meat for 60 to 90 seconds, until it comes together as one cohesive, sticky ball.
- You now have sausage. If you don't want to case it, you are done. If you do want links put the meat into the stuffer. Slip a length of casing on the stuffer all the way, leaving about 4 inches of "tail" hanging off. Crank the stuffer down to remove air. "Milk" the air out of the "tail" of casing, then fill the casing entirely, making a large coil. You want it full, but not overly tight at first. Repeat until you've cased all the meat.
- To make links, gently compress one end of a coil and tie off that end of casing. Moving about 6 inches down the coil, pinch off a link with your fingers. Spin that link away from you a few times to form the link. Move down the coil, pinch off another link and, this time, spin it towards you. Repeat until the end, and tie off that last link. (Here is a video of the process.)
- Use a needle or somesuch to prick out any air pockets in the links, gently compressing them to fill the gaps. Be careful, as you don't want to burst the link. Hang your sausages as noted in above and, if you can wait, eat the next day.
Notes
Nutrition
Nutrition information is automatically calculated, so should only be used as an approximation.

an excellent article , i live in australia where deer are regarded as a pest and its easy to shoot them .i only shoot those i wish to eat .usually a shoulder shot .i haven’t tried to make sausages from them but yor article is most informative . thank youm
Hi Hank
A year ago I set a goal for myself. I want to learn how to make French Sauces. I started out with Bernaise. Sauce. Yes you’re right…practice creates improvement.
I found this recipe French Glacé De Viande. It is reducing as I type. Your tips and precautions are greatly appreciated. Now that I have the Glacé De Viande I can tackle the brown sauce.
Thanks!!
Diana
What a great, well written, informative, and humorous site. Great work. I’ve been making sausage – tho’ not frequently – for 25 years, but after around eight minutes of reading here I’ve picked up a few tricks and gotten answers to: “Gee, I wonder why it turned out like that?”
I live in Japan. But am Canadian. Enough said. I might as well study how to hunt wild boar naked with only chopsticks!
But your blog was fun to read and we’ll, who knows? I haven’t had a decent Italian sausage in 30 yrs …. sometimes I think I can change these things. It obviously just takes money. A 100$ meal I guess.
Adam
Hi Hank
I am making pork sausage with the family. I am retired, but they are working. I was thinking about grinding the pork sausage (with seasonings) the day before. That would leave only the stuffing for the second day. Have you ever done this or do you think there would be issues? All of the sausage will be frozen and not smoked.
Thank you
Roger
Roger: You should be fine.
Thank you so much for the prompt reply.
G’day Hank
great article!
My mate just leant me his sausage stuffer so I’m gonna have a crack at it.
I make my own sauerkraut and pork apple sauerkraut and cheese snagggers seem like a match made i heaven, what do you rekon is the best kinda cheese, I’m thinking a hard or semi hard cheese. I’m thinking apple juice of concentrate, but dried apple crossed my mind. What you think, or is this a dumb idea??. cheers
Mick
Mick: Normally when you add cheese to a sausage you use something called “high temp” cheese, which won’t melt to terribly when you cook the links. As for the apple, I think chopped up dried apple would be a good option here.
I tried this recipe but found the fat rendered out of the sausage when cooked leaving the texture of the sausage granular and a bit dry. I cooked at 180c in an air fryer for about 15 mins and today tried reducing the temperature to 170c to see if that helped but the fat is still coming out. Do you have any idea where I’m going wrong?
Emma: I have no idea. I have never even thought about using an air fryer to cook sausage. Some fat will always render, but not a ton if you cook them on the grill or in a pan. The weeping of fat can also be a product of poor binding, that step where you mix everything before casing. If things get too warm, the bind can be unstable or break and you will get excessive weeping of fat when it’s cooked. My guess is that is what’s going on.
What do you think about the kitchen aid stuffer? I have the kitchen aid grinder and I think it’d be easiest this way. Thanks!
AJ: I don’t like it, sorry.
Can I add peppers and onions to the mix before stuffing? Do they have to be cooked first?
Craig: I generally don’t, but you can. And yes, you should cook them first, then let them cool. I prefer adding onions rather than peppers in this way.
How much chili powder can you use to make chili brats? Would like to make chili brats but can not find a receipe for it.
Thank you Sheila
Sheila: I don’t know what chili brats are, so I can’t help you. Sorry.
Great article – thank you for the information! Garlic scapes are coming up in our region and was thinking of making a pork sausage with them. I think I would either chop them up pretty small or throw them in the second grind. Any thoughts on proportions for a 5 lb batch of sausage?
Rob: I’d add maybe 1/2 cup of minced scapes, tops.
It’s funny how much of this is stuff I already knew from working with my father. Dad did all his own butchering–and a little for local farmers–but he only started processing deer as a sideline when a friend sent a deer to Bath Packing to be made into two types of sausage and got back just over 50 lbs from a 170 pound deer! (Yes, he delivered the whole, cooled, skinned deer himself to Bath Packing and watched them tag it.) Dad talked him into letting us butcher his next deer, complete with three kinds of sausage, and boy was he surprised when he took home four boxes of meat and fresh sausage from a smaller doe! (Dad gave him the box of smoked sausage a week later.). We have made all kinds of sausage over the years, even making a stab at German Bologna at one guy’s request that didn’t turn out.(German Bologna–true German Bologna–relies on accurate temperatures and we just couldn’t get good enough control for that with our equipment.) Dad hates that he doesn’t have Grandma Croft’s old recipes but she never wrote anything down. He relied a lot on “Great Sausage Making and Meat Curing” by Rytec Kutas (?), the now deceased founder of the Sausage Maker and he bought over half his equipment from them–including all his grinder plates. Dad thought the recipes were heavy in salt but dead on in most of the other ingredients. (It also had the only chili recipe I like: a loaf chili that used flour as a binder, with beans optional. What’s funny is I make a damn good Crockpot chili.) Dad might go a little overboard on the Prague Powder (If the recipe called for 2 and 1/2 teaspoons Prague Powder/Instacure#1, he would put in three level teaspoons.) but that was it. He was also a stickler for cooking up a sample to check the seasoning mix. (One guy infamously told Dad that he wanted his hot sausage HOT and Dad kept trying to talk him down; he couldn’t eat the sausage Dad made because it was TOO hot. Dad grew his own hot peppers and adjusted the amount according to how hot that year’s crop turned out to be.) Sausage seasoning can vary from one time to another, heck, even two batches made exactly the same on the same day may not taste the same. Dad was looking for consistency in his work. And he achieved it.
hank – thank you for sharing this info! a couple questions. i’m (making sausage?) from beef tongue and i’ve boiled it first so i could peel it. because it was already cooked (then cubed and refrigerated), i went ahead and did the first grind w/ a combo of tallow and lard i’d saved from the pan in prior cooking (chilled bacon grease, hamburger grease). 40 ounces tongue and 6 ounces tallow/lard w/ salt + spices. this coarse grind is already a tasty snack as is, but i’m wondering if i could succeed to do a finer grind and try to knead it as you describe above? (to then form in a pan… i’m imagining something textured like liverwurst but entirely different ingredients) or, since this coarse grind is from cooked ingredients that it wouldn’t pull together? right now the coarse grind is sitting in the fridge…
diane: I definitely would grind it fine for a more spreadable consistency.
Can I add pink curing salt then smoke these sausages
Lewis: Yes, you can. Use about 4 to 5 grams per 5 pounds.
Have you ever included organ meats in your grind? It seems like sausage would be a great place to hide these valuable portions of the animal. Any organs that you would not include?
Georgette: All the time. I’d avoid lungs and kidneys.