As an Amazon Associate I earn from qualifying purchases.
I butcher all my deer, elk, and other big game at home, and over the years I’ve collected some vital deer processing equipment to help me to the job well. What follows is my guide to that gear.
I have never taken any of the animals I’ve hunted to a butcher. I’m not sure why, but it’s probably because a) one of the skills I learned as a cook in restaurants years ago was breaking down whole animals, mostly lamb; and b) the first guy I ever hunted deer with was my friend Tim Huber, and he wouldn’t think twice about butchering his own deer, even in a hotel room. And yes, we did indeed do that once in Choteau, Montana (and yes, we cleaned up afterwards).
Butchering to me is therapeutic, which could sound weird to people who’ve never done it.
But breaking down animals I’ve hunted is, to me, like opening a Christmas present. Each cut gets me thinking about what sort of meal I might make with it. Roasts, steaks, shanks, even the trim and stew meat and offal. My knives become an extension of my hand, quick as lightning. And at the end of it all comes time for sausage and salami, an equally satisfying process.
I get asked a lot about the deer processing equipment I use for all this. Well, here’s what I’ve learned over the years. Keep in mind that this is what works for me. I’d love to hear what other stuff you love to use, as I know there are some other great home (and professional) butchers out there.
(Keep in mind this post is for big game. I have instructions on How to Break Down a Game Bird here.)
In the Field
I’m not going to go into guns and ammo here, but for the record I shoot a Sako bolt action in .270 and run Nosler trophy grade copper ammo through it… OK, so you have a deer or pig or whatever on the ground: Now what tools will you need?
I really like a good knife with a gut hook to get things going. Not strictly necessary, but I like the way a gut hook unzips a paunch quickly. For this I use an Outdoor Edge knife, plus a field saw. Only thing you need to be careful about is understanding how sharp those scalpel blades really are. I’ve cut myself twice and barely knew it, once all the way to my knuckle. But I’d allowed myself to get distracted when that happened. Keep your eye on the ball and you’ll be amazed how easily things go with this knife.
I rarely use gambrels but they can be handy if you have big trees around. I typically skin one side of an animal, then flip it using the skin as a mat for the other side. Works fine and is great in grasslands, where there are no trees. But lots of people prefer to hoist an animal up on gambrels.
You’ll also want to pack in a game bag. The kind I just linked to is the one I like: It’s real cheesecloth, not the cheap stuff that lets flies in. Regular sealable plastic bags are handy for the heart, liver and kidneys. Zip ties are a good idea for attaching your tag, although leftover twist ties from a loaf of bread work well, too.
Deer Processing Equipment at Home
Once you get home, you need an area to work in. I use my little galley kitchen — 67 square feet including the counters — but then Holly is also a hunter so we’re cool with that. I know lots of people who set up stations in their garage, complete with stainless steel tables and special sinks. That’d be awesome, but in our deer seasons my garage can often be 95°F, which is not ideal for game processing. So for me, the kitchen is better.
You’ll want lots of cheap kitchen towels and large plastic tubs, both of which are available at your local supermarket. Have several rolls of paper towels around, too.
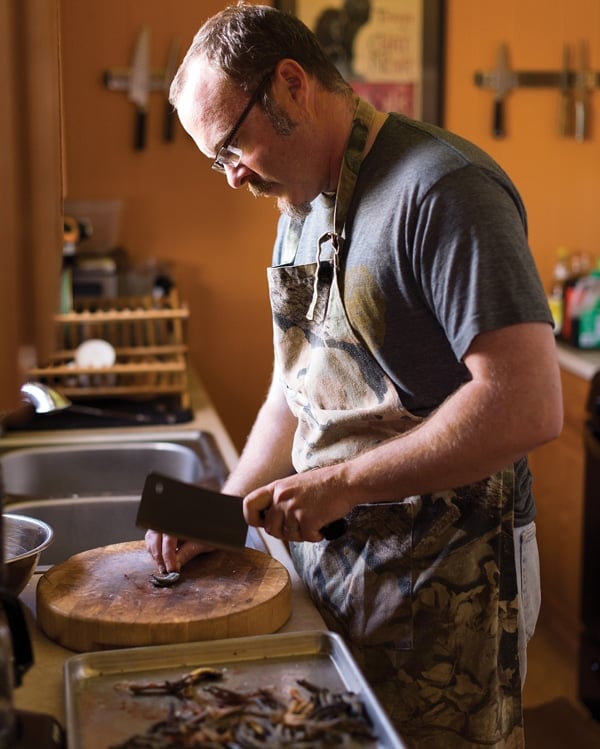
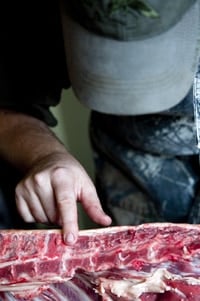
If you haven’t already, you need to quarter your critter. I use a pair of boning knives for most of this work as well as the fine work that follows. My go-to is an ancient stiff-bladed Old Hickory boning knife I got from my friend Elise. I’ve also used this J.A. Henckels boning knife and it’s pretty close. I like the stiff blade for most uses because it feels more substantial somehow. That said, I switch to a flexible boning knife when I remove the backstraps and slice off silverskin.
The reason is because the bend in the blade really helps you extract as much meat — or save as much in the case of silverskin removal — as possible. Flex blades tend to be thinner, too, which helps a lot. My flex blade knife of choice is the Global 6 1/4 inch flexible boning knife. I’ve been using one for many years and I find its thin blade to be perfect for fine work. The Global edge really holds, too, unlike my ancient, stiff-bladed knife, which needs to be resharpened often.
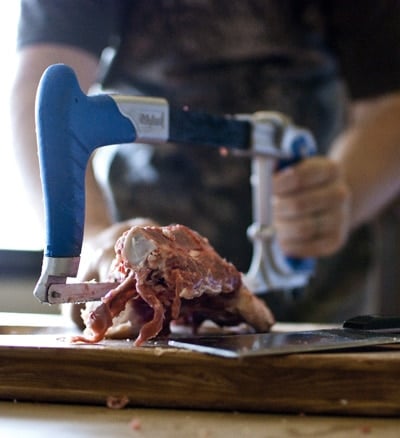
I can do almost all my butchery with just those two knives, plus my regular chef’s knife. The only other tool I need is a saw of some sort. I used to use a regular hacksaw, but I’ve graduated to a proper DEWALT cordless sawzall. I use the saw only for ribs and shanks. Everything else I can do with a knife. Keep in mind I don’t cut chops, so I don’t need the saw for that.
Storage Gear
I typically keep the broken down deer or pig or whatever in the fridge for several days before I freeze it. I find this lets the meat relax and results in more tender venison or pork down the road. It also gives me time to make burger and sausage, which I’ll get to in the next section. But when it’s time to freeze things, there is only one way to go: Vacuum sealing.
I’ve used both chamber sealers and suction-style sealers. If you really want to spring for a serious set-up, a chamber sealer is the way to go. I love my VacMaster 215; get the oil-cooled model.
A cheaper option that is almost as good is either the Weston 1100 sealer or the FoodSaver Gamesaver. They’re still about $300, but should last you many years. I have the older version of the FoodSaver vacuum sealer and have pounded on it for several years with no complaints. And by “pounding on it” I mean hundreds of game birds and fish, plus a few wild pigs and deer. Can you get cheaper vacuum sealers? Yep. But you get what you pay for. Bad seals, overheating motors. This is an area you don’t what to be skimpy on.
As for a freezer, buy a chest freezer. Period. And while not strictly deer processing equipment, it’s vital to have one. Chest freezers can be stored out of the way and they will get a lot colder than your kitchen freezer. And they’re not terribly expensive. I just bought a 7-cubic-foot freezer from Home Depot for $235.
 Burger, Jerky, Sausage
 Burger, Jerky, Sausage
I am not going to get into dry-curing salami in this section, as that’s an advanced discussion. But this is the basic equipment you need for making your own burger, fresh sausage and jerky.
First you need a good grinder. If you are just starting out and happen to have a Kitchenaid stand mixer, the KitchenAid grinder attachment works fine for small batches; it’s what I used for years. But if you process more than, say, a deer a year, you really ought to spring for a good grinder. I use the Weston No. 8 grinder. LEM also makes excellent grinders. Buy commercial grade and at least 1/4 horsepower. These grinders make quick work of anything you can stuff into it.
My absolute favorite part of these grinders is the fact that you can buy all sorts of different dies for them, so you can grind as fine as 3.5 mm, which is almost an emulsified sausage, all the way to 12 mm, which great for that first grind in sausage-making.
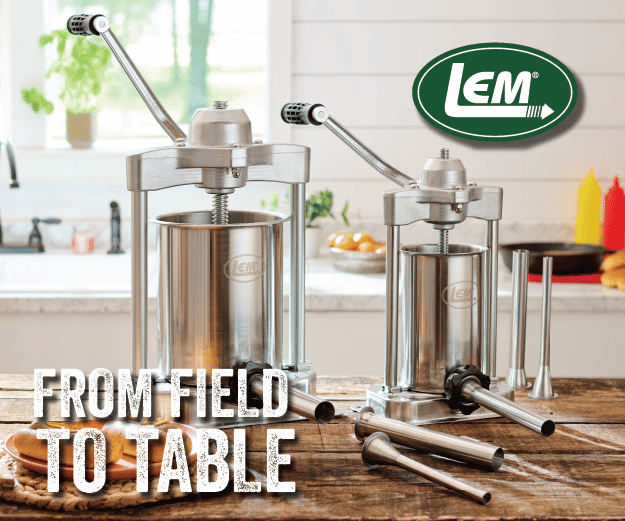
As for a sausage stuffer, you can’t go wrong with LEM’s 5-pound sausage stuffer. If you plan on linking your sausages, you really, really need a dedicated stuffer — running ground meat through the auger of your grinder can destroy its texture.

Other sausage-making equipment you’ll want will be natural hog casings, curing salts and some sort of rack to hang the links.
As for jerky, “jerky guns” are OK for ground meat jerky, but mostly I cut my own meat by hand and dehydrate it. My dehydrator of choice? The Excalibur 9-tray dehydrator, which will handle anything you can throw at it.
Phew! A lot to cover. But that should get you started. My advice? Build up your collection of deer processing equipment over time, as some of it can be expensive. Start with a good boning knife and a vacuum sealer and you’re well on your way.


I wish I had read this article sooner, some great tips. I killed and butchered my first deer this year, and boy was it a job.
What are your thoughts on draining deer meat over ice before freezing?
Hank,
Thanks for writing this article. I just got into deer hunting in PA a few years ago, and after taking my deer to a few different processors, I want to begin to do my own butchering. This article is a great starting point. Much appreciated. brother!
Hank,
Do you ever reuse your vacuum sealer bags? If yes, with any success?
Peter: No.
Hi Hank,
My daughter just took up hunting this fall and got a cow elk last week. She took the cooled and hung carcass into a local butcher/abattoir for cutting as she was not prepared for the extra work this year. She had an accurate weight of the carcass and asked for standard cuts. She ended up with 51% recovery.
Is there a rule of thumb for what gets into the freezer from a hanging weight?
Bill: Nope. It all depends on what you use and how you process it.
I am looking to buy my grandson a starter Butchering kit for Deer. Any suggestions? I was looking at the Outer Edge kit at Cabels? Any help would be appreciated. Thanks
Hi Hank! I’ve been a fan of yours for years, and I was just prowling through your site looking for paté recipes. I came across your comments at the top of the page about butchering deer in a hotel room in Choteau, MT – that’s my hometown! Great hunting country, as you hopefully found.
What is your reasoning for the vacuum sealer over freezer paper for venison and poultry (not talking about fish)? Does it save lots of time when packaging? Freezer paper (not butcher paper) is cheap and I have been using it for years. I have never had any issues with freezer burn and have pulled out steaks that have been in the freezer over a year and they cooked up just like steaks that had been in for a month (freezer definitely needed to be reorganized). I can’t seem to justify the purchase of a $400 machine when the paper works just fine.
Just one thought to add to an excellent post – the economy of vacuum sealers is like that of ink jet printers and disposable razors. Saving some money up front just means you spend lots more as much on the disposables.
I bought a higher end chamber sealer (the VacMaster VP112) a few years ago. It cost $539, which puts it at the low end of commercial sealers, and we paid another $95 for over 1000 bags. Even looking at the best deals on consumer grade vac bags/rolls, they come in at at least three times the price.
(Good time to add I have no affiliation with VacMaster or any other vacuum sealer)
We butcher a few farm animals a year + hunting season, plus put up lots of seasonal veggies and soups, so a larger investment in a vac sealer makes sense to us. If you’re just breaking one out once a year for a deer it probably doesn’t. I do love that the chamber vac sealers let you handle liquid too – a small perk.
Richard, Opinels are great knives.
For the price ans weight it’s hard to do better for a small, super sharp knife.
To avoid problems with water, I highly suggest taking them apart bu removing the locking collar (with a pair of needle-nose, pull off the top), punching out the pin with an appropriately sized punch, then soaking the handle in linseed oil for a week or two (at this step I usually reshape the handle with knives, chisels and files to be more to my liking, taking the lacquer off with sandpaper. you can get stupid creative here) and force patina-ing the blade by soaking it in white vinegar for a few hours (then take out, rinse and dry throughly and give it a coat of cooking oil. Reassemble that in reverse and you will have a knife that never gives you a problem with water. At the price point you can buy a box full and finish them up all at once in a few hours. The only problem is that you start giving them away as gifts. Best pocket knife ever.
You can even take a dremel with a grinding wheel and reshape the blade into a drop point if you like. Go slow and quench frequently to avoid changing the temper of the knife point. Do this before you patina.
I remember breaking deer down as a kid. I never remember taking a deer to the butcher. We have used the refrigerator “aging” for years. Depending on what the temps are, We usually skin and quarter the deer immediately. We turn the kids loose on the carcass to see how much meat they can get for their favorite jerky. If this does one thing, it teaches them a little bit about deer anatomy and the meat saver shots. About 10 years ago we began making the sausage ourselves and have since added better quality stuffers, meat grinders and smokers to enjoy the bounty. Recently, I have taken an interest in charcuterie using venison. I guess it’s part of the journey. I really enjoy your website Hank and refer to it on a regular basis. Keep up the good work.
I’ve butchered the last 3 deer I’ve killed. The website that was most helpful to me is http://www.huntershowto.com. The website doesn’t seem to have a lot of traffic and hasn’t been updated for quite some time, but the detailed videos are amazing. He really deserves more credit for what he’s done. Through the various videos in the “Media” section, he basically shows every cut you should make from the first incision in the field to deboning the last front quarter. The only thing I do different is that I leave the shanks whole rather than stripping them for ground meat. If any of you have any trepidation about butchering your own deer, you should really watch these videos.