As an Amazon Associate I earn from qualifying purchases.
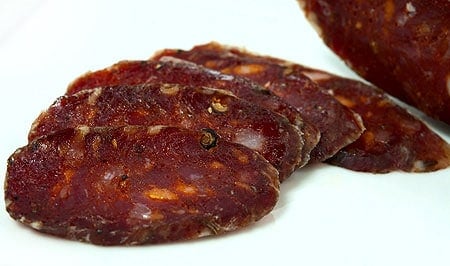
I am a big fan of easy-to-eat salami. I grew up eating Slim Jims, and thin salami you can carry along with you are a real treat on the road or in the field; we love to eat them in the duck blind in winter.
As far as salami goes, this cacciatore salami is pretty easy. It uses standard hog casings instead of beef casings, which can be tough to find. The wider beef casings are more challenging to cure, too. These thinner salami can cure in as little as 2 weeks, although a month is better.
Note that if you have a choice of hog casing widths, you want slim ones, not the fattest available. I use these.
The flavorings here make a powerfully spiced salami. You can pare them back if you want, or change them any way you wish — only don’t mess with the salt, curing salt, dextrose or sugar, and black pepper.
You also will need a few things before you even start:
- Curing salt No. 2, and a special bacterial starter that ensures the good bugs beat the bad ones.
- A humidifier, or a place where the humidity can reach 85 percent.
- A place to hang your sausages in this humid environment.
- A place to hang your sausages after the initial ferment, preferably a place with humidity about 70 to 80 percent and about 50 to 60°F.
- Hog casings, which are available at any good supermarket (ask the butcher) or in a butcher’s shop.
Make your cacciatore salami with pork (wild or farmed), venison or beef. You could use other animals, but be sure to read this article on the possibility of trichinosis in wild game first. No one wants to get a parasite.
If you’ve never made a salami before, start by reading my recipe for basic salami, and go from there. Salami-making is an advanced skill, so newbie sausage makers beware: Salami involves cured raw meat, and sanitation and strict adherence to salt content, nitrate and starter culture is vital. I am serious. If you screw around with the ratios in here mindlessly, you can get yourself very sick.
That said, this is not rocket science. And it’s a great salami to learn and master.
Ingredients
- 4 pounds pork, venison or wild boar
- 1 pound pork fat
- 51 grams (about 3 tablespoons) kosher salt
- 10 grams (1 tablespoon) sugar or dextrose
- 6 grams (about a teaspoon) Instacure No. 2
- 1 tablespoon garlic powder
- 2 teaspoons caraway seed
- 1 tablespoon ground coriander seed
- 2 tablespoons ground black pepper
- 1 teaspoon cayenne
- 3 tablespoons sweet paprika
- 5 grams (about 1 tablespoon) starter culture T-SPX
- 1/3 cup distilled water
- 1/4 cup red wine
Instructions
- Chop the meat and fat into 1-inch chunks. Remove as much silverskin and gristle as you can from the pork. Mix the meat and fat with the salt and the Instacure No. 2 and grind through a coarse die; I use 10 mm. Put in the fridge in a covered container overnight.
- The next day, put about 10 feet of hog casings into some warm water and set aside.
- Mix all the spices and sugar with the meat and fat. Chill for 1 hour in the freezer, then grind through a medium die, about 6 mm. Note, if you've already ground the meat through a die this small, grind only half of it. Check the temperature of the meat: If it's 35°F or colder, grind half of the mixture through a fine die; I use a 4.5 mm die here. If the meat mixture is warmer, freeze it until it hits the right temperature and then grind. Either way, put the meat into the freezer while you clean up and get ready to stuff the links.
- Run warm water through your hog casings while the meat is chilling. This flushes them, and will show you any leaks in the casings. Set them back in the warm water when you’re done.
- Also while you are waiting for the meat to chill, get your starter culture ready. Gently mix the starter culture with the distilled water and let it sit for at least 15 minutes.
- Once the meat is 32°F or colder, put it in a large bin. Add the wine and starter culture and mix everything well with your (very clean) hands for a solid 2 minutes. Your hands should ache with cold as you do this. Alternately, put the mixture into the bowl of a stand mixer fitted with the heavy paddle attachment. Mix everything on the lowest setting for 60 to 90 seconds. Either way. you will see the meat change texture: it will bind together and stick to itself.
- Put the meat into your sausage stuffer and stuff it into the hog casings. Twist off into links of about 8 inches. Twist off your links (Here's a quick video on making the links) or tie off each link with kitchen twine. As you do this, use a needle or sausage pricker (Heat the tip of the needle over a flame until it glows; this sterilizes it.) and prick out any air pockets in the links. Do this gradually and gently or you will rupture the casing. This takes some practice.
- Hang the links on a drying rack — a wooden clothes drying rack is excellent for this. Now you need to ferment the sausage. You will want to tent the hanging sausages with black plastic from some garbage bags, or some other plastic sheeting. If you have one, put a humidifier under the sausages. You really want them to stay moist. Let the sausages hang for at least 36 hours, and up to 48 hours. Every 6 to 8 hours, spritz them with a spray mister to keep them moist. This is the fermentation stage, the stage where the starter culture you are using defeats any bad bacteria in the sausage.
- When the sausages are ready, hang them in your drying chamber. I use an old fridge with a temperature regulator and a humidifier in it. Hang the links at about 70 to 80 percent humidity for at least 2 weeks before eating. You can let them go as long as 6 weeks. Store in the fridge, or vacuum sealed in the freezer.
Nutrition
Nutrition information is automatically calculated, so should only be used as an approximation.



Hi Hank,
Hoping for a bit of help here, with what I realize is a somewhat poorly-defined question:
I followed your recipe, as well as making 2 other recipes at the same time, a pepperoni and a spanish chorizo. Did all the recipes carefully, basically committing to 5 lbs of meat, and pre-measuring 3 batches of spices and 3 batches of sugar/cure. After mixing all the stuff together for each recipe, we ground the meat up then added culture so each batch got ~1/4 package of t-spx.
Sausage was mixed in a stand mixer, stuffed, and incubated at RT for a bit over 36 hours. By the end, and now drying, it has a pretty noticeable “sharp” odor. I don’t have a better descriptor, but it certainly isn’t the usual rotten meat spoilage odor I am used to or that you’d get for example from roadkill, a freezerburnt roast left in the trash, etc. It is, like I said, sharp.
Knowing that’s pretty vague, does it at least track right? Tried a bit of meat raw and it does taste tangy, just a little concerned with how pronounced that sharp odor is, since I certainly don’t experience it in finished salami so I am not sure if its a red flag, or something normal that also sort of goes away with extended curing.
Any thoughts?
Thanks in advance
Mark: Hard to say, but yes, there is often a strong “cured meat” smell that happens.
is that a smell that dissipates as it dries, or is the odor of wet post-ferment sausage pretty much what you end up with after final drying as well?
again, thanks in advance.
Hey Hank , whats up with the wierd timeline for the grinding in this recipe ? I understand that adding the salt and cure #2 the night before introduces flavour and lets the cure start to work the day before but if your going to grind half of the meat again the second day why not just grind half on the 10mm and half through the 6mm the night before. Will this have any effect on the results?
Thanks
I grew up working along side a butcher and hunter and I cannot stress enough the safe handling of meat, especially in dry cured uncooked meat products. At least half the cases of food poisoning in this country come from incorrectly cured or preserved homemade food. I was taught to overmeasure cures and bacteria starter cultures in any type of meat product or dairy product because IT MADE THE PRODUCT SAFER TO CONSUME!!!! I do it to this day. And I thank God you follow this philosophy.
Half the food poisoning in the country LoL , i would wager you wont find a case of botulism in the last 100 years from homemade salamis or cured whole muscles , just sayin
I’d be more concerned with veggies
Friends of are family have a similar recipe and the store there sausage in a mason jar filled with oil. Would you recommend this for storing?
Kirk: Huh. Can’t speak to that, but my first thought it that it might be dangerous in terms of promoting botulism in the anaerobic environment.
What temperature should you keep your drying chamber?
Kirk: I prefer somewhere around 45 to 50F.
A really nice approach, however spray with penicillinum after or during fermentation processes it will be a nice addition.
Also 5 mm hand-cut back lard will improve these notably.
Pepon: Definitely a good tip, and sometimes I do that. Thanks!
The starter culture and distilled water amounts seem a little over the required amounts. Maybe a typo? Perhaps 0.5g starter culture and 1 tablespoon of distilled water would be more appropriate for this quantity of product.
Alan: Nope, it is correct. In the production of home salami, you over-introduce starter culture to ensure that you have proper distribution in the meat. It is the better safe than sorry approach. I get this comment a lot, and this is the reason. More starter doesn’t hurt anything. It is a safety measure.
Alan was right, the starter culture that you link to in the article comes in a bag of 25 grams good for 440 lbs of meat. The 5 grams in your recipe would be sufficient for 88 lbs of meat. I understand that you over introduce the culture but 20 times as much???
Ciprian: Yes. That much. It hurts nothing and is recommended by basically every single professional charcuterie maker when translating a recipe for home use. If you don’t want to do this, don’t. But there is a reason for this, and I will not change it. It’s safety, first and last.
Frank a
Hi been making sausage since I was 16 tought by my mother making dry sausage is the best but your right be careful you way of making is close to mine made yours is very good
I used .012%(recommended on package) of the weight of the meat for the t-spx and it came out just fine
I am a serious foodie and a cook based on growing up Italian. I am making sausage on a new level. Interested in dried sausages, salami so I will be your new student. Thank you for such great info.