The Best Way to Make Acorn Flour
September 26, 2013 | Updated February 12, 2021
As an Amazon Associate I earn from qualifying purchases.
There is really only one good way to make quality acorn flour: Cold leaching.
Leaching, as is pulling something out. In this case, that something is tannin, which is present in all acorns. Different acorns have different levels of tannins, but in general oaks of the red oak family have more, the white oak family less. One, the Emory oak of the Sonoran Desert, has almost none at all.
Before I go much further, let me answer the question in many of your minds: Why the heck would I bother making flour from acorns? First, flavor. It’s a lot like chestnut flour: Nutty, a little sweet and just generally interesting. Second, nutrition. Acorns vary in nutrition. Some are very starchy, some oily, a few high in protein. Third, it’s just kinda fun to make something useful and tasty out of something many of us mistakenly believe is poisonous.
In my original post about eating acorns, I recommended the boiling water method of leaching out all those bitter tannins. This works fine, and is comparatively fast; you can have a batch of acorns leached in the time it takes to watch a football game, which is about three hours for those of you who have never actually watched a football game.
The problem? The resulting acorn flour is very dark, and the boiling process destroys a key starch in the acorns — a starch that acts a lot like gluten in wheat, i.e., it helps the acorn flour stick to itself, or to thicken gravy or a roux.
I have found myself using acorn flour mostly for making roux, coating meats or as a flour additive in baked goods, tortillas, and pasta. So that starch is pretty important to me.

Cold leaching solves this problem. It preserves the starches and, when dried properly, keeps the flour lighter — closer to whole wheat than that dark chocolate brown you can get with boiling water-leached flour. The tradeoff is time. It takes at least a few days to “clean” your flour, and it can take more than a week.
But it’s easy time. All you need to do is tend your flour once or twice a day. Here’s how to go about it.
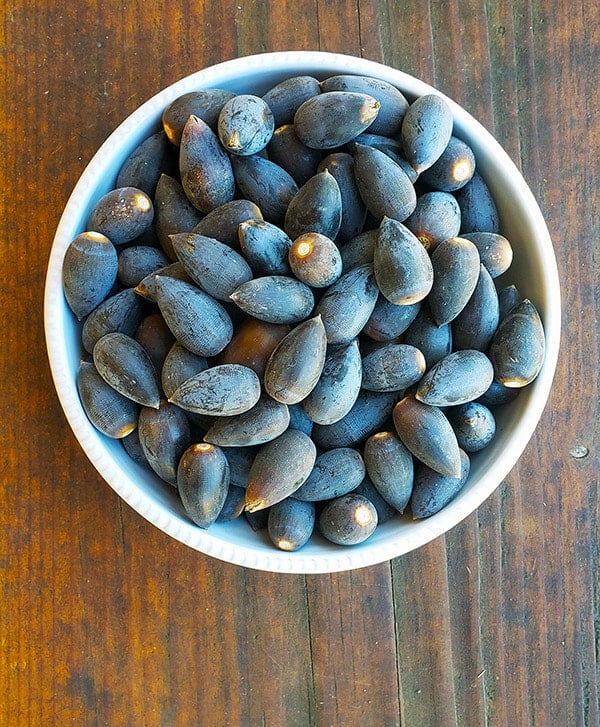
Start with acorns. I know, obvious, right? But know that they need not be fresh. Last summer I made a batch of flour from some red oak acorns I’d picked the previous October. I’d laid them out in a shallow layer in a large tray and just let them dry out. When it came time to crack the shells, it was so much easier than with fresh acorns; fresh acorn shells are pliable, and don’t crack like, say, a hazelnut’s shell.
You will need to soak your shucked acorns in water overnight, though — and it’s the devil to get the papery skins off dried red oak acorns. Those skins darken the flour and are very tannic.
I don’t really bother working too hard at removing the skins, but there is a trick that helps get them off (the skins are called the “test”): Freeze your acorns fresh. When they thaw and you crack them, the skin comes off a lot easier. The problem is storage. Acorns are bulky and can take up a lot of space in your freezer. But hey, if you want that skin off, it will help.
Regardless, shuck your acorns into water. This helps prevent them from oxidizing. I find that if I leave acorn nutmeats out, they turn brown over time. If they are fresh acorns, the papery skins should slip right off once the acorn has soaked a bit.
If you have some acorns with worm-eaten bits, you can cut off the bad part if you want to and toss the good part into the bucket of water.
Once your acorns are all shucked, put enough of them to fill a blender or food processor (use a food processor if your blender isn’t too strong) up about 1/3 of the way. Add enough water to fill the bowl of the processor or blender up halfway. Buzz the crap out of it until you get what looks like a coffee milkshake. Play a mean trick on your friends by pouring them some, and watch the hilarity.
Now, you will need a large container. The absolute perfect container to my mind are those big glass jars you get at the Asian market to make kimchi. You can buy gallon glass jars online or in many hardware stores for about $15. Pour the “coffee milk shake” into the big jar and keep adding more until you have about 50 percent ground acorns and 50 percent water. Cap the jar.
Put the jar into the fridge or just a cool place — it must be below 75°F or the flour will ferment — and walk away. Each morning, pour off the water, being careful to not lose too much of your acorn flour. Refill the jar, cap it and shake the hell out of it, turning it upside down to make sure all the acorn flour is suspended in the water. Repeat as necessary.
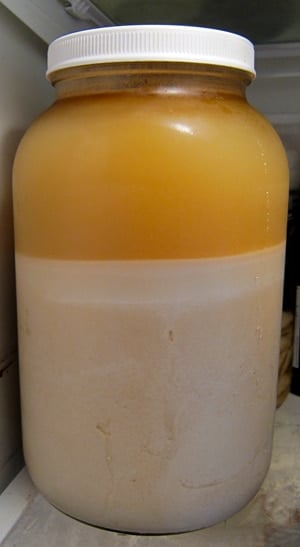
Now, there is an added tip you can do to make an even higher quality acorn flour: Strain the water every day through cheesecloth. Why? Look at the picture above: See the top layer that’s lighter in color? It’s acorn fat and starch.
It’s so light some will pour off every day as you change the water. Straining through cheesecloth preserves this fat and starch and will make your flour even richer and tastier. Do this and you will be rewarded with flavor later.
You know your acorn flour is ready when you roll some around in your mouth and it tastes really bland. Not tannic or bitter at all. Roasting can eliminate a little bit of tannin, but we’re not roasting in this case, so you want the flour to be as “clean” as possible.
For California Valley oak acorns, Eastern white oak acorns or other “sweet” acorns, this process could take as few as three days. But 5 days is more normal. California black and blue oaks take about a week. And Eastern red oak acorns? They took 10 days. When in doubt, go another day. You can’t hurt the flour by leaching a few extra days.
Now you have a bunch of soaking wet flour. First thing you will need is cheesecloth. Any supermarket will have it, but I have taken to using real cheesecloth, i.e., cloth actually used in cheesemaking. You can buy real cheesecloth online or in specialty shops.
Line a fine-mesh strainer with some cheesecloth and set it over the sink. Pour the water in the jar through it, catching all the flour.
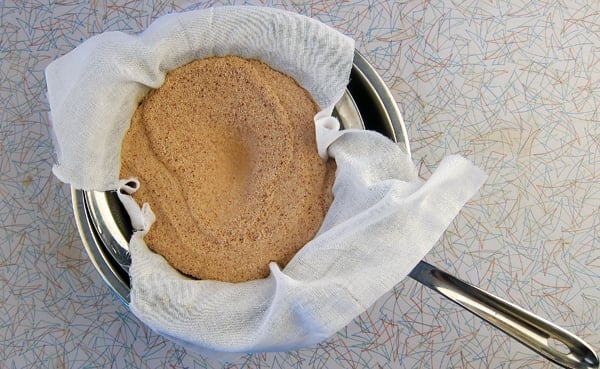
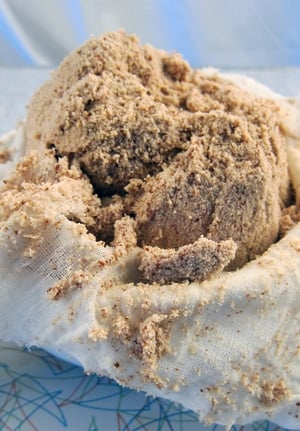
Squeeze the cloth tight around the flour to extract as much water as possible. This is why I use real cheesecloth — the cheap stuff at most supermarkets is too porous and thin to do the job very well, forcing you to squeeze less and spend more time drying — and the longer the drying time, the darker the flour. You will be left with what looks a lot like a ball of clay.
Tip: Let the water in the bowl settle for 1 hour. Carefully pour off the water and you will see a layer of what looks like beige house paint or melted coffee ice cream. This is acorn starch and fat. Use a spatula to scrape it into the container you are drying your acorns in.
Now you need to really dry your flour, unless you plan on making something with it right away. I almost never do this.
Spread your wet flour on a baking sheet, or on a solid dehydrator tray; the trays you use for fruit leather. I prefer the dehydrator because I can dry at a lower temperature. Or, if you do this in summer, you can dry outdoors or in a hot garage.
Dry at as low a temperature as you can. I use a dehydrator set at 95°F. Check in on your flour every few hours, turning it over so it dries evenly. This can take anywhere from an hour to a day. You want the flour to be dead dry. No moisture.
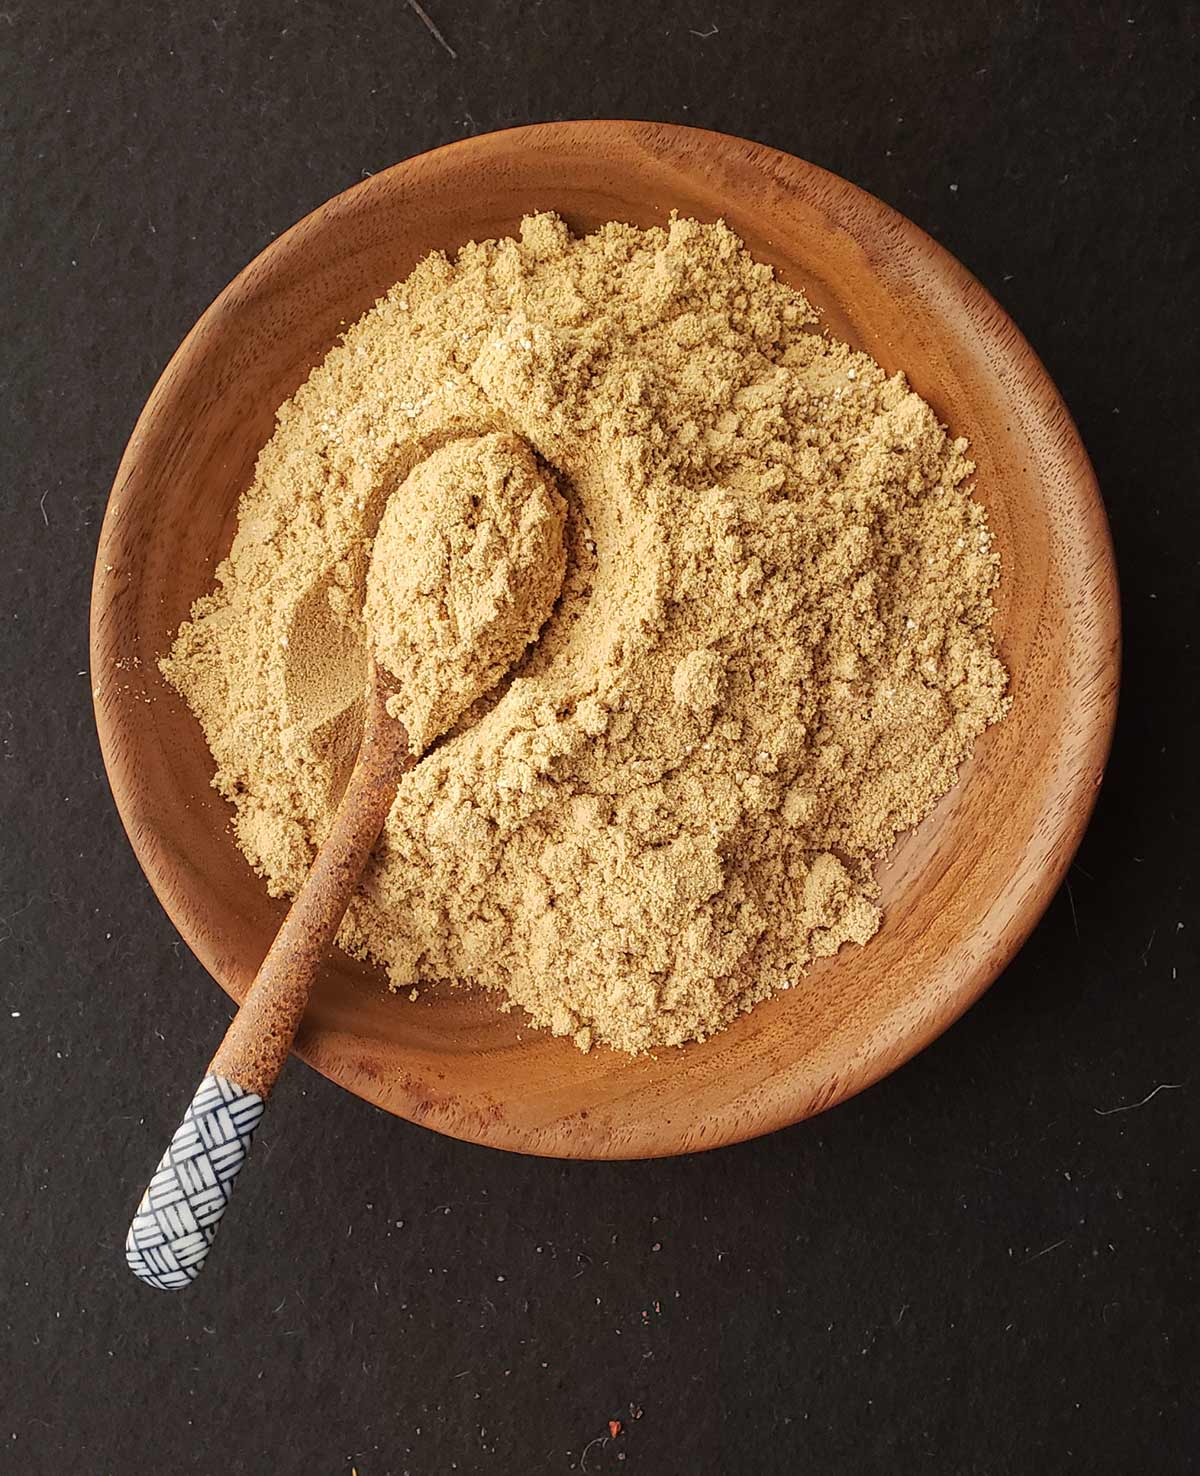
You are almost there. You now have what is essentially acorn “corn meal,” a gritty, coarse “flour” you can use to make polenta with; it’s pretty good, actually. But to make real flour you need to grind it one more time.

To turn your acorn polenta into acorn flour, grind the dried meal in a spice grinder, coffee grinder, or, best yet, a Vitamix fitted with dry blades. This is what I use, and it is worth every penny.
If you have a flour sifter this is a good time to break it out. Grind and sift into a clean bowl until you have nothing but pure, powdery goodness. A typical coffee grinder will require about 35 seconds of grinding to get there, my Vitamix takes only 15 seconds.
Your acorn flour is mildly fragile, especially if you are dealing with high fat acorns, like blue oaks, live oaks and red oaks. I store mine in quart Mason jars in the fridge or freezer. Stored this way, the flour will last for several years — which is good, because oaks don’t drop huge amounts of acorns every year.
Does all this sound like a lot of work? Well, I won’t lie to you: It is. And like I said, this process makes the highest quality acorn flour possible. There are easier ways, but the quality of the flour is inferior. This will make you quite aware about how we take regular wheat flour for granted. Do this and I can guarantee you will not be tossing around acorn flour the way you would with all-purpose. It’s too precious.
How to Make Acorn Flour
Equipment
- Cheesecloth
- A large jar
- Blender
Ingredients
- 3 pounds acorns
- Water
Instructions
- Start by shelling your acorns into a bowl of cool water. This will take about an hour, more or less. I typically do it while watching television. Putting the shells in water immediately will prevent them from oxidizing.
- Once you have all the acorn meats shelled (a little of the brown skin, called the test, is OK), puree them with water in the blender. Pour this into your large jar and set in a cool place, cooler than about 60°F. I will often refrigerate it. Temperatures too warm will cause it to ferment.
- Every day, up to twice a day, carefully pour off the water and replace it. As an added, but optional step, you can pour the last of each day's water -- the stuff with the most fine sediment in it -- into a baking sheet and let the water evaporate from it. What's left is pure acorn starch, which you can use exactly like corn starch.
- After about four or five days, taste the meal. It should be bland, not bitter. If it is still bitter, keep changing the water until it's not. Each species of acorn will need different leaching times.
- When the wet meal is ready, move it to a strainer lined with cheesecloth. Strain out as much water as possible. In this step, you really do want to capture this last water because it is loaded with starch. Let that water evaporate from a baking sheet.
- Lay out your wet acorn meal to dry. I use a dehydrator set at 95°F. Shoot for conditions like that. An oven is too hot and will turn the flour dark brown.
- When the meal is completely dry, add it and any chunks of acorn starch to a spice grinder or blender and buzz until completely fine, like wheat flour. Store in a jar in the fridge or freezer, so the acorn fats don't go rancid. It will keep this way a year or more.
Notes
Nutrition information is automatically calculated, so should only be used as an approximation.


I finished our first try at doing this and everything has worked out excellent. Thank you Hank! Next fall, we’ll do it again but probably do it faster, and sooner, we had alot of moldy ones…and had to toss those.
Wouldn’t it be much easier to soak them whole, then re-dry them, then ground them?
Hi Hank! I have many English Oaks lining our lane. This year I collected a bunch, and, not being able to process them right away, I wanted to keep them from spoiling, so I put them in the oven to dry in the shells, just on the pilot light (less than 100 degress). Now I am beginning to shell them and some are dark brown. Is this just a color change that comes from the slow drying (I kept putting them in and out of the oven, whenever I could, on cookie sheets.) They were soooo hard after shelling that I couldn’t crack them in my coffee grinder as I had hoped to, before leaching, so I gave up and just started cold leaching, changing the water several times a day. Now they are softening, and I think I might grind them up some. After leaching, I’m planning to roast them, in pieces, for making Acorn Chai. How long should I leach them? I’m assuming until the water no longer is brown or brownish.
One of your last comments reminds me of something that I realized about our modern agriculture and processing techniques. For one, very few people realize the actual energy input required to obtain say a pound of flour. Secondly, I believe our evolutionary physiological growth/adaptation has not nearly caught up to how quickly our methods and thoughts have evolved. Put another way, not terribly long ago on the scale of human existence a greater amount of personal energy input, directly or indirectly, would have been required from most of us to obtain a pound of flour. We have tapped the stores of our planets energy and translated it into our rapid expansion and growth. This comes with a cost that must be balanced. And while much of this is what many would consider to be “good” growth, it needs the temperance and reflection of our past to equalize and ensure our future.
My folks have a Burr oak in their backyard. I collected some 50lbs so far. Any idea how those and on nutrition, ie, starchy, oily, or high protein? I am just about done with my first batch but I was having trouble finding stats on them.
Here is the process my grandmother taught me. Our way of shelling the acorns seems a lot simpler?
https://oakmistgrove.blogspot.com/2013/10/making-acorn-flour.html
Ever try making madeleines with acorns? I’ve had good luck with a recipe using skinned and ground almonds, whipped egg whites, some orange flower water… no wheat flour or baking soda. Fairly roughly ground almonds from an old fashioned nut grinder of the sort clamped to a table. I still remember how shocked I was they came out light and fluffy. Hmm. I just started to process a bunch of valley and live oak acorns. Maybe a maple flavor to the “gingerbready” acorns? Do you get that ginger-y flavor without roasting the acorns?
FWIW: From the lower SF Bay Area word is the local Ohlone people cracked open the dried acorns by holding them pointy side down on a flat rock and lightly tapping the top flat end with a small stone. I tried that and it works like a charm. No hammer needed.
Chris S, the only plants that make gluten proteins are wheat, rye, and barley (including all the forms or wheat). Gluten in any other type of product comes from those cereals or cross-contamination.
Hmm…for some reason, the URL didn’t post. One more try: https://blogs.scientificamerican.com/food-matters/2013/09/20/tannosomes-and-the-trickle-around-effect/. If that doesn’t work, googling “tannosome” will find the article, if you’re interested.
I keep meaning to do this. But speaking of tannins, there has been some extremely exciting science news lately: French researchers discovered the “tannosome”, a new (to us) kind of organelle found in plant cells that’s responsible for the production of tannin. (See, for example, .)
It kind of boggles the mind that this is something that science didn’t already figure out, considering the pervasiveness of tannins in plants. But: very cool!
Cool post. When I was young, an old Pomo Indian woman explained to me how to her people traditionally processed acorns. It was probably the old school version of how Kathy and her family do it. I was fascinated and still am but had never actually gone out and done it. It was a whole lot simpler, but the simplicity is one of the reasons I never did it. According to her, they dug a hole in the ground to leach them, and a mortise and pestle to grind the flour. So a little modernized version might actually be a help to me.
Thanks, Hank – a very interesting read. I use the boiling with several changes of water technique, don’t bother to dry it, and use it as a coarse meal rather than a flour. It comes out yellowish, never dark brown.
Rather than storing the flour, we use it immediately for breads, etc., that we make with the acorn meal, and store them in the freezer. But I guess it makes sense to use your technique if you make a large quantity of flour for long term storage. We also throw all kinds of acorns (white, red, black) into the same mix (I’m a fairly lazy forager).
Thanks!
Hank — This reminded me of one of my boyhood favorite books — My Side of the Mountain. The boy in the story learns to make acorn pancakes and they become a treat for special occasions. Love reading about this. https://en.wikipedia.org/wiki/My_Side_of_the_Mountain
Dawn: Great idea! Thanks.
Kate: It’s closer to chestnut flour. I use it to make a roux, to coat meats, to add to regular wheat in baked goods and pasta, shortbread, etc.
Wendy: Plastic is fine.
Marie: Not really, unless you have a month to kill. And besides, horse chestnuts, even when the prussic acid is leached out, as pretty tasteless.
Would the tannin leaching process work on horse chestnuts? We have several in our neighborhood and I just hate not doing something with the big, glossy nuts each fall. Thanks!
We’re buying a house and it has two enormous oak trees. Time to try acorn flour.
Thanks for the acorn research. Now that I have moved back to California I am excited to make acorn flour. Is there a particular reason the you specify leaching in glass rather than plastic? Do the tannins react with plastic? I have plenty of plastic that size but no glass..though I have been thinking about kimchi as well..
What are some of the things you make with acorn flour? Is it similar to almond flour?
Hi Hank,
I have 5 Black Oaks on my proeprty and am looking forward to trying this recipe out. Thanks for providing it.
Sue
Hey Hank – thanks for the updated info. I’ve always wanted to make acorn flour. One of these days! Also, here’s a suggestion: paint strainer bags from the hardware store would work really well for this type of thing. We use them to strain out the ground nuts when making nut milks. And at around $1.25 a pop, you can’t beat the price.