As an Amazon Associate I earn from qualifying purchases.
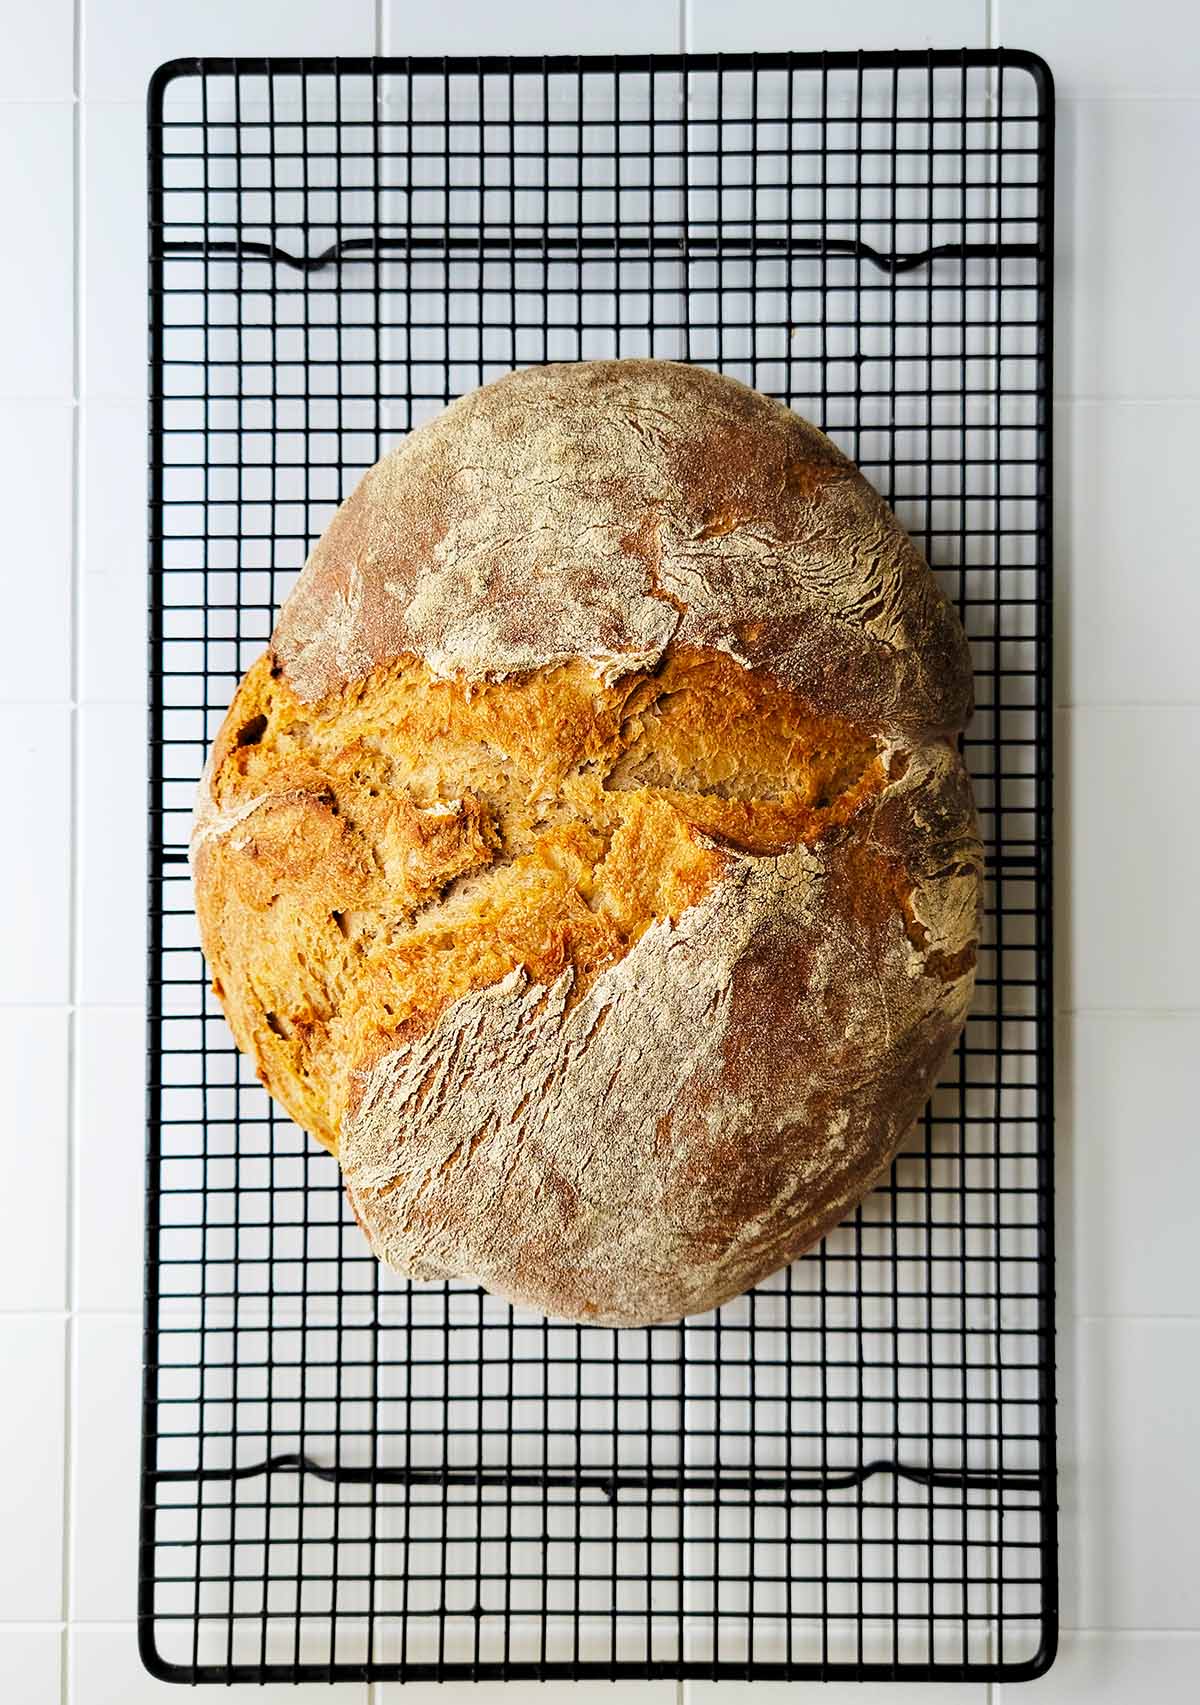
This is a recipe for an airy, light rye bread, basically a sourdough rye ciabatta. It’s is a 45 percent rye, 55 percent wheat bread that uses an overnight sponge. The result is a fantastic, tangy, summery loaf.
Unless you’ve been following me on Instagram, you wouldn’t know that I have been working with rye breads of all kinds for nearly a year. I am using as my bible the great book The Rye Baker, but Stanley Ginsburg.
Until now, I’ve been religiously following his recipes, learning how rye flour works in all sorts of forms. There really is no better book for this than Ginsburg’s. And this light rye bread is indeed inspired by his recipes, but there’s enough of my own take here that I feel OK to post it.
Let me start by saying that if rye is tricky, a rye ciabatta is even trickier. Ciabatta dough, if you are familiar, is wet and flowy and sticky. Add rye to this and, well, it’s wetter and flowier and stickier. But hang with me and follow my directions and you’ll have a fantastic, airy, light loaf of rye bread — not something you may be familiar with.
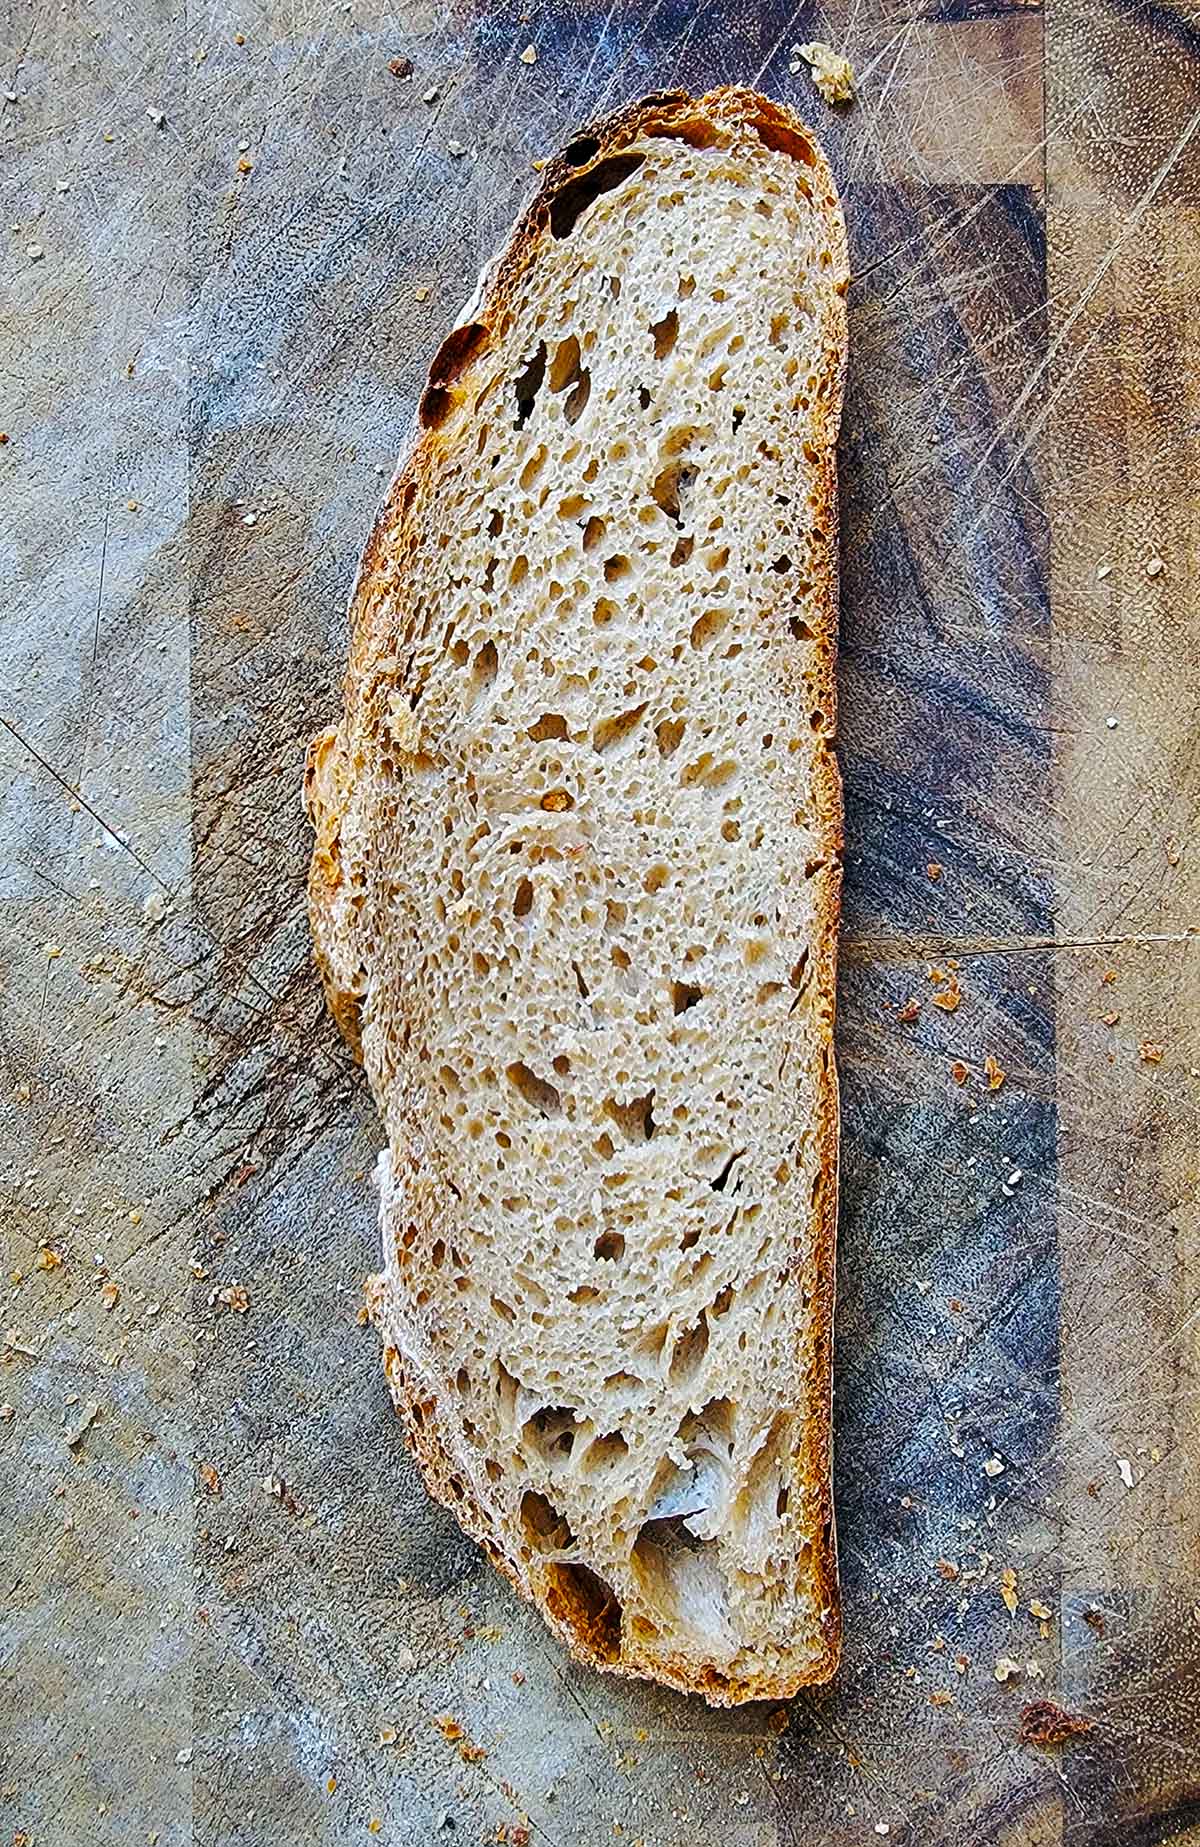
The genesis of this recipe is one for a Galician rye in Ginsburg’s book. It’s the lightest rye in that book, with the most open crumb — ciabatta bread is known for a wide open crumb, with lots of big air pockets in it.
I start with all the rye in the recipe, 45 percent of the loaf, as a sourdough sponge. This ferments all day on the countertop, then I refrigerate it overnight to develop the sour even more. I let it come back to room temperature before adding strong wheat dough — bread flour is a must here — mixing it way more than you think you should, then baking it hot.
That’s a lot to unpack. Let’s start with the starter.
Rye Starter
You will want a rye starter. Yeah, I know. When I said this loaf was a long time coming, I meant it. It takes the better part of a week to get a rye sourdough starter going, but it’ll last forever if you feed it.
Making a rye starter is pretty easy. Mix equal parts rye flour and warm water by weight, and put it in a jar with a lid. Yes, weight. I have found that I absolutely need a scale to make good bread — if I want to be able to repeat my results. So everything here will be by weight. And in grams. (Sorrynotsorry)
So mix 70 grams of rye flour and 70 grams of warm water together. Cover the jar and let it sit. Every morning for at least 5 days, and likely a week, discard 50 percent of the jar’s contents and refresh it with a new 1:1 mixture of rye flour and water by weight. Stir this in and let it sit.
At some point, usually 5 days in, you’ll get that nice sourdough smell and the starter will be all bubbly and active. Now you can make your light rye bread.
Note: I make rye bread every week. I keep my starter active. You may not be so ambitious. You can keep your starter in the fridge for up to 2 weeks between “feedings,” and you can also freeze it.
Or, if you’re really a casual baker, dehydrate it at 100F until it’s a crust, then keep that dry stuff in a jar. Then, you’ll want to add fresh flour, water and this dried starter a few days before you make another batch, feeding each day.
In all cases, you will want to give the starter a day or two of regular feedings before you bake again.
Light Rye Flour
So, most supermarkets only carry dark rye. Why only God knows. Yes, you can make this “light” rye bread with dark rye, and it will be good, but it won’t be light in color, just light in texture.
I vastly prefer to order white rye online. I get mine from Janie’s Mill in Illinois. It’s fantastic. White or light rye is used mostly in Polish ryes, and it’s kinda spicy compared to the darker flours, but I notice this because I eat an awful lot of rye bread and can tell the difference. You may not be able to, I dunno.
This light rye, plus the high protein bread flour, which I also get from Janie’s, makes a pale loaf that will trick most people into thinking it’s 100 percent wheat.
Whatever you use, it must be fine flour. Don’t use coarse rye or rye chops, which are basically rough meals better suited for German black breads. They’re great, but this is not that.
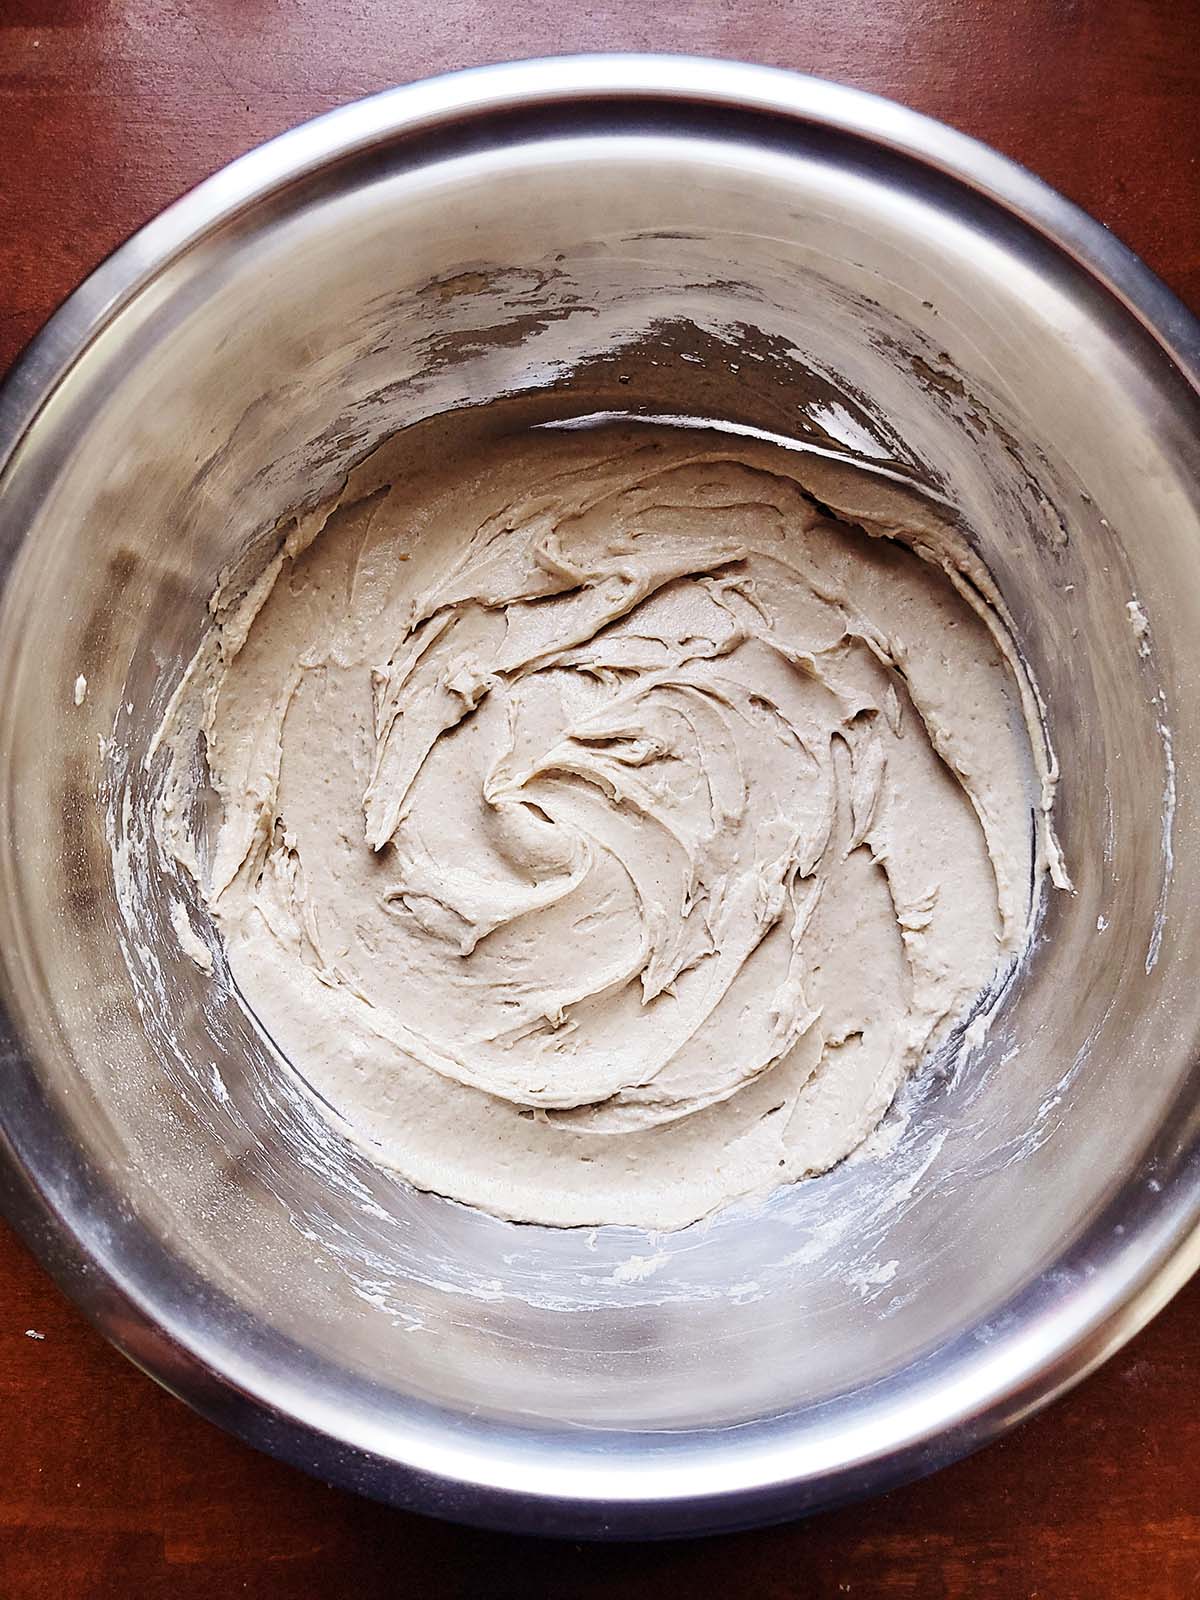
Light Rye Sponge
A sponge is basically a wet mix of flour and water and starter. You use them because you start with a smallish amount of starter, and you are feeding that starter with more flour and water for many hours — usually 8 to 16 — so the end result is a fully yeasty mass that will lift a whole loaf.
This light rye bread uses a massive rye sponge to leaven the whole loaf, more or less. I add a scant 1 gram of store-bought yeast as an insurance policy. That’s it. We’re talking serious, no joke, long-ferment sourdough here.
And just because I like it sour, I take that sponge and chill it overnight for it to develop even more. I learned this trick from working in a pizzeria back in New Jersey: The dough guy made all the balls for each pizza at night before he left. They hung out in the fridge all night and morning, and got taken out late morning for lunch, then as needed.
Ginsburg has a French rye in his book that does this, too.
Working the Dough
OK, not gonna lie: This is a wet dough. You can’t knead it. You will need lots of extra flour and floured hands to manipulate it. And if you want to do things right, you should get a banneton, a wooden bread proofing bowl that’s usually lined with linen.
I use this banneton, but you can use any you might have. If you are a casual baker and don’t want to buy a banneton, here’s a post on banneton substitutes. I have not used any of these substitutes, however.
Ginsburg’s recipe for the Galician rye does something wild: After mixing the sponge with the rest of the ingredients, he uses the dough hook on the stand mixer for a full 30-plus minutes! I’ve never seen this, and the result is nothing short of amazing.
The gluten development in this light rye bread is astonishing. First, the rye gluten fully develops in the overnight fermenting stage, then this long mix with the high-protein bread flour creates an insanely elastic, wet dough that holds air bubbles like nobody’s business.
Downside: You need a stand mixer. Ain’t no way you’re manipulating this dough for 30 minutes by hand.
Finishing the Light Rye
The finished dough has a long ferment — two-plus hours. But a short proofing time. The dough needs to go from banneton to a parchment-lined baking sheet and into the well preheated oven within seconds or it will flatten horribly. (Ask me how I know…)
You start with steam, which you get by pouring boiling water into an open container — I use a hotel pan — and put that in the hot oven. That steam helps develop a nice crust. You then remove the steam container, drop the heat and let the loaf finish up.
Don’t slice it until it has cooled. Rye breads don’t like to be eaten right out of the oven, because in many cases the crumb will be wet and gunky if you slice it when it’s hot. Rye needs that chill time.
The upside: Rye doesn’t go stale quickly, so keep this bread out, uncovered and slice off pieces to eat and it’ll be fine for up to five days. I turn the loaf on the cutting board so the cut side is down, which keeps that open part from getting too stale.
If you liked this recipe, please leave a ⭐️⭐️⭐️⭐️⭐️ rating and a comment below; I’d love to hear how everything went. If you’re on Instagram, share a picture and tag me at huntgathercook.
Light Rye Bread
Equipment
- 1 Stand mixer, like a Kitchenaid
- 1 banneton basket (or an alternative)
- 1 Kitchen scale
- parchment paper
Ingredients
RYE SPONGE
- 235 grams rye flour, ideally light rye
- 20 grams rye starter (see headnotes for making one)
- 235 grams warm water
REMAINING DOUGH
- 300 grams bread flour, or high-protein flour
- 220 grams warm water
- 11 grams salt
- 1 gram instant yeast
Instructions
- Mix the rye flour, rye starter and water together in a bowl by hand until it looks like wet clay. Cover and let sit out on the counter 8 to 10 hours. Do this in the morning.
- That evening, put the covered bowl in the fridge. This is optional, but makes a better bread.
- The next morning, first thing, take the sponge out of the fridge to come to room temperature for an hour or more.
- Add the sponge, bread flour and warm water to the bowl of a mixer and mix with the paddle on its slowest setting for 3 minutes. Scrape down the paddle, cover the bowl and let this sit 15 minutes.
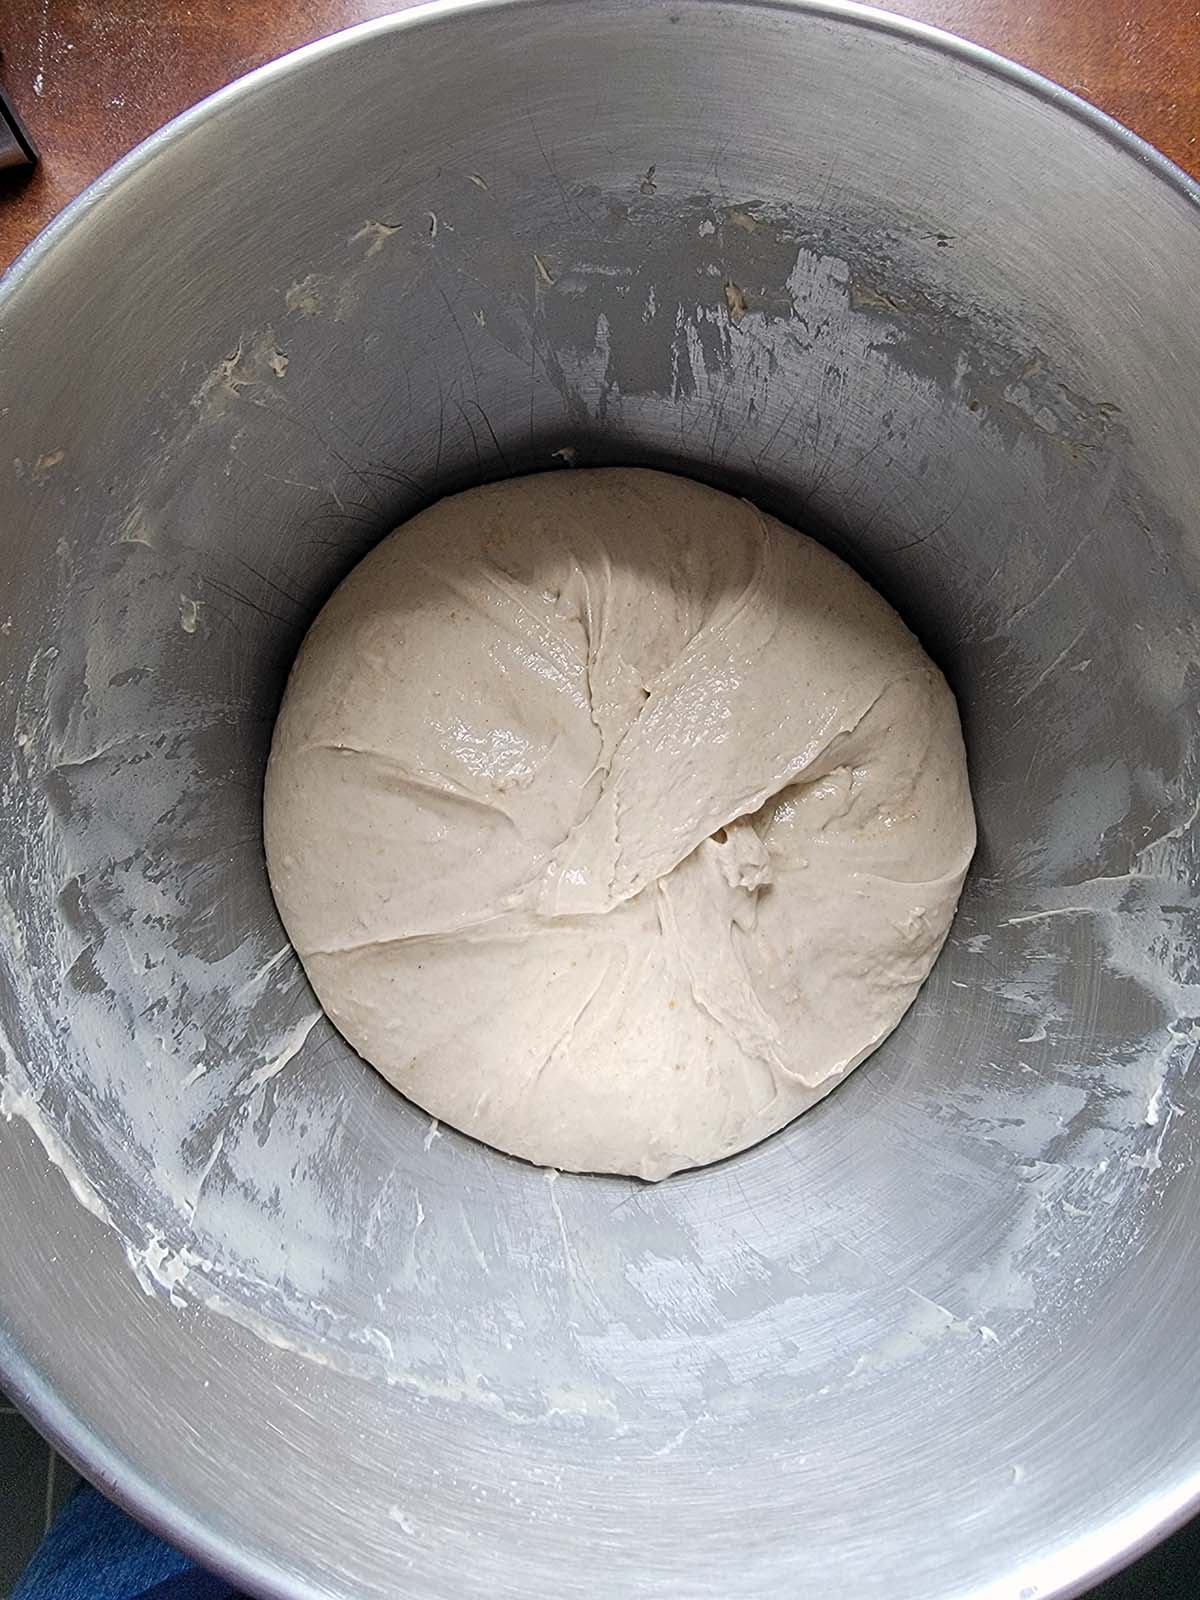
- Sprinkle the salt and yeast on the mixture, then use the dough hook to mix it all for 30 minutes, again at the slowest setting. This process develops the gluten so the loaf can hold large air pockets later. Use a rubber spatula to scrape down the sides of the bowl to form a roudish ball. (See photo above) Cover the bowl and let this ferment 2 hours, up to 2.5 hours in cold weather. The dough should double in size.
- With about 30 minutes to go in the ferment, put a rack in the middle of the oven, and preheat it to 450°F. Boil some water and put it in an oven-proof container, like a hotel pan, in the oven.
- When the dough is ready, use a rubber spatula to scrape it out of the bowl carefully, keeping as much air in the dough as possible, and onto a well-floured surface. Using floured hands, roughly shape it into a ball by folding the corners in on themselves. Carefully move the very gooshy dough into a banneton. Cover it with a linen cloth or somesuch and let this proof 10 minutes.
- Line a baking sheet with parchment paper. When the oven is ready, flip the dough from the banneton to the parchment paper and into the oven. Do this quickly. Bake the bread with the steam tray for 15 minutes.
- Remove the tray and drop the heat to 390°F. Bake until the loaf is golden brown and thumps when you tap it on the bottom, about 30 to 35 more minutes. Don't slice it until the loaf has fully cooled.
Nutrition
Nutrition information is automatically calculated, so should only be used as an approximation.


Hank, I have been lamenting over this recipe for a while. After getting the started going and getting the courage to take a stab at it. I made this recipe the other day and wanted to say thanks for a great bread recipe. I followed the instruction and it turned out really well. Not having a banneton I improvised with a tea towel and a colander dusted with flour. My adult kids gave me the Buck, Buck, Moose cookbook a couple years ago. As I’m an avid hunter. It has helped me completely change my approach to wild game cooking. I love to cook and share food with friends and family and I get a lot of compliments. Thanks to your wonderful instructions in your cookbook. Appreciate you and what you do. Keep up the good work.
I’m definitely going to bake this bread. I bake a lot of sourdough, rye included. Rye is a challenging flour to work with. I’ve had a few victories and some abysmal failures. It’s so easy to over ferment rye. It’s curious that this dough spends 30 min in the mixer and no folds. I shall bake it in my trusty Challenger oven (preheated of course). I don’t have light rye, but you said it would be okay. I’ll let you know how it goes.
Hey Hank
Can you suggest any modifications for high elevation. 7500ft
Attempt one tastes good and mixed results when it comes airyness. Baked for 35 minutes. I am using exact ingredients form Janie’s mill. Thanks
Zach: I can’t, because I am still learning as a baker. Maybe there are some other bread bakers here who live at altitude?
I’ve tried this recipe twice. Followed the instructions to the letter. Taste is amazing, but I get no rise. Used a very active rye starter. Normally, I bang out a good loaf, but this one has me baffled.
Suggestions?
James: No rise at all, or it’s just a low loaf? This won’t get lofty like a 100% wheat loaf. It’s too wet a dough for that. The only thing that comes to mind is that maybe you overproofed it? I know that rye loaves can be fermented/proofed too long, and they lose some lift that they would have had earlier. In Ginsburg’s book, he notes that the keys are that “doubled in volume” rather than time. In summer, like now, what might take 2 hours may only need 80 minutes. Still learning here, too.
Thanks Hank, for this recipe. Based on your dive into Rye, I bought Ginsberg’s book. And yesterday I baked this recipe. I’ve been baking for several years, leaning heavily on Ken Forkish but this recipe was the push I needed to try rye.
Honestly, I was hoping for a more domed loaf, something that looked more like yours. I lined my banneton with Saran Wrap that I sprayed with oil in anticipation of the dough sticking to the basket. So mine came out more like a discus or flattish brown turtle. But the texture, the crumb and especially the flavor made up for the appearance.
I will be making this bread again. Why not? Getting the starter going is half the effort.
Thanks again
Working with wet doughs is challenging, but this recipe is a game changer. I opted to use my starter that we’ve tracked back to 1905, kept in 3 separate nalgene bottles (risk management). The overnight in the fridge also overcomes the issue that celiacs have with store-bought crap bread. My diabetic neighbor can eat slo-dough like this with no problems. Great recipe on a usually difficult grain to get right.
Oh Hank! So much drama in the making of a light rye loaf. I love your books, recipes, and writing. I know you are one of a kind. Keep going, you’re doing great.
Jane
Agreeing with Ed – a great explanation / teaching of a challenging subject.
You did good!
Hank,
I’m impressed. You truly are a jack of all trades. You did a good job in one article covering a complex subject (especially helpful were the various ways to preserve your starter). Have you tried folding to get rid of your need (no pun intended) for a mixer? There was a great video on YouTube, no longer available, where Craig Ponsford made a 100% hydration ciabatta. The way that the dough came together from folding was magical. As a minimalist, I suggest Ken Forkish’s “Evolutions in Bread”. No mixer, just a Cambro storage container and a scale. (His pizza book is another winner).
Always enjoyable to read your writing!
Ed: You can do that fold, but it seems to create a denser crumb. I’ll check out that book! Does it have rye in it?
Hank, yes it does have a few rye breads. It and Hamelman’s “Bread: A Baker’s Book of Techniques and Recipes” are my two main go-to bread books – though it never hurts to look at thefreshloaf.com.
Ken Forkish’s book is awesome. One nice thing about it is that he has a number of really good one-day breads. I highly recommend it.
Hank,
On the list for mid October. I do not bake breads at the house – May through September – fortunate to have a reknown bakery within walking distance from our house – so when hot outside I prefer to pick up from them rather than get the house really hot with the oven.
Have a great week!
Tad
Huh, interesting! I have made some delicious rye in the past, with what is labeled “rye flour”. My guess is that it’s white rye. I’m going to try this, but not being you, I’ll use my regular wheat flour, and add some caraway seeds because I adore them. Have you tried this in a dutch oven to prevent spreading? I used to preheat to 450 but now I just start my bread in a cold dutch oven in a cold oven. Thanks for the recipe!
Melissa: I’ve not tried it in a Dutch oven. But in this case I’d preheat it. Things need to move fast when this dough is ready.
Can this be kneaded in a food processor?
Adriana: I doubt it. A food processor’s blades will cut the gluten strands. I think you need a mixer here.