As an Amazon Associate I earn from qualifying purchases.
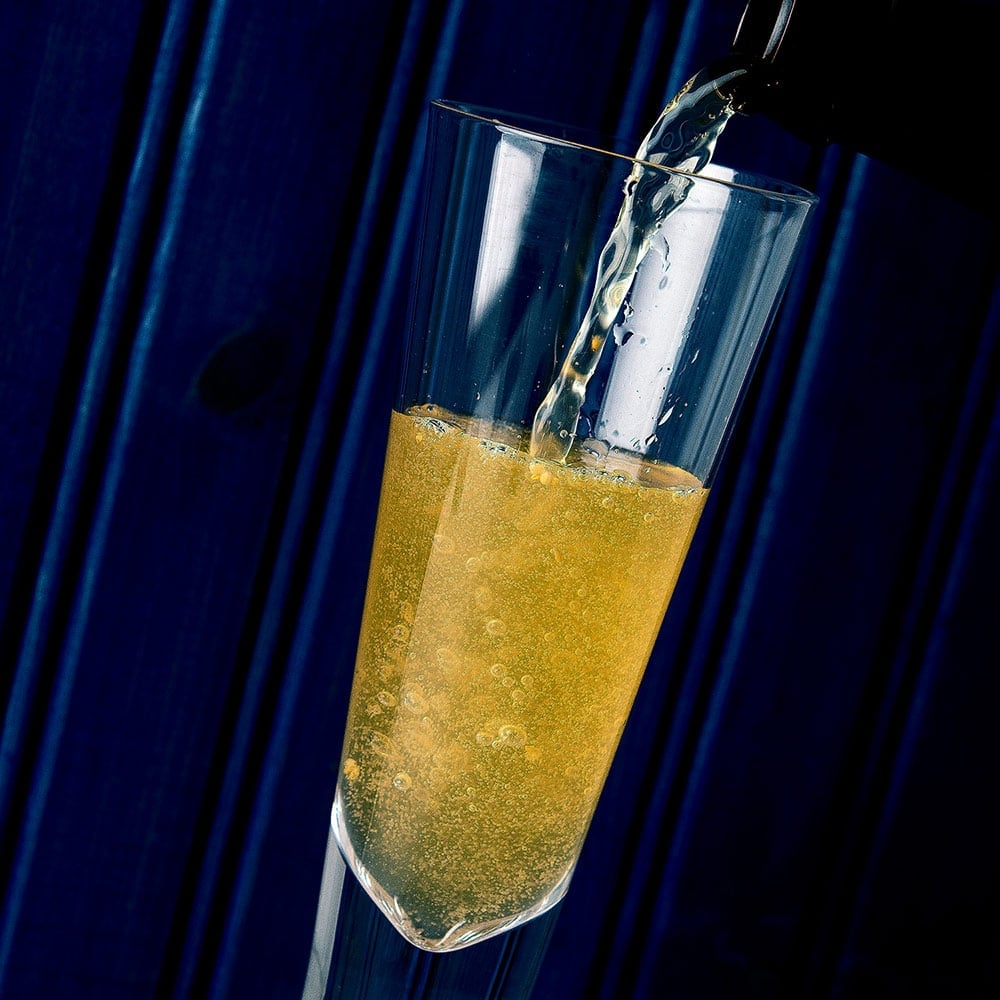
Elderflower champagne. What’s not to love? You get aroma, bubbles, and alcohol. And making your own can be as easy, or as complicated, as you want it to be. What follows are various ways you can make your own sparkling, alcoholic elderflower drink.
Absolutely the easiest thing to do is just make a cocktail. Mix as much elderflower syrup as you want in a glass, mix with liquor of your choice — typically vodka or gin — and top with seltzer water. For an added elderflower punch, you can use elderflower vodka as your alcohol source. Of course, these require you to have made the syrup or cordial beforehand, but most people who do work with elderflowers either make the syrup or soak the flowers in vodka. What I want to talk about here, however, is fermenting your own sparkling drink.
Note that I say “drink” and not beer or wine or mead because elderflowers can be any of these.
Why elderflowers? They are abundant, for one. There is a European species, as well as a few here in North America. Keep in mind I am talking about the blue or black elders, not the red elderberry, which won’t work for this purpose. Note that in Southern California there is a weird mutation in some of their blue elders where the berries ripen to a translucent green. These “white elderberries” can certainly be used here.
Another reason to use them is because elderflowers are highly aromatic, especially if you pick them before noon. Late morning is best. There is definitely an elderflower flavor, too, which I find tough to describe. And then there’s the color. Elderflowers are the color of fresh sweet cream, and the pollen is a soft yellow. A good elderflower wine looks a lot like a chardonnay.
Let me start with the basics.
No matter which path you choose to ferment your elderflowers, you need to remove the flowers from the stems. It’s OK to have the very tiny terminal stems still in the mix, but you want to remove as many of the larger stems as possible.
Why? They contain cyanide, which is not good eats, and even though these compounds of not tolerant of heat, they are bitter besides. Removing stems is a pain in the neck, but it needs to be done.
Oh, and as you are stripping off all those flowers, you will notice a zoo of various winged and crawly things escaping them. Not a bad idea to remove as many as you can, but you must be at peace with the fact that there will be at least a couple bugs in your soon-to-be wine or beer. Occupational hazard. If this makes you feel squinchy, you should probably never drink grape wine ever again. I know what lurks in those primary fermenters…
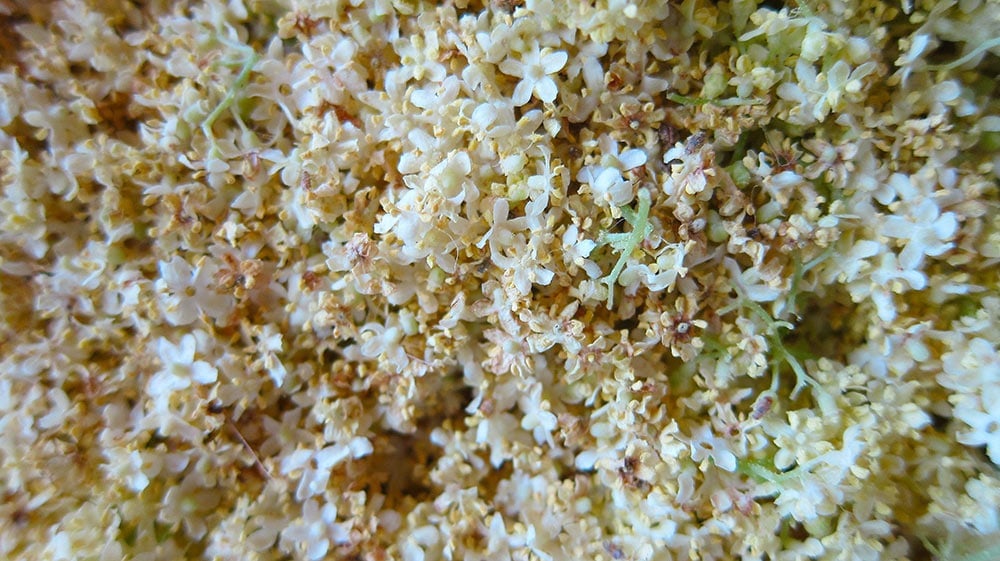
You also need a lot of flowers. Fortunately, foraging for elderflowers is easy. Bring a paper grocery bag and a pair of scissors and snip off the flower heads you need. My recommendation for a typical batch of elderflower hooch is at least one grocery bag, and two is better. Remember you are not packing the flowers into the bag, so it can be a little less than you might think. No, there is no exactitude in this process, as in pounds of flowers per gallon of wine. Given that so much of wine and beer making is science, and ingredients measured to the gram, this is a nice break from that. The more flowers you add, the stronger the elderflower flavor in the drink will be.
ELDERFLOWER BEER, MEAD or WINE?
What to put your flowers into? Anything, really. You can put them into sugar water if you wanted. Most people use sugar water with lemon juice and zest as a base. This will make elderflower wine. If you do this, I highly recommend that you use a more complex-tasting, less refined sugar. My preference is turbinado or demerara sugar, which you can get as Sugar in the Raw. It gives the wine a little color and a bit more flavor than white sugar.
For more flavor, use honey. I recommend a light honey, as dark honeys will not show off the pretty golden color of the elderflowers. Remember that to make a mead, you need to dilute honey to at least 70 percent water to 30 percent honey or it will not ferment well. You can dilute it more if you want. This is a great route to go, one I do often.
Finally, you can sweeten the liquid with malted grain. You can of course mash your own grains, usually barley or wheat, and make a traditional beer wort, but remember you want to showcase the elderflowers, so if you do this, I’d recommend pilsner or pale malt with some wheat malt, too. When I do this, I use dried extract of these malts, which is basically a sweet malt powder you pour into boiling water. Easier and faster, and the result is less beery and more elderflower-y.
How much sweetener you use will determine the alcohol content of the drink. You can do anything from just enough to get fermentation all the way to about 14 percent alcohol, which is what you’d get in a hefty wine, mead or champagne. Remember that beer yeasts typically top out around 8 percent alcohol, although there are exceptions.
For a 1 gallon batch, here are some ratios:
- 3 pounds of honey, which is about 4 cups
- 2 1/2 pounds of turbinado sugar, about 4 1/2 cups
- 1 pound dried malt extract, a scant 1 1/2 cups
Keep in mind your final alcohol content will be different in these ratios. For the dried malt extract, you’ll end up with a light elderflower beer with roughly 5.5 percent alcohol. With the sugar and mead, you’ll end up with something stronger, closer to 14 or 15 percent. Yes, you can use less sugar or honey for a lower alcohol content.
THE WEE YEASTIES
Now, yeast. And this is a big one.
There are recipes out there where you simply dunk the flowers into your sugary water, often with some lemon. This actually works because fresh elderflowers are coated with wild yeasts. Now if you do this, know that your elderflower wine/mead/beer will vary every time you make it. Different yeasts ferment differently, and who knows what’s on your elderflowers?
There is a good chance that at least one of the wild yeasts playing the game is in the genus Metschnikowia, which is a common yeast on fruits and flowers. What you need to know about this yeast is that it starts fermenting quickly, and dies once the alcohol level of the mead/wine/beer hits 5 percent. Note that if the sugar level of your liquid isn’t high enough to get you past that 5 percent threshold, the Metschnikowia yeasts will continue on their merry way, doing who knows what to your drink.
A corollary to the flowers-in-sugary-water method is elderflower mead. Honey has lots of wild yeasts in it, yeasts that “wake up” when you dilute the honey to at least 70-30 water to honey. That’s why mead will ferment all by itself. Adding the fresh elderflowers will add even more wild yeasts to the party, and you will find you have embarked on a magical mystery tour of fermentation.
Most makers of wine, mead and beer choose to pitch (add) yeast to avoid the mystery. There are several good reasons for this. First, wild ferments require you to be patient. Sometimes very, very patient, as in wait a year before drinking your wild elderflower champagne. Why? All those mystery microbes interact at different rates and temperatures. Often when one finishes its time on stage, it sets that stage for the next microbe. One common example of this is brewer’s yeast, Saccharomyces, followed by its cousin Brettanomyces. Brewer’s yeast often kicks out and dies in a couple weeks. Brett can slowly chew leftover, complex sugars for a year. And in the meantime? Your beer or wine can smell like rotten eggs, horses, farts… you get the point.
The second good reason for pitching yeast is consistency. Like I said, wild ferments are, well… wild. They can be different every time, and not all will be good. And some will be undrinkable. Seriously. You need to be fearless, patient and willing to dump batches if this is the route you go. None will be toxic, but some will be sulfurous, or stink like wet dog, or like Band-Aids. Ew. When you pitch a known yeast, you more or less know what you are getting.
In general, for elderflower mead you will want to pitch a strong wine yeast that can handle lots of alcohol and acidity. Champagne yeast is my choice. I will often use Lalvin EC-118, but Lalvin D-47 is also common. (They are common in brew shops and I have links to buy them below.) You can use these yeasts for a sugar-based elderflower champagne, too.
For elderflower beer, I prefer to use a saison yeast. Saison is a Belgian farmhouse beer known for fruity aromas that largely come from the yeast. Saison yeast also likes to ferment hot, so when elderflowers are ready and your house’s “room temperature” is well over 70°F, this yeast is perfectly fine. Most beer yeasts don’t love it when temperatures are hotter than about 75°F; they’ll ferment, but weird stuff happens when it’s that warm. If you can keep your elderflower beer fermenting below 70°F, any ale yeast will work. I’ve never tried a lager yeast with elderflowers, but I bet it would work if you could ferment the beer between 45°F and 55°F, which is what lager yeasts prefer.
Incidentally, if you go the wild yeast route, keep things cool, like 70°F or below. Wild fermentation in warm temperatures promotes a lot of the microbes that stink or can foul your champagne. This is why the Belgians brew their wild fermented beers in fall and winter.
THE FERMENT
Fermentation in a glass jug (carboy), food-grade plastic bucket, or in a stoneware crock is what I normally do. If you use an open fermenter, cover it with a lid or cloth to keep bugs out. Don’t worry about wild yeast getting into the fermenter if you are pitching store-bought yeast: Once the yeasties start doing their thing, they give off so much carbon dioxide that it serves as a a”gas blanket” on top of your champagne.
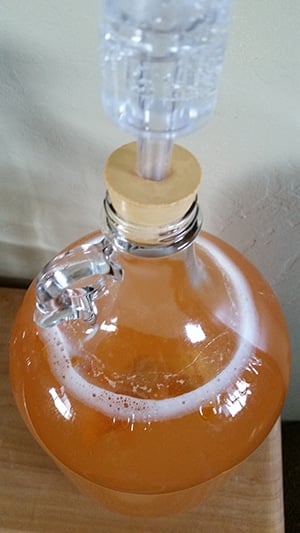
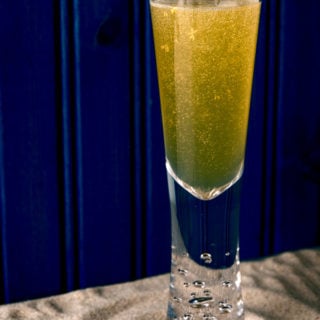
How long to ferment? At least a week. Longer if you are working in a cool environment. If you are working with an open fermenter, stir everything once a day. This aerates the yeast, and keeps the flowers, which will be floating on top of the liquid, from getting mold. After about a week you will want to strain off the flowers and move your champagne to a clean glass container with an airlock. This is for secondary fermentation, pictured at right.
If you are making an elderflower beer, you will just need to leave this for another week or two, to let the yeast debris and stray flower bits settle on the bottom of the glass carboy. If you are using wine yeasts for mead or wine, this process will take longer. My recommendation is to let the champagne sit a month in the carboy before you even look at it.
How will you know when your elderflower champagne is ready?
Well, here’s the lowest-tech route. Ferment a week, strain and bottle in clean soda bottles. Let the champagne sit at room temperature until the bottles are tight. Soda bottles can withstand a huge amount of pressure, so still-fermenting elderflower champagne will be fine. In fact, this is the low-tech way to get your fizz on. Keep an eye on the bottles. Once they get firm when squeezed, usually a week or two, put them in the fridge for storage. Otherwise you can get a geyser when you open the bottle.
Do not do this with glass bottles. Let me say this again: Do not do this with glass bottles! You will create a grenade that can kill you. Seriously. Flying glass shrapnel is nothing to mess with.
PRIMING and BOTTLING
For real champagne, you get your carbonation only when the fermentation is done. How do you know when that is? Buy a hydrometer and a beaker, and a wine thief, and test your champagne. Sound complicated? It isn’t. Use the wine thief to suck up some of your elderflower champagne, put it in the beaker, and drop the hydrometer in. It will float, and you read the numbers where the waterline is. There are several measures of sugar, which is what this device tracks. Winemakers use the Brix scale, beer brewers specific gravity. No matter what measure you use, there should be almost no residual sugar left in your champagne. We’re talking 1 Brix or less, or a specific gravity definitely lower than 1.020, and 1.010 or less is a better target.
Why? Because you want all the wee yeasties to have done their work. Only then is it safe to bottle your champagne, now with a little hit of extra sugar. This is called priming sugar, and this is what creates a proper elderflower champagne. How much sugar? Depends on your bottle. Champagne should be fizzy, no? So you want enough to get you there. That means you need strong bottles.
Beer bottles are stronger than wine bottles. Wine is still, so the ability to withstand pressure isn’t needed. Best of all are champagne bottles, or beer bottles from beers that were corked and caged like champagne. Save them from previous drinking sessions or buy them. Easiest is to just use beer bottles, a capper and to not put too much priming sugar in. Here is a general guideline for priming sugar:
- For beer bottles. A 12-ounce bottle should get 4 grams of table sugar. A 16-ounce bottle needs 5.3 grams, and a bomber, a 22-ounce bottle, needs 7.4 grams. Why grams? Precision matters here. Too much and you can blow your bottle. No bueno.
- For corked champagne bottles. A 22-ounce bomber needs 8.5 grams, and a regular 750-milliliter champagne bottle needs 9.7 grams. Remember with these, you will need to use champagne corks and cages. The difference in sugar between the 22-ounce beer bottle and a 22-ounce cork bottle is that the cork bottle can withstand higher carbonation, so I reflect that in the priming sugar.
Once your elderflower champagne is primed and sealed, you will need to keep the bottles at room temperature for at least 2 weeks before you can drink your champagne. But be patient. Bottle conditioning is a living process, and your champagne will change, slowly, in the bottle over the months and years to come. Always keep a few bottles back to see what becomes of your experiment — this is especially true if you are doing the wild ferment.
ELDERFLOWER CHAMPAGNE: THE RECIPE
Keep in mind this is one possible recipe, given all I’ve mentioned above. Use it as a guide.
Stuff you need before you start. (Links take you to Amazon, where you can buy them, if you don’t have a brew shop near your house.)
- A glass 3 gallon carboy
 , and/or a food-grade plastic bucket or stoneware crock
 - Sugar, honey or dry malt extract
- Saison yeast, some other ale yeast, or wine yeast
- An airlock
- A siphon
- A Triple Scale Hydrometer and beaker
- A gram scale, for the priming sugar
Elderflower Champagne
Ingredients
WHAT YOU NEED
- 2 pounds Briess Golden Light dry malt extract
- 1 pound Briess Bavarian Wheat dry malt extract
or
- 9 pounds of honey, about 3 quarts
or
- 7 1/2 pounds turbinado sugar
- 3 gallons water (filtered or spring. If the water has chlorine in it, that can kill yeast. Letting chlorinated water sit out for a day will blow off most, however.)
- A handful of dried lemon peel, or the zest of 6 lemons
- Juice of 2 to 6 lemons (to taste)
- 1 1/2 pounds of elderflowers, destemmed, about 2 paper grocery bags full
- Saison yeast, or other ale yeast
- Priming sugar (see above)
Instructions
- Boil the water and stir in the dry malt extracts. When they dissolve, add the lemon zest. Boil for 5 minutes, then turn off the heat and chill the mixture quickly. You can put the pot in an ice water bath, or you can us a wort chiller to cool it quickly. Or, you can boil 1 1/2 gallons of water, mix in the extract and lemons, then add another 1 1/2 gallons of cool water; this trick works well.
- If you definitely don't want any wild yeasts from your elderflowers to get in the game, add all your flowers the second you turn off the heat and before you start cooling the water. The heat will kill the yeasts. Your tradeoff is less elderflower aroma. I normally add a big handful of flowers after I turn off the heat, then the rest as it is cooling.
- Add the juice of 2 lemons, then taste the mixture, which will be very sweet. Add more lemon juice to taste. You want it a bit tart, as this will balance the beer when it's done. An acidic liquid also inhibits the growth of bad bacteria, like E. coli. Move the mixture into your primary fermenter, usually a clean bucket or stoneware crock.
- Once the temperature of the mixture is down to about 75°F, add the yeast. If using liquid yeast, just let the yeast come to room temperature and pitch it into your fermenter. Stir well and cover your fermenter with the bucket lid, or a cloth, or the airlock if using a glass carboy. Let the beer ferment at room temperature -- anywhere from 65°F to 85°F with saison or wine yeast -- for at least a week. I prefer 2 weeks. Look at the activity each day. You'll get some dramatic fizzing going on for a few days, then things will settle down to a slow and steady fizz. Once that happens, normally a week, make sure the fermenter is less open to air. If you have a bucket, put the lid on and use an airlock. With stoneware, you don't have that option.
- After a week or two, strain the beer to a secondary fermenter. You can do this in a few ways. The best way is to siphon it off to a glass carboy. You can pour the beer through a fine-meshed strainer into a carboy fitted with a funnel, but this opens up the beer to a lot of air. If you are using wine yeast, this is less of a problem because the liquid will have more alcohol, which is resistant to more microbes than is beer. Put the airlock on the carboy and let this sit until the activity stops completely, at least a week. This would be a good time to take out that hydrometer and test your beer. If the specific gravity reads 1.015 or lower, you can bottle it. If not, let things lie another week or three.
- When you are ready to bottle, make sure your bottles are sanitized and primed with the appropriate amount of sugar. Siphon your elderflower beer/wine/mead into the bottles, leaving about an inch to 1 1/2 inches of headspace. Cap and put your bottles away for 2 weeks before opening. You now have elderflower champagne.
Nutrition information is automatically calculated, so should only be used as an approximation.

Hank,
I was watching a British video where a guy has an interesting technique for making elderflower champagne – he doesn’t take the flowers off of the stems but, instead, but dunks the flowerhead in petals first and leaves the stems sorta floating out the top.
https://www.wildfooduk.com/articles/making-elderflower-champagne/
Since you’re not eating the stems – where the cyano-toxins are at – do you think that it would leak glycosides into the brew? Maybe it makes it more bitter?
All I know is that removing all those petals is such a labor – even more so than removing elderberries from stems! I did it anyways, to be safe, but what’s your take on this method? I’d be making a lot more if this was a safe alternative technique. Our elderflowers are in bloom right now and on my 2nd batch.
Hank,
Your priming sugar amounts don’t cover swing top bottles. I have a few cases of 750ml EZ Top swing top bottles for my elderflower champagne.
Using the beer ratios, that puts me at 8.45g of sugar/750ml.
If I were using champagne bottles I’d use 9.7g/750ml.
Which would you use for this type of bottle?
Would you go with the beer bottle priming sugar amounts or the champagne bottle amounts?
Sounds great! Thanks for everything you do Hank! I’m going to try this soon. Still waiting on the flowers. I didn’t see any hops in this recipe. Will the flowers or lemon juice provide some bitterness? I’m planning on scaling this to a 5 gal batch.
Ryan: No hops in it. There is no real bitterness if you make it as a champagne. If you make is as a beer, I’d use some baseline hops early for bittering, like in an English ale, then “dry hop” with the flowers.
Hi Hank
Great! Question should I also add yeast when I prime? been standing for 1 1/2 months fermentation finished
Ian: Yes, you should.
How much yeast should be added when priming?
Linda: Not sure the size of the packet, but 1 standard packet of champagne yeast.
Hank,
My first 2 batches that I made, I didn’t add priming yeast (woops!) when I primed the bottles as I didn’t see the comment about adding yeast in time. But they seem to be carbonating well without the added yeast.
I am only making a gallon at a time but my 3rd batch is ready to bottle. Will try adding 1g of yeast to this batch + priming sugar to see how it does.
Hank….I’m not sure if this is good or bad….I’ve moved my beer into a glass carboy after 2 weeks. It smells great but tastes sour. I took a gravity measure of 1.010. It still has lots of elderflowers floating in it.
Should it have this sour taste now and get better after I prime and bottle it?
Barbara: The sour is part of the elderflower yeast. Sour as in tart or as in gone bad? I find I age mine for several months before it tastes the way I want it. And yes, you will need to strain the elderflowers out when you bottle.
Hank, I’m a week into this elderflower beer fandango and I’ve got more questions. Do I need to remove all the elderflowers from the brew after 1 week then put my airlock on? I have been stirring once a day with only a cloth over the top. After that, I need to let it set another couple weeks? I’m a nervous Nelly about all this.
Barbara: Yeah, I would. After a week most of the serious fermentation is over. Now there is less CO2 coming off the brew to protect it from airborne microbes.
Hank, another fantastic post! Thanks for all the fantastic detail!
I just started homebrewing this year (I live 30 mins from Northern Brewer *grins*) and it’s a wide, deep rabbit hole.
Can’t wait to see you in Cedarburg (WI) this fall for the dinner and book signing!
Hank….is it possible to substitute wet malt extract for the dry? If so, at the same quantities?
Barbara: I believe you’ll need slightly more wet extract than dry, but honestly it’s pretty close. Using wet you will get a bit boozier elder beer, but it will still be good.
Hank….love ya …love ya podcasts, blog and website! Okay, I’ve made many a batch of champagne and now I’m trying your beer recipe. My question is this: I will be filling liter growler bottles. How much sugar to prime them? Also, tell me this: You say to add lemon zest. If I use the juice of 2 lemons just use the zest from those two?
Barbara: Lemon is to taste, so whatever you want to add. As for priming sugar, use this calculator: https://www.northernbrewer.com/priming-sugar-calculator You want about 3 volumes of CO2.
Hi Hank, Great article. I’ll be giving your recipe and process a go soon. I was wondering if you’ve ever taken a crack at brewing Dandelion Burdock Beer/Soda. I just did a first pass at one to figure out the balance of flavors, ingredient ratios, etc. https://www.gardenisto.com/gourmet/beverages/dandelion-burdock-beer-1/ Would love your opinion on it, or maybe you have a recipe of your own you could post on honest-food. Thanks, Ben
Gardenisto: I am playing with one. It is not ready for prime time. Biggest thing is to use the roasted root as a coffee substitute for stouts or porters, or even a brown ale. Sometimes people will use the leaves as a bittering agent, but I think there are better herbs out there for that.
“Oh, and as you are stripping off all those flowers, you will notice a zoo of various winged and crawly things escaping them. Not a bad idea to remove as many as you can, but you must be at peace with the fact that there will be at least a couple bugs in your soon-to-be wine or beer. Occupational hazard. If this makes you feel squinchy, you should probably never drink grape wine ever again. I know what lurks in those primary fermenters…”
It’s really encouraging when you talk about stuff like this. These type of things can really mess with people’s minds, especially when done for the first time. Getting hung up on and worrying about every little odd detail, when they’re often not worth worrying about in the first place, can derail things fast and leave people rattled.
Very thorough rundown, thank you for this!
This works best if your water is not chlorinated; perhaps the chlorine kills the yeast.
I’ve been homebrewing beer for several years, and this article was spot-on with the technical details. Fascinating read – I’m going to expand my horizons into mead and champagne now. Cheers!