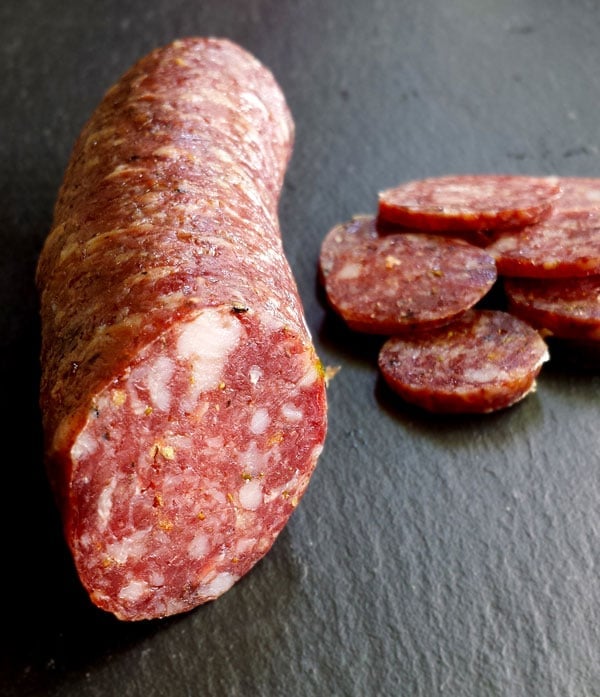
Finocchiona
Finocchiona is a pretty easy salami to make, and an ideal one is very mild with enough fennel flavor (it's sorta like black licorice) just to make things interesting. I used some excellent Duroc pork for the batch pictured, but wild boar works fine -- if it was pretty fatty. If you want to go with another meat, 4 pounds of venison added to 1 pound of pure pork fatback will work, too, or 3 pounds venison plus 2 pounds of fatty pork. Don't do this with bear meat, as the risk of trichinosis is real. Keep in mind that while this is an easy salami to make, it's still salami, not a fresh sausage, so you need to be an experienced sausage maker to try it. Follow the directions below and you should be in good shape.
Servings: 20
Ingredients
- 5 pounds fatty pork or wild boar shoulder
- 51 grams of kosher salt
- 6 grams of Instacure No. 2
- 10 grams dextrose or 15 grams sugar
- 1 tablespoon ground black pepper
- 1 tablespoon minced fresh garlic
- 1 tablespoon fennel seeds
- 1 tablespoon ground fennel seeds or fennel pollen
- 1/3 cup ouzo or other anise-flavored liqueur
- 1/4 cup distilled water
- 10 grams FRM-52 or T-SPX starter culture
- Wide hog casings, 38 to 45 mm
Instructions
- Chop the meat and fat into chunks that will fit in your grinder. Remove any especially nasty silverskin and gristle from the pork. Mix the meat and fat with the salt and the Instacure No. 2 and grind through a coarse die; I use 10 mm. Put in the fridge in a covered container overnight.
- The next day, put about 15 feet of hog casings into some warm water and set aside.
- Mix all the spices and sugar with the meat and fat. Chill for 1 hour in the freezer, then grind through a medium die, about 6 mm. Note, if you’ve already ground the meat through a die this small, grind only half of it. Check the temperature of the meat: If it’s 35°F or colder, grind half of the mixture through a fine die; I use a 4.5 mm die here. If the meat mixture is warmer, freeze it until it hits the right temperature and then grind. Either way, put the meat into the freezer while you clean up and get ready to stuff the links.
- Run warm water through your hog casings while the meat is chilling. This flushes them, and will show you any leaks in the casings. Set them back in the warm water when you’re done.
- Get your starter culture ready. Gently mix the starter culture with the distilled water and let it sit for at least 15 minutes.
- Once the meat is 32°F or colder, put it in a large bin. Add the ouzo and starter culture and mix everything well with your (very clean) hands for a solid 2 minutes. Your hands should ache with cold as you do this. Alternately, put the mixture into the bowl of a stand mixer fitted with the heavy paddle attachment. Mix everything on the lowest setting for 60 to 90 seconds. Either way. you will see the meat change texture: it will bind together and stick to itself.
- Put the meat into your sausage stuffer and stuff it into the hog casings. Form links of about 10 inches, leaving at least a 4-inch "tail" of casing on one end, and about 6 inches on the other. You'll get about six long links. Tie off the short end the first link. Gently compress the meat in the casing. You'll see lots of air bubbles form. Use a needle or sausage pricker (Heat the tip of the needle over a flame until it glows; this sterilizes it.) and prick out all of the air pockets. Do this gradually and gently or you will rupture the casing. This takes some practice. When each link is nice and firm in the casing, tie off the second, longer end and tie off a loop so you can hang the link from an "s" hook or somesuch.
- Hang the links on a drying rack — a wooden clothes drying rack is excellent for this. Now you need to ferment the sausage. You will want to tent the hanging sausages with black plastic from some garbage bags (make sure they are not perfumed!), or some other plastic sheeting. If you have one, put a humidifier under the sausages. You really want them to stay moist. Let the sausages hang at 67°F to 80°F for at least 36 hours, and up to 48 hours. Every 6 to 8 hours, spritz them with a spray mister to keep them moist. This is the fermentation stage, the stage where the starter culture you are using defeats any bad bacteria in the sausage.
- When the sausages are ready, hang them in your drying chamber. I use an old fridge with a temperature regulator and a humidifier in it. Hang the links between 50°F and 60°F at about 70 to 80 percent humidity for at least 3 weeks before eating. You can let them go as long as 2 months. They're ready when they've lost 30 percent of their original weight, or when they feel firm throughout. Store in the fridge, or vacuum sealed in the freezer.
Notes
Once you've made your salami, I vacuum seal it and keep it in the fridge, where it will last basically forever. At least a year, probably more.
Nutrition
Calories: 117kcal | Carbohydrates: 1g | Protein: 14g | Fat: 5g | Saturated Fat: 2g | Cholesterol: 46mg | Sodium: 1042mg | Potassium: 250mg | Fiber: 1g | Sugar: 1g | Vitamin A: 4IU | Vitamin C: 1mg | Calcium: 20mg | Iron: 1mg