As an Amazon Associate I earn from qualifying purchases.
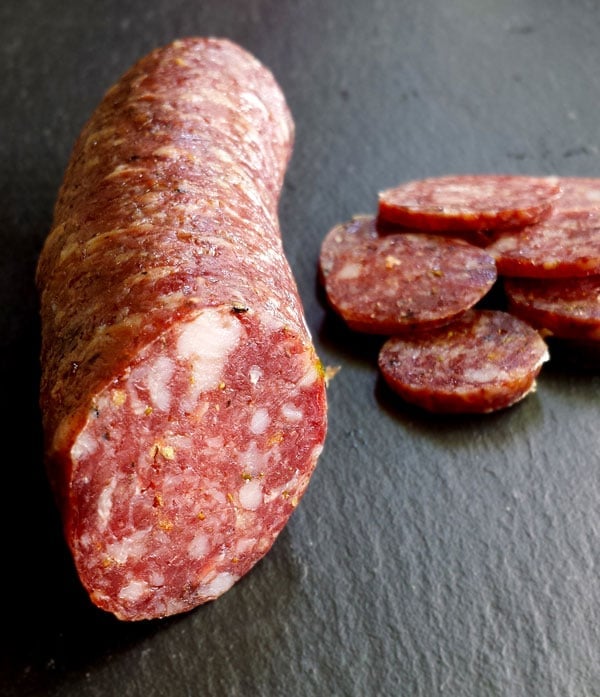
Fennel salami, finocchiona in Italian, is a classic in the canon of the salumiere’s art. The old legend its that some light-fingered Italian lifted some regular ole’ basic salami, and then got discovered. He hid it in a patch of wild fennel as he made his escape, then came back for it later. When he did, it smelled beautifully with that sweet, herby, anise aroma you either love or hate.
You pretty much have to be OK with fennel (anise) to like this salami. You can detect it when you eat it, although the cured pork is still the star of the show. I only mention this because some people have a strong reaction to anise flavors (very close to black licorice). If you hate this flavor, make the basic salami I linked to in the previous paragraph.
Finocchiona is an ancient type of cured sausage, dating back to the Middle Ages. Most sources place its origin in Tuscany.
Regular fennel seeds you buy in the store are fine, but if you can get wild fennel seeds, they are stronger in flavor. (Here’s how to harvest wild fennel seeds.) Fennel pollen is another optional ingredient in this salami. It’s very floral and lovely, but really doesn’t keep for a long time. After about six months or so, it will lose it’s aroma. (Here’s how to gather fennel pollen.) You can also buy fennel pollen online.
Finally, you will want some sort of anise-y liqueur to boost the flavor. I use ouzo, but I suppose sambuca would be more traditional. Pretty much every Mediterranean culture has an anise-flavored liqueur — Pernod and Pastis are the famous ones in France — and all work fine.
You also will need a few things before you even start:
- A humidifier, or a place where the humidity can reach 85 percent.
- A place to hang your sausages in this humid environment.
- A place to hang your sausages after the initial ferment, preferably a place with humidity about 70 to 80 percent and about 50 to 60°F.
- Hog casings, which are available at any good supermarket (ask the butcher) or in a butcher’s shop.
- Curing salt and starter culture. Links to where you can buy these are in the ingredient list.
Enjoy!
If you’ve never made salami before, read this recipe a few times first and take your time. Finocchiona is not a tough salami, but it’s still a salami. If you are not already comfortable with making sausages already, stop here and make a few batches of fresh sausages and then come back to this.
Finocchiona
Ingredients
- 5 pounds fatty pork or wild boar shoulder
- 51 grams of kosher salt
- 6 grams of Instacure No. 2
- 10 grams dextrose or 15 grams sugar
- 1 tablespoon ground black pepper
- 1 tablespoon minced fresh garlic
- 1 tablespoon fennel seeds
- 1 tablespoon ground fennel seeds or fennel pollen
- 1/3 cup ouzo or other anise-flavored liqueur
- 1/4 cup distilled water
- 10 grams FRM-52 or T-SPX starter culture
- Wide hog casings, 38 to 45 mm
Instructions
- Chop the meat and fat into chunks that will fit in your grinder. Remove any especially nasty silverskin and gristle from the pork. Mix the meat and fat with the salt and the Instacure No. 2 and grind through a coarse die; I use 10 mm. Put in the fridge in a covered container overnight.
- The next day, put about 15 feet of hog casings into some warm water and set aside.
- Mix all the spices and sugar with the meat and fat. Chill for 1 hour in the freezer, then grind through a medium die, about 6 mm. Note, if you’ve already ground the meat through a die this small, grind only half of it. Check the temperature of the meat: If it’s 35°F or colder, grind half of the mixture through a fine die; I use a 4.5 mm die here. If the meat mixture is warmer, freeze it until it hits the right temperature and then grind. Either way, put the meat into the freezer while you clean up and get ready to stuff the links.
- Run warm water through your hog casings while the meat is chilling. This flushes them, and will show you any leaks in the casings. Set them back in the warm water when you’re done.
- Get your starter culture ready. Gently mix the starter culture with the distilled water and let it sit for at least 15 minutes.
- Once the meat is 32°F or colder, put it in a large bin. Add the ouzo and starter culture and mix everything well with your (very clean) hands for a solid 2 minutes. Your hands should ache with cold as you do this. Alternately, put the mixture into the bowl of a stand mixer fitted with the heavy paddle attachment. Mix everything on the lowest setting for 60 to 90 seconds. Either way. you will see the meat change texture: it will bind together and stick to itself.
- Put the meat into your sausage stuffer and stuff it into the hog casings. Form links of about 10 inches, leaving at least a 4-inch "tail" of casing on one end, and about 6 inches on the other. You'll get about six long links. Tie off the short end the first link. Gently compress the meat in the casing. You'll see lots of air bubbles form. Use a needle or sausage pricker (Heat the tip of the needle over a flame until it glows; this sterilizes it.) and prick out all of the air pockets. Do this gradually and gently or you will rupture the casing. This takes some practice. When each link is nice and firm in the casing, tie off the second, longer end and tie off a loop so you can hang the link from an "s" hook or somesuch.
- Hang the links on a drying rack — a wooden clothes drying rack is excellent for this. Now you need to ferment the sausage. You will want to tent the hanging sausages with black plastic from some garbage bags (make sure they are not perfumed!), or some other plastic sheeting. If you have one, put a humidifier under the sausages. You really want them to stay moist. Let the sausages hang at 67°F to 80°F for at least 36 hours, and up to 48 hours. Every 6 to 8 hours, spritz them with a spray mister to keep them moist. This is the fermentation stage, the stage where the starter culture you are using defeats any bad bacteria in the sausage.
- When the sausages are ready, hang them in your drying chamber. I use an old fridge with a temperature regulator and a humidifier in it. Hang the links between 50°F and 60°F at about 70 to 80 percent humidity for at least 3 weeks before eating. You can let them go as long as 2 months. They're ready when they've lost 30 percent of their original weight, or when they feel firm throughout. Store in the fridge, or vacuum sealed in the freezer.
Notes
Nutrition
Nutrition information is automatically calculated, so should only be used as an approximation.


Hank
I wanted to ask if I can just use 5 pounds of pork shoulder with no additional fat to be added ? Your recipe calls for 5 lbs of fatty pork? Does that mean I cut up the pork should including the fat cap or layer on top on the roast ? Do I need to add extra back fat ?
cnb@riofloor.com
Carl: Yes, if the pork shoulder is nice and fatty. Yes, include all the fat on the shoulder. If you do that, no need for back fat.
Thanks for sharing this recipe – I followed it but put in 4″ casings, aged 3 months and it’s absolutely perfect. Glad to share a picture or two if there was a way to upload it.
I also compared this recipe to another website ‘Artisan” recipe online – this one is much better.
Hi Hank,
I’ve been making charcuterie for some time now but always been confused on how to calculate weight loss from the very beginning or after the fermentation. Last time I made finocchiona, it lost 10% in 2 days of fermentation and then 37% more in 40 days and the result was perfect. But didn’t have much luck with capicola and prosciutto weight-loss-wise. Cure, spices and casings add some weight too…
Are you sure about the 10 grams of starter culture for 5 LBS of meat. ?
Neil
Neil: Yes. I follow a better safe than sorry approach, which is widely recommended for home charcuterie. You really want to be sure to get the starter well distributed.
Thank you Hank!
Hi Hank,
I live in Northern New Jersey and want to give this a go within the next month while the temperatures are low. My basement is at about 65 but I can close off an area and crack the window ever so slightly to have it at about 55. Does sunlight affect the curing process? If so should I just black out the windows? Also would a fan on low blowing on the sausage be beneficial?
Lastly, is using a starter necessary? I worked in an Italian butcher as a teenager and the butcher used to make sausage right in the walk-in fridge with nothing but regular salt and a bit of wine, once cured he would then hang them out to fully dry. I bought Curing Salt #2 because its my first time trying this and I wanted to be safe but you’re site is one of the only ones I’m seeing that says to use the starter. Just wondering if I keep a close eye on it and temps are right I can pass the step of using a starter. I’m trying to keep these as natural as possible.
Thank you for sharing!
RJ: Yes, you will want it closer to 55F for hanging, and yes, light is bad, so shade the window as best you can. As for the starter, it is there to give you the best chance of success. It is true that it’s possible to make salami without one, but until you have everything dialed in, you run the risk of spoilage. And it can take weeks to show up, and then your batch will be lost. I highly recommend that you get the starter.
T-SPX is used 25g per 440lb of meat, or ~.06g per pound. For a 5lb recipe you’d be using .35g. Any reason you’re recommending use of 25x the manufacturers spec?
Brad: I get this question a lot. I do this because it is better to be safe than sorry. Extra cure hurts nothing and it ensures that you have sufficient cure in every part of the meat to do its job. I am writing largely for amateurs, and so my recipes are designed to work with casual salami makers, not pros. If you want to use less cure, that’s fine, but this is why I do what I do.
Okay, thanks for the clarification.
I have another question, does this recipe call for smoking or not.
Lindsay: no. You don’t smoke this one.
I made this recipe yesterday. When I was working out how much fermenting culture to use I became vary confused. The recipe call for 10 grams of T-SPX Starter. I bought a packet of CHR Hansen’s Bactoferm T-SPX Fermenting Culture. The pack contained 25 grams which is suitable for 100 kgs of meat.
This worked out that I only needed 1.575 grams of the culture for my 6.3 kilograms of meat.
Very confused.
Lindsay: Because I follow the “better safe than sorry” approach, as I mentioned in the post. The reason for this is because, in very small batches like this one, you need more than is recommended to ensure you have enough of the right bacteria.
Is it alright to use collegen casings instead of pork casings?
Craig: it won’t hurt anything, but collagen casings are not as good. They are barely edible and are not as permeable as hog casings.
Hi Hank! I have a question . I have not available as you starter cultures. I may use some for cheese, which are designated also for acidify the milk ? I may using red dry wine for the same purpose ? Other suggestion ? To order on line is not a solution for me , because the shippiment to Romania is very expensive. I got some additives such starter cultures fro Canada and transport cost me 100 dollars. Thank you very much.Ianes
Traian: You can try it without the starter culture. Some people never use them. I do as an insurance policy against the batch going bad.
Will a typical refrigerator hold 50-60F, or would I need to modify the thermostat?
thanks!
Dan: Good catch. I added temperatures in the recipe above. I like at least 25 percent fat, and up to 40 percent. One third fat to two-thirds meat is a good ratio. And yes, you can do it in a fridge if you can control temp and humidity.
I’m going to try this, I already ordered the starter. But I have a few questions:
– what would be the fat to meat ratio, assuming that I start with very lean meat? 1:2?
– what are the temperatures for steps 7 and 8 (fermentation and drying)
– would you see any problem if I do both fermentation and drying in a closed fridge, temperature and humidity controlled? I have an old fridge that I could use exclusively for this.
Thanks
Excellent!