As an Amazon Associate I earn from qualifying purchases.
With the possible exception of a whole dry-aged ham, to my mind salami is the highest form of the butcher’s art.
The careful crafting of raw meat, salt, spices and time create something very different from a fresh sausage. It is not crazy to call it alchemy. But making salami is no joke. It takes time, an attention to detail (and sanitation), plus a careful eye to troubleshoot problems. Doing this at home is not for beginners.
But when you do pluck up enough courage to make your own at home, this is the salami recipe you should start with. It is the classic, the “little black dress” of a salami, flavored only with salt, black pepper and a bit of garlic. The meat is the star here, not the spices.
Every salami-making culture makes a version of this sausage, and recipes are similar whether you look to Spain or France or Italy or Hungary or Germany — although these last two nations tend to smoke their salami, too.
If you’ve never made fresh sausages before, bookmark this recipe and come back when you’ve made a dozen or so batches. You need to be comfortable with the basic sausage-making process before you take the step of curing them. You also need some special equipment. Don’t try to shortcut salami making. You will pay for it eventually.
First, you need a good grinder. For small batches I use the KitchenAid grinder attachment, but with anything larger than 5 pounds, I use a Weston grinder. You need a sausage stuffer, too. Can you hand-cut the meat and fat? Yes, but it requires a sharp knife and an awful lot of patience.
To hang your sausages for the few days it takes to ferment them, I use a simple wooden clothes rack. I also buy “S” hooks from the local hardware store to hang the links. You’ll also need a humidifier both for the fermentation process and while your links are drying. I use this one , and it’s worked well for me for 3 years now.
Finally, you must have a curing chamber; my friends at Elevated Wild have a DIY tutorial here, and I use a fancy Dry Ager, which ain’t cheap, but it’s great.
The salami-making process is this: You make sausage, only with added sodium nitrate (Instacure No. 2) and a starter culture, then ferment the sausages at room temperature for a few days to let the good bacteria in the starter beat back any bad bugs within the meat. Do you need these? Absolutely.

Yeah, I hear you: “But can’t salami be made without them?” Yes. But you can’t. The people who can work in places where they’ve made salami for decades or even centuries, and the ambient air has the good bacteria already; it’s like a sourdough. For you and me, nitrate and starter culture is an insurance policy against botulism and listeria.
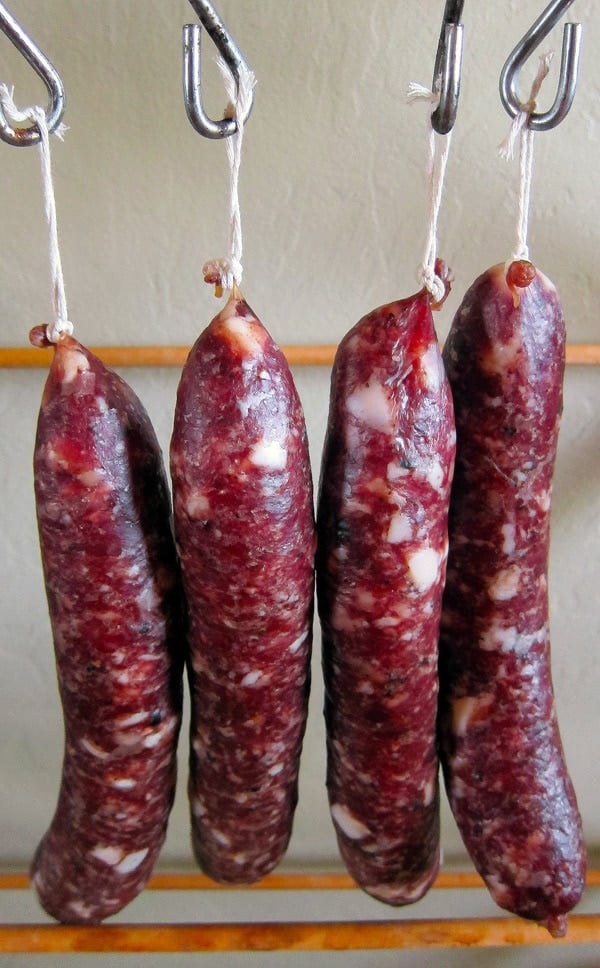
The last stage is to hang the links to dry out slowly in the chamber or in a basement.
The key to successful drying is to let the sausages dry slowly, little by little. Why? This does two things: First, you prevent the dreaded “case hardening,” where the outside of the salami dries too fast and prevents the interior from drying properly. And second, the longer you cure your salami, the better it will taste.
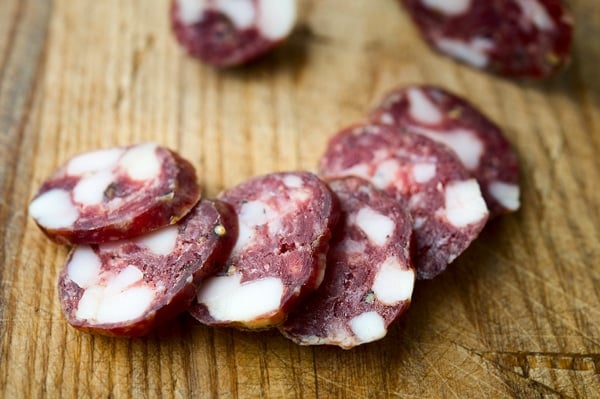
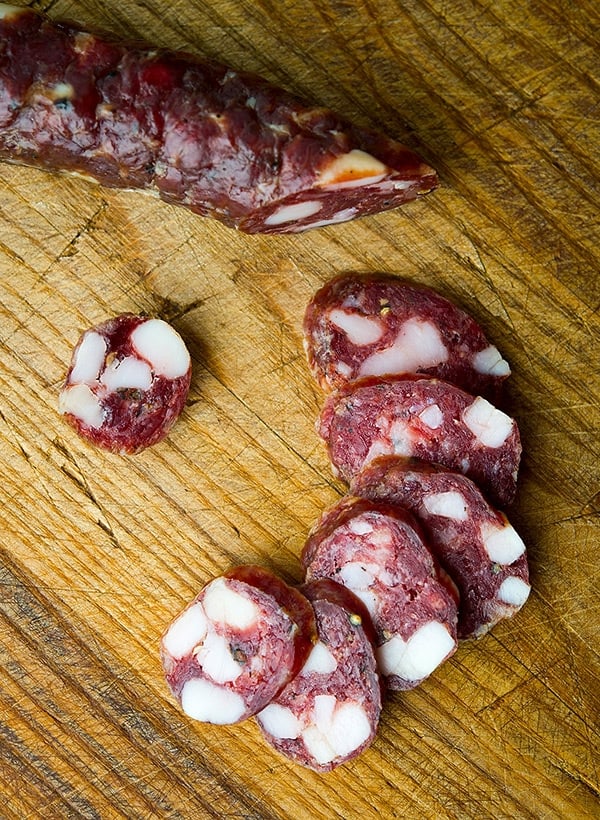
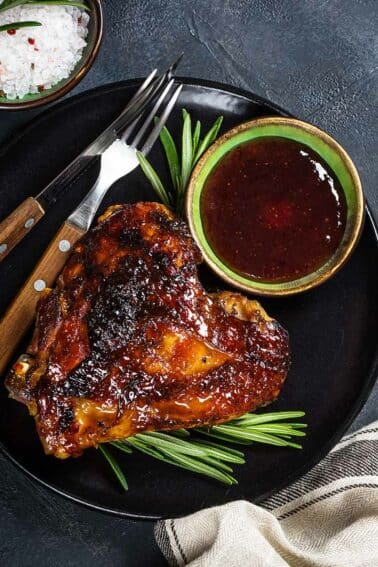
Truly great salami has a distinct funk to it, like cheese. I’ve made a lot of decent salami, some mediocre and a few crappy ones. Only once in a while does everything work perfectly. The batch of wild boar salami in these photos was one such time. I cured these links for more than 2 months, with slowly decreasing humidity until they had that sweetish meat funk we all know and love.
Don’t know what I am talking about? That’s because 90 percent of all salami made in the United States is not cured long enough. It’s fine, but hasn’t had the time to develop. We Americans are always in a hurry.
Follow this recipe, get decent equipment, and you should be fine. But remember: Sausage making is a sprint, salami making is a marathon. You must be careful and clean at the start — remember we’re dealing with raw pork here — and you cannot forget about your salami while it cures or you may be very, very sad. Still, this ain’t rocket science.
You can make salami at home, and when you do, it is one of the most satisfying things you can make with your own two hands.

This is my master recipe for making salami. It works well with most meats, and over the years I’ve done it with pork, wild boar, venison, duck, goose, bear and lamb. The fat is always pork fat, with rare exceptions.
If you have something against pork, use the fat trimmed from lamb or beef steaks and roasts, not suet or kidney fat, which is too waxy.
There is no substituting the Instacure No. 2 in this recipe. Nitrate has been used in salami making for 2000 years, and I don’t intend to break that tradition. And for those of you freaked out by nitrates, know that a serving of spinach or celery will give you 100 times more nitrates than you will get by eating this salami.
As for the starter culture, I know it’s a lot. Technically you could cut the amount of culture a a few grams, but you’d need to make sure the meat is really well mixed to get it distributed right. The amount I use is essentially the “better safe than sorry” approach. If you want to use less, that’s on you.
Finally, I prefer using really wide hog casings instead of beef middles, as is customary in Italy. Why? They’re easier to cure, and are still plenty wide enough to get a nice slice.
I get my wide hog casings, starter culture and Instacure all online from Butcher and Packer.
Basic Salami
Ingredients
- 4 pounds pork shoulder or wild boar meat
- 1 pound pork fatback
- 51 grams salt
- 6 grams Instacure No. 2
- 12 grams sugar or dextrose
- 1 tablespoon coarsely ground black pepper
- 2 tablespoons minced fresh garlic
- 1/3 cup red wine
- 1/4 cup distilled water
- 5 grams FRM-52 starter culture, or T-SPX culture
- Hog casings, preferably 38-42 mm wide casings
Instructions
- Start by setting out 1/2 to 2/3 pound of the pork and dicing it fine. I like doing this because it varies the grind within the sausage from very fine to chunky. To me, this is more interesting. You can run it all through the grinder if you prefer, or if you think someone will get all crazy if they see big pieces of fat in their salami. Cut the remaining fat and meat into chunks that will fit into your grinder. Trim as much sinew and silverskin as you can.
- Put both the diced and chunked fat into separate containers in the fridge. Mix the salt with the meat and put it in the fridge overnight. This helps develop myosin, which will give you a tighter bind when you stuff the links later.
- The next day, put the fat and your grinding equipment -- blade, coarse and fine die, etc -- in the freezer. Mix the Instacure, garlic and half the black pepper into the meat. Put that in the freezer, too. Let everything chill down until the meat hits about 28°F or so. It won't freeze solid because of the salt. Normally this takes about 90 minutes. While you're waiting, soak about 15 feet of hog casings in a bowl of warm water, and put the red wine in the fridge.
- When the meat and fat are cold, take them out and mix together, but keep the diced fat separate for now. Grind 1/2 to 2/3 of the mixture through the coarse die of the grinder. Grind the rest through the fine die. I do this to vary my grind, which makes for a better texture in my opinion. Sometimes I do 3/4 fine and 1/4 coarse, depending on my mood. The key is variability.
- Put the meat and fat back in the freezer while you clean up. Dissolve the starter culture in with the distilled water.
- When the meat mixture is back below 35°F, you can mix it. I put the mixture into a big plastic bin with the diced fat, the remaining black pepper, the red wine and the starter culture mixture and mix it by hand for about 2 to 3 minutes. If you do this, you'll know the mixture's cold enough if your hands ache from the chill. Or, you can put everything into a big stand mixer and mix on low for 90 seconds to 2 minutes. I prefer to mix by hand.
- Put the sausage in the fridge while you clean up. Run some clean water through your casings to flush them and to see if you have any leaks. Cut lengths of casing of about two feet to 30 inches and set all but one back in the water. Thread the one onto your sausage stuffer.
- Pack the sausage into your stuffer and get ready to make the salami. Leave 4 to 6 inches of casing hanging from the edge of the stuffer as a "tail;" you'll use this to tie off the salami in a bit. Start working the meat into the casing, using your fingers to flush any air out of the casing and to regulate the flow. I prefer straight links of about 10 inches to a foot. Remove the link from the stuffer and repeat with the remaining casings and sausage.
- Now gently compress the meat within each casing, watching for air bubbles. Heat a needle or a sausage pricker in the flames of your stove to sterilize it, and prick the links to let any trapped air out. Tie off both ends of the link in a double or triple knot (you don't need a specialized butterfly knot with hog casings) and then tie a loop of kitchen twine to one end, making sure the twine knot is underneath the casing knot you just made: This will prevent the twine from slipping off. Hang your sausages from "S" hooks or somesuch on a wooden rack.
- To ferment your links, you will need to keep them warm and moist. I do this by putting a humidifier under the hanging sausages and then tenting the whole shebang with big garbage bags that I've sliced open on one end. I also use a water sprayer to spritz my sausages a couple times a day. Doing this prevents the casings from hardening. Keep your sausages hanging at room temperature (65 to 80°F) for two to three days.
- Now you need to dry your sausages and turn them into salami. Hang them in a place that is about 50°F to 60°F with about 80 to 90 percent humidity. In most cases you will need to put a humidifier under your links. I also spritz them with water once a day for the first 2 weeks. After the first week of hanging, drop the humidity to 70 to 80 percent. On the third week drop it again to 65 to 70 percent and hold it there until a total of 5 to 10 weeks has elapsed since the salami went into the chamber.
- You now have salami. To store long-term, vacuum seal them individually and keep in the fridge. They will last indefinitely this way, and the vacuum sealing will keep them from becoming rock hard. You can also freeze them.
Notes
Nutrition
Nutrition information is automatically calculated, so should only be used as an approximation.


Hi Hank,
I finally have the courage to try to make your prized salami! You seemed to denote negative consequences for not using enough FRM-52 starter culture, or T-SPX culture. Which I understand completely. I’m trying to get my head around why anyone wouldn’t use the suggested amount in full. Does this change the flavour of the salami as a finish product?
Your thoughts? Thanks
Clinton: It does not. People want to use less because it is expensive, and, if you are very good at mixing your meat mixture, you can indeed use less. I go with the better safe than sorry theory.
Hi. I made the above recipe but realised I forgot to add the sugar. Is that a problem? Do I need to ditch it and start again?
Mon: You should be OK, although it’s not ideal. The sugar is there to feed the good bacteria in that starter. But, people have made salami for ages without it, so you should be good. You’ll notice if the salami is bad.
Hey there – So we’ve made salami successfully in the past but this year we butchered a Kune Kune and this fella was reallllly fatty, so when my husband did 3 salamis this time, we’re at the 11 week point and it’s nowhere close to being done. It’s got a very very small amount of mold on it but nothing to write home about, and is a bit firm but not salami-firm. We’ve actually been better this time than in the past at maintaining the appropriate temp/humidity, but I’m really thinking there was just too much fat in the grind. If I’m right…is there any way to rescue these salamis? Just let them hang even longer, or are we SOL?
Your thoughts are appreciated, as we are out of pork having already made boatloads of bacon, sausage, guanciale (your recipe – YUM), a prosciutto in process, and of course about a thousand quarts of rendered lard. Thanks!
Well, you always want a fat percentage no higher than about 35%, so if you are in that ballpark you should just keep hanging it. If it’s higher, They’re just going to be soft, and keep them in the fridge and enjoy the fatty goodness!
When using bear meat to make this recipe, is there any concern of trichinosis?
Bryan: No, because the high salt level of the salami renders any possible larva inert.
Is it okay to use meat that has been stored in the freezer (eg, 1 week) for salami? I know fresh is ideal, but time for manufacturing isn’t always available after the deer has arrived. Thanks
Peta: Yes, you can use pre-frozen meat.
I made a salami curing device out of an RV refrigerator box. I bought some control boards that control humidity and temperatures together. I then integrated them into the heating/humidity/venting system The meat will be elk, and the fat will be pork jowls. I have never started a fermentation before, what would you recommend to use to get the fermentation started. I have been reading about slowly matching the temp to humidity number close and slowly decrease them together. I’m in Nevada where outside humidity will never be an issue. It will always be inside a temperature controlled wildlife butcher shop that I built. I’ve also heard about making a special link of salami to use for testing for contamination Do you have any suggestions, or pointers on any of this? Am i heading in the right direction? Who would you suggest that I get the fermentation starters from, as well as larger pork casings? I have a bunch of 25-32 mm in stock for regular sausage. Would that work for my first go around? I’m all ears! Thanks!
I was just wondering if you can use a small percentage of beef with the pork to make salami?
Kezza: yes, you can do that.
Sorry – confused. You say to dice 1/2-2/3 lb of “pork”, and then mention people freaking out about big chunks of pork *fat*. Which is it – pork, fat, or both? Thanks! (I’m in the middle of this right now…. 🙂
Andrew: It’s all of that.
Is there a risk of getting Trichinosis when curing uncooked wild boar? How would one negate that risk?
Matt: No. The salt levels in this salami render the parasites inert.
Are there any drawbacks using the umai dry “system”?
EL: Yes, UMAI doesn’t cure meat. It’s a fraud. Read the Amazon reviews and you’ll see a full third of reviews hate the thing. And NO real meat curer uses them.
Really nice… I would love to make this! But I think I speak for every one out there when I say,…. we need some, if not all steps with pictures…!!! Please!!! Seems hard to follow… plastic bag tents and crap what da?!
Can you use tender quick instead of Instacure No. 2?
Roy: No. You cannot sub Tenderquick for No. 2.
I found a used wine cooler that works great as a curing chamber. Temps and humidity are pretty steady at the recommended dry curing ranges. Plus the metal rack on the very top is perfect for hanging the salamis off of. Bottoms ones removed. Your recipe above is very similar to the Lithuanian skilandis I’ve been making.
Hank,
Great site.
Is it possible to dry just in my everyday use kitchen fridge. I live in a city and don’t really have space for a second fridge for meat.
Is there a trick to making it wor?.
Thanks!
Josh. No. A fridge is too cold and too dry. You’re out of luck, sorry.
At what point does the sugar in the ingredients get added?
Alan: With the salt.
Is it mandatory that I used 10 grams FRM-52 starter culture, or T-SPX culture?
I prefer not to, staying with the all natural.
I know its a must to use •
51 grams salt
6 grams Instacure No. 2
Joe: Your call. Adding starter culture is not “unnatural.” It is an insurance policy that ensures the proper bacteria populate your sausages. If you leave it out, they can rot or worse, you can poison yourself. That said, if everything goes right, the correct bacteria will spontaneously populate your salami. It can work, but you’re playing double-or-nothing.
The bactoferm dosing guide says a 25 gram packet is suitable for up to 220 lbs of meat. Is it really necessary to use 10 grams in a 5 lb recipe? I wouldn’t mind using that much except the stuff is like $30 for 25 grams!
John: Yes, it is necessary. You don’t have commercial mixing gear like the companies do. This is a better safe than sorry measure virtually every salami maker catering to the home market does, me included. I don’t want to see someone get sick because of to little starter culture.
Question: I have been doing my own wildlife butchering for decades. I have been wanting to make my own salami’s for years, but here in Northern Nevada we have virtually no humidity, and my butcher shop that I built into a garage expansion, sits around 39 degrees this time of the year. Are there any ways to fudge with those temperature and humidity levels?
John: You’re temp will be OK, it’ll just take things longer to cure. Humidity? You need to run a humidifier there non-stop. That’s what I need to do.
I have a lot of fat (not skin) from the belly. Could this be used instead of the fat back?
Josh: Yep. It can.
I’m making the salami for first time were do ifind instacure no2 and starter culture
Matthew: Online. I give you links for them in the article.